Gemini API Compatible with OpenAI Interface: How to Configure and Use for Free in Compatible Apps
The Gemini series of large models might be underestimated. Whether in terms of model capabilities, free usage quotas, or service stability, it is no less impressive than other mainstream models. Especially its developer platform, Google AI Studio, not only has a user-friendly interface and easy operation but also offers a very generous free usage quota. For this reason, Gemini has become my primary large model in use today.
It's worth mentioning that Gemini is also compatible with OpenAI's API interface specifications. This means that in many applications that support the OpenAI API, you can seamlessly switch to Gemini with simple configuration changes. This might be something many people are not yet aware of.
Below, I will use the tool pyVideoTrans as an example to demonstrate how to configure it to use the Gemini API.
Register for a Free Google Account and Obtain the Gemini API KEY
- First, you need a Google account. If you don't have one yet, you can register for free using a phone number. The entire process is completely free, but please note that you need to have access to a scientific internet connection to access the relevant services.
- After registering and logging into your Google account, visit Google AI Studio: https://aistudio.google.com/
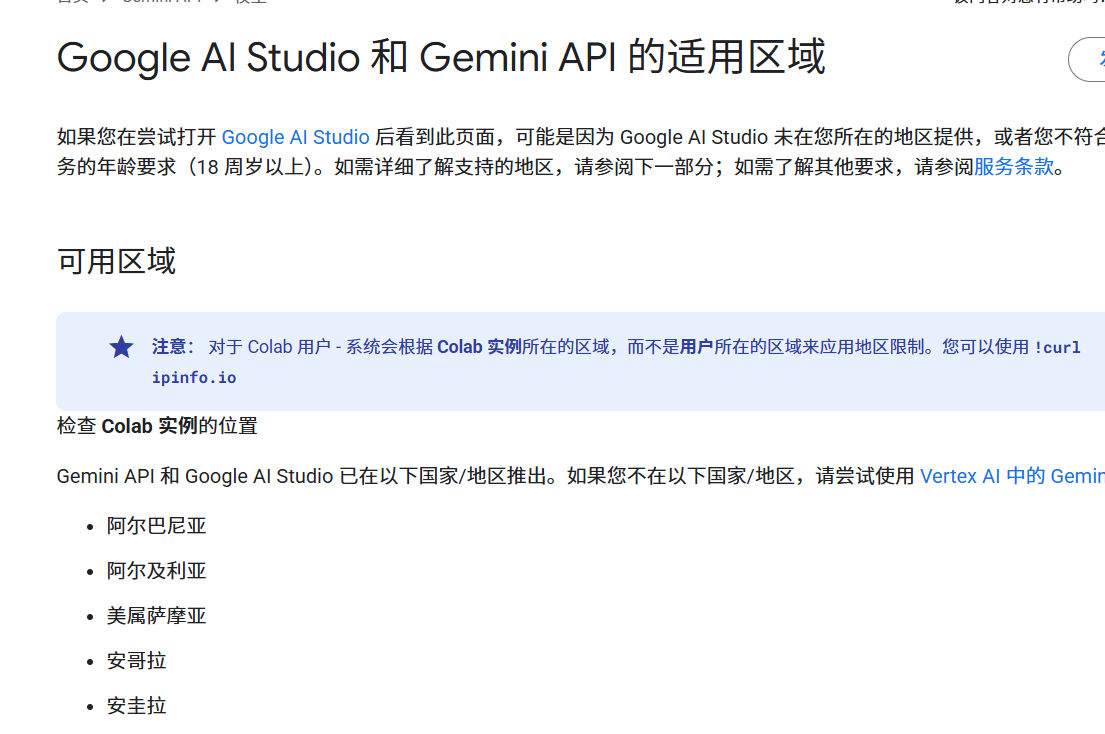
- Google AI Studio has access restrictions for certain countries/regions. If you see the following prompt page, it means the region of your current "proxy" node is restricted. Try switching to nodes in other countries/regions until you can access it normally.
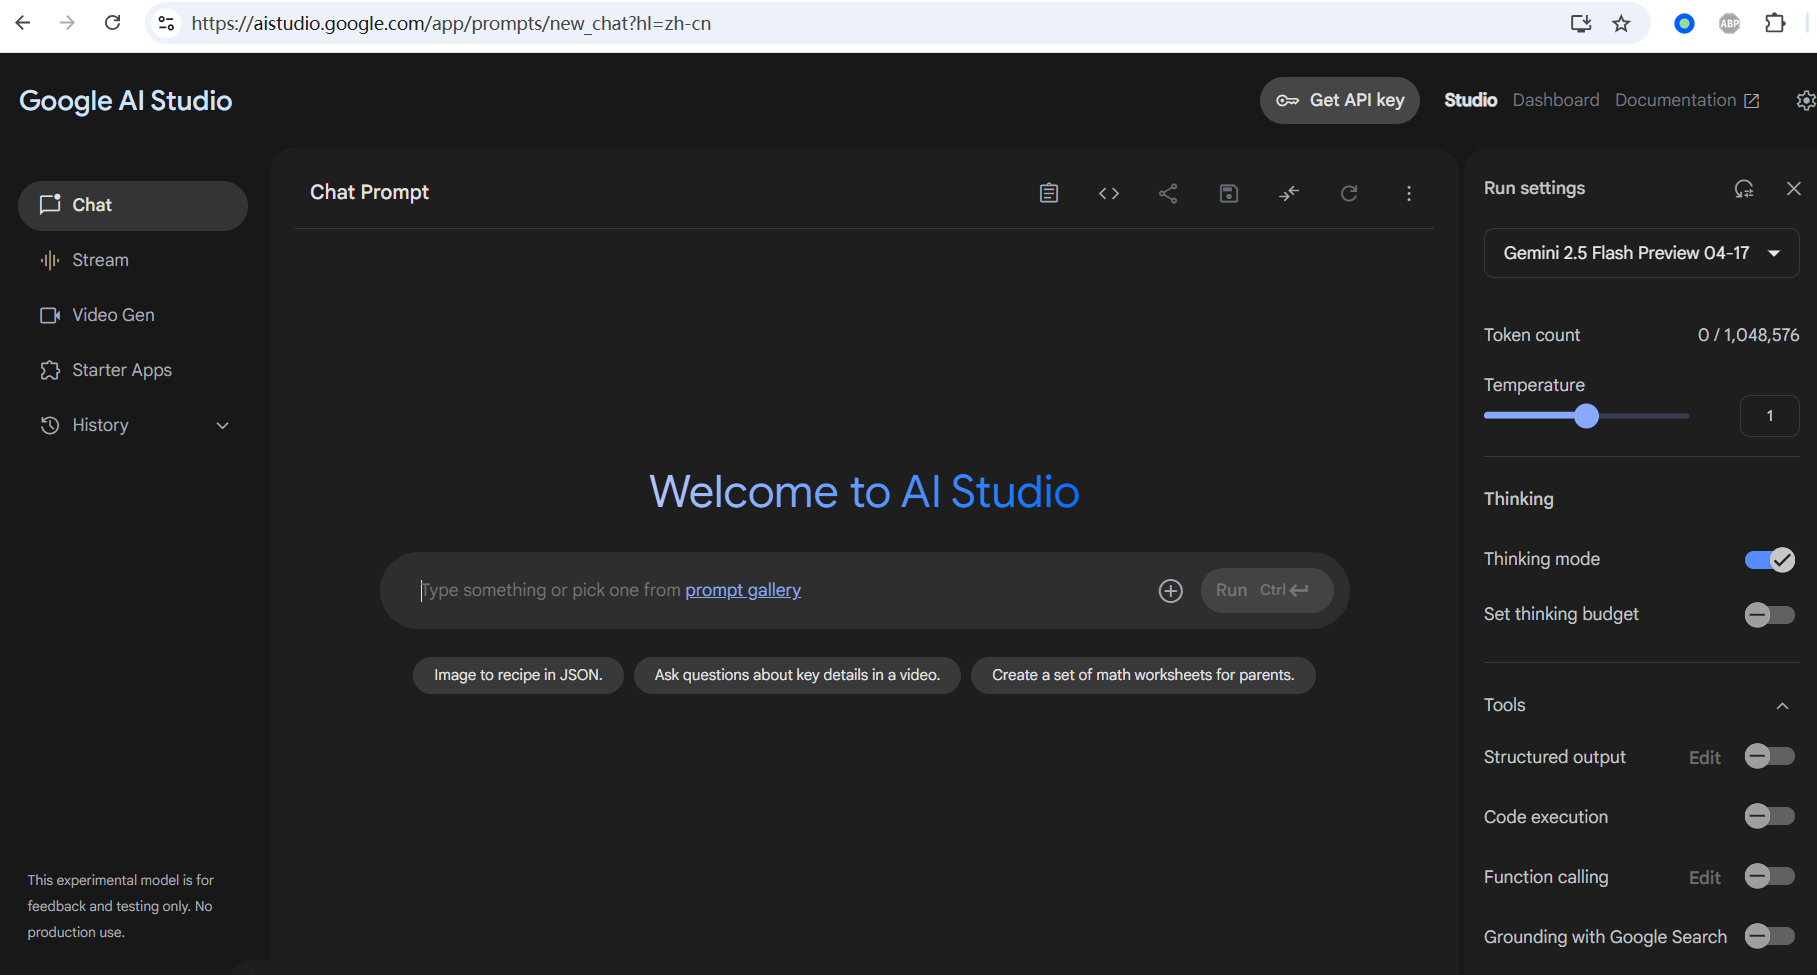
- After successful access, you will see an interface similar to the one below, indicating that you can start using Google AI Studio.
- Next, we need to obtain the API Key. As shown in the image below, click the
Get API keybutton in the upper right corner of the page. If you haven't created one before, the system may guide you to create a project first and then generate the API Key. Just follow the prompts.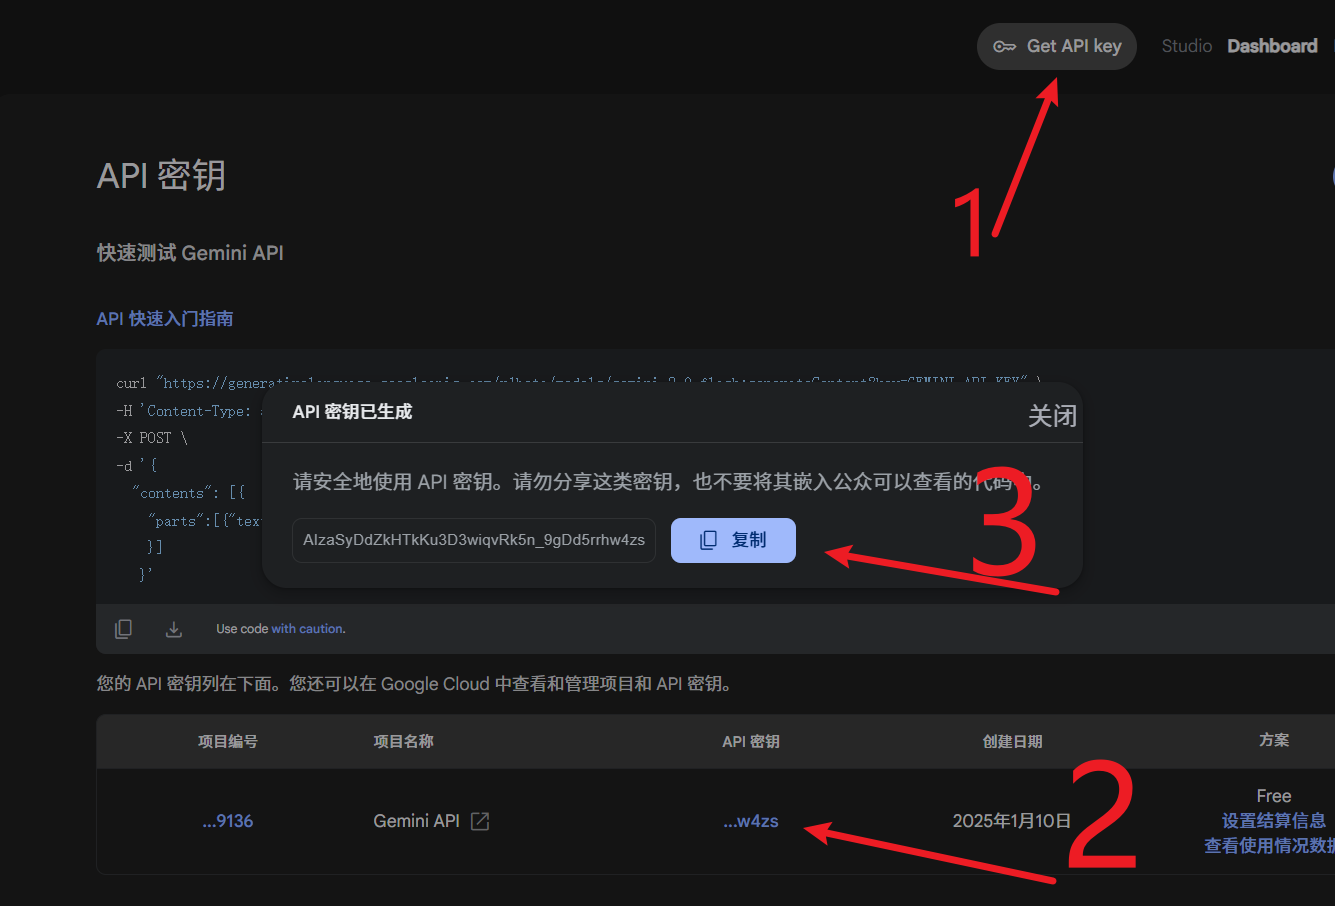
Fill in the Information in pyVideoTrans's OpenAI API and Compatible AI Section
- Open pyVideoTrans and locate the configuration section under Menu → Translation Settings → OpenAI API and Compatible AI.
- Enter the Gemini OpenAI-compatible API address
https://generativelanguage.googleapis.com/v1beta/openai/into theAPI URLinput box. - Paste the Gemini API KEY you copied in the previous step into the
SKinput box. - In the
Fill in all available modelstext box below, enter the names of the Gemini models you wish to use. You can find these model names in the Google AI Studio interface (e.g.,gemini-2.5-flash-preview-04-17,gemini-2.5-pro-preview-05-06,gemini-2.0-flash). If you need to add multiple models, separate them with English commas,.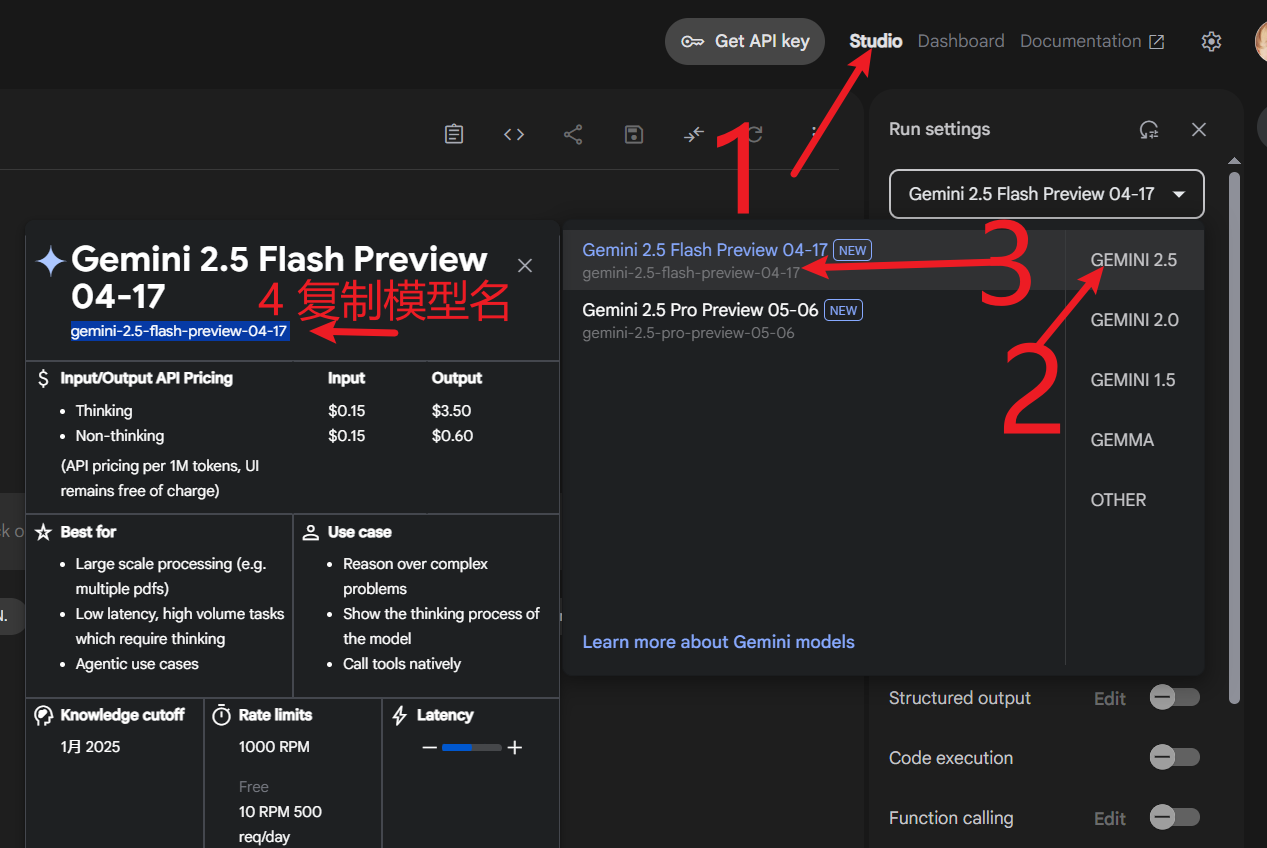
- Then, select the Gemini model you wish to use currently from the model list.
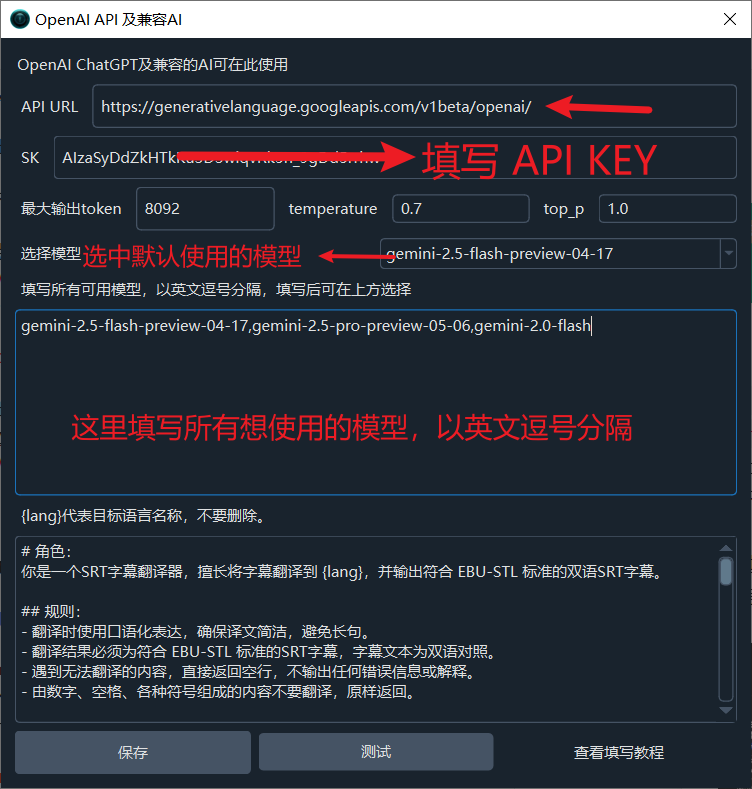
- After completing the above steps, click the "Save" button.
- Test Connection: If you have already set up a valid network proxy on the main interface of pyVideoTrans, or if your computer is configured with a global proxy (system proxy), you can now click the "Test" button. If the test passes without errors, it means the configuration is successful, and the Gemini API is ready to use in pyVideoTrans.
What to Do If There Is a Network Connection Error?
If you see a network connection-related error message after clicking "Test," the issue is likely with the network proxy configuration.
- First, ensure that the configuration has been saved.
- Then, check the scientific internet tool you are using:
- Is "Auto-configure system proxy" or "Global proxy" mode enabled? If not, try enabling it and test again.
- Manual Proxy Configuration: If you do not want or cannot enable global proxy, you can find the local HTTP proxy address and port number provided by your scientific internet tool. The format is usually
http://IP_address:port. Enter this complete address into the "Network Proxy" text box on the main interface of pyVideoTrans. For example, the default local proxy address for some tools might behttp://127.0.0.1:10808.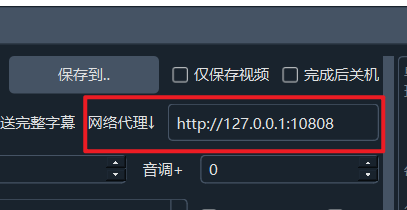
Most scientific internet tools provide a local proxy IP address and port number. The IP address is usually
127.0.0.1(representing the local machine), and you need to find the specific port number corresponding to the tool. Then enter the completehttp://127.0.0.1:port_numberinto the network proxy settings of pyVideoTrans.
Here are some examples of port numbers for common scientific tools:
If your tool's default port is
10808, the proxy address ishttp://127.0.0.1:10808.
If your tool's default port is
7890, the proxy address ishttp://127.0.0.1:7890.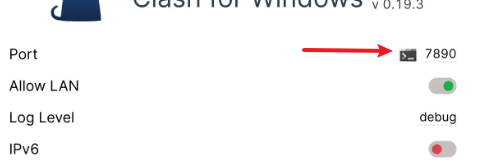
After correctly configuring the proxy, test the connection again, and you should be able to successfully use the Gemini API.