If you don't need CUDA acceleration, you don't need to install or configure CUDA, cuDNN, etc.
CUDA is a tool from NVIDIA that enables your graphics card to handle more tasks. In this software (pyVideoTrans), if you want to enable CUDA acceleration, you must first install the CUDA environment. This guide will walk you through installing CUDA 12.6 and the corresponding cuDNN 9.8 on Windows 10.
Why choose CUDA 12.6 instead of 12.8? Because 12.8 is the latest version and may not be fully compatible with some software yet, leading to potential issues. 12.6 is a relatively stable and up-to-date version. Of course, if you prefer 12.4 or 12.8, the installation process is similar—just adjust the version numbers according to this tutorial.
Step 1: Check if your graphics card is from NVIDIA
Open Device Manager
- Right-click the "Start" button (the Windows icon) in the bottom-left corner of the desktop.
- Select "Windows Administrative Tools - Computer Management" from the menu to open the window.
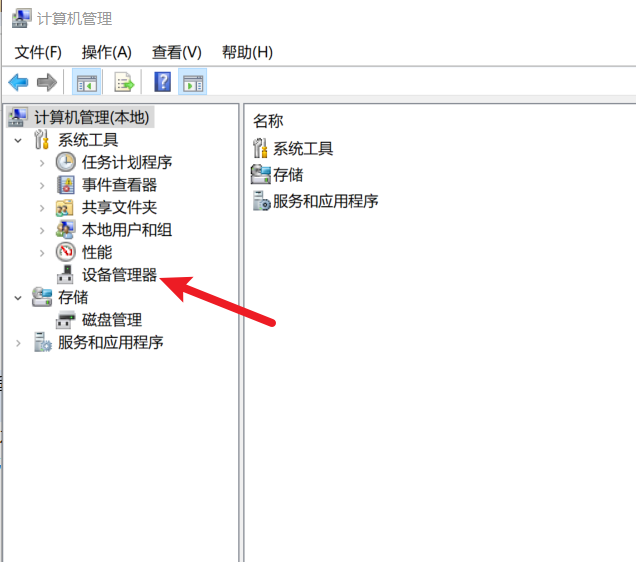
Find graphics card information
In the Computer Management window, click
Device Manageron the left, then find "Display adapters" on the right and click the small arrow to expand it.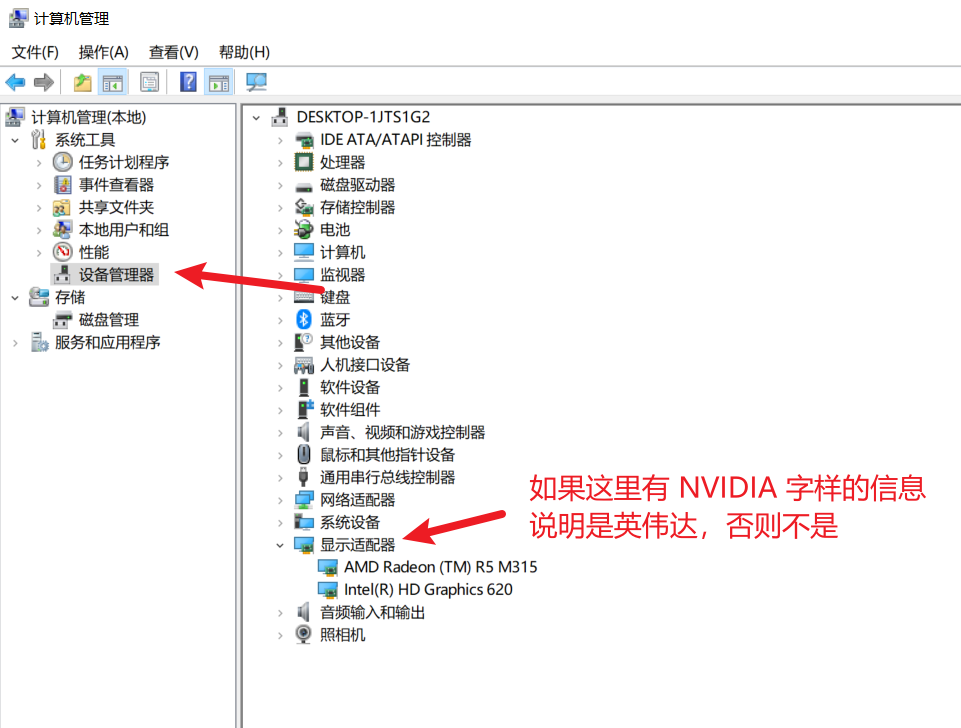
Look for "NVIDIA" in the list, such as "NVIDIA GeForce GTX 1660".
If present, congratulations—your graphics card is from NVIDIA, and you can proceed. If not (e.g., it shows "Intel" or "AMD"), CUDA won't work, and this tutorial ends here.
Step 2: Check and update your graphics card driver
Open NVIDIA management software
If you have the graphics driver installed, there might be a green "NVIDIA" icon in the taskbar (near the time). Right-click it and select "NVIDIA GeForce Experience" to open.
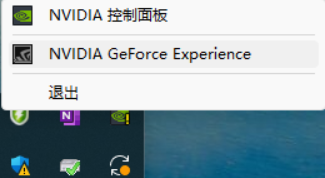
If not, skip to step 3 to download manually.
Check driver version and update
- After opening, click "Drivers" in the top-left corner.
- It will show the current driver version (e.g., "546.33"). If a new version is available, there will be a "Download" button.
- Click "Download" and follow the prompts to install, then restart your computer.
No software? Download driver manually
- Open a browser and go to: https://www.nvidia.com/en-us/geforce/drivers/ to download the driver update software, then install it.
- After installation, open it and follow the instructions to check for driver updates.
Step 3: Check if CUDA is already installed and determine the maximum supported version
Open Command Prompt (CMD)
- Press the Windows key + R on your keyboard to open the "Run" window.
- Type
cmdand press Enter to open a black command-line window.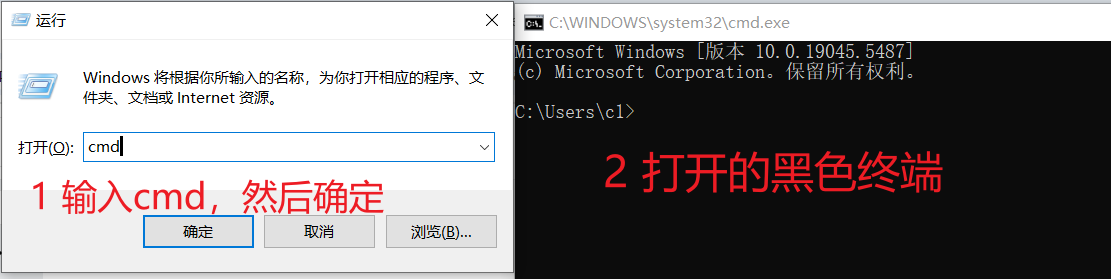
Check CUDA version
- In the command line, type:
nvcc -V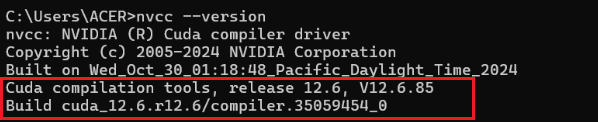
Press Enter. If it shows something like
Cuda compilation tools, release 12.6, V12.6.xxx, CUDA is installed with version 12.6. If it says "not recognized as an internal or external command", CUDA is not installed—proceed with installation.- In the command line, type:
If the version is 11.x, uninstall it first and then reinstall 12.x.
Check the maximum supported CUDA version
- In the command line, type:
nvidia-smi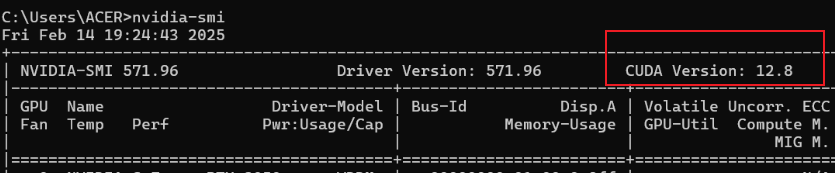
Press Enter; a table will appear with "CUDA Version" in the top-right corner (e.g., 12.6 or higher). This indicates the highest version your driver supports. As long as it's 12.6 or above, you can install CUDA 12.6.
If it shows 11.x, your graphics driver is too old—update it first.- In the command line, type:
Step 4: Download and install CUDA 12.6
Download CUDA 12.6
- Open a browser and go to the NVIDIA download page: https://developer.nvidia.com/cuda-downloads?target_os=Windows&target_arch=x86_64&target_version=10&target_type=exe_local
- Select "Windows" > "x86_64" > "10" > "exe (local)", then click "Download".
- The filename will be something like
cuda_12.8.1_572.61_windows.exe, and it will download to your "Downloads" folder.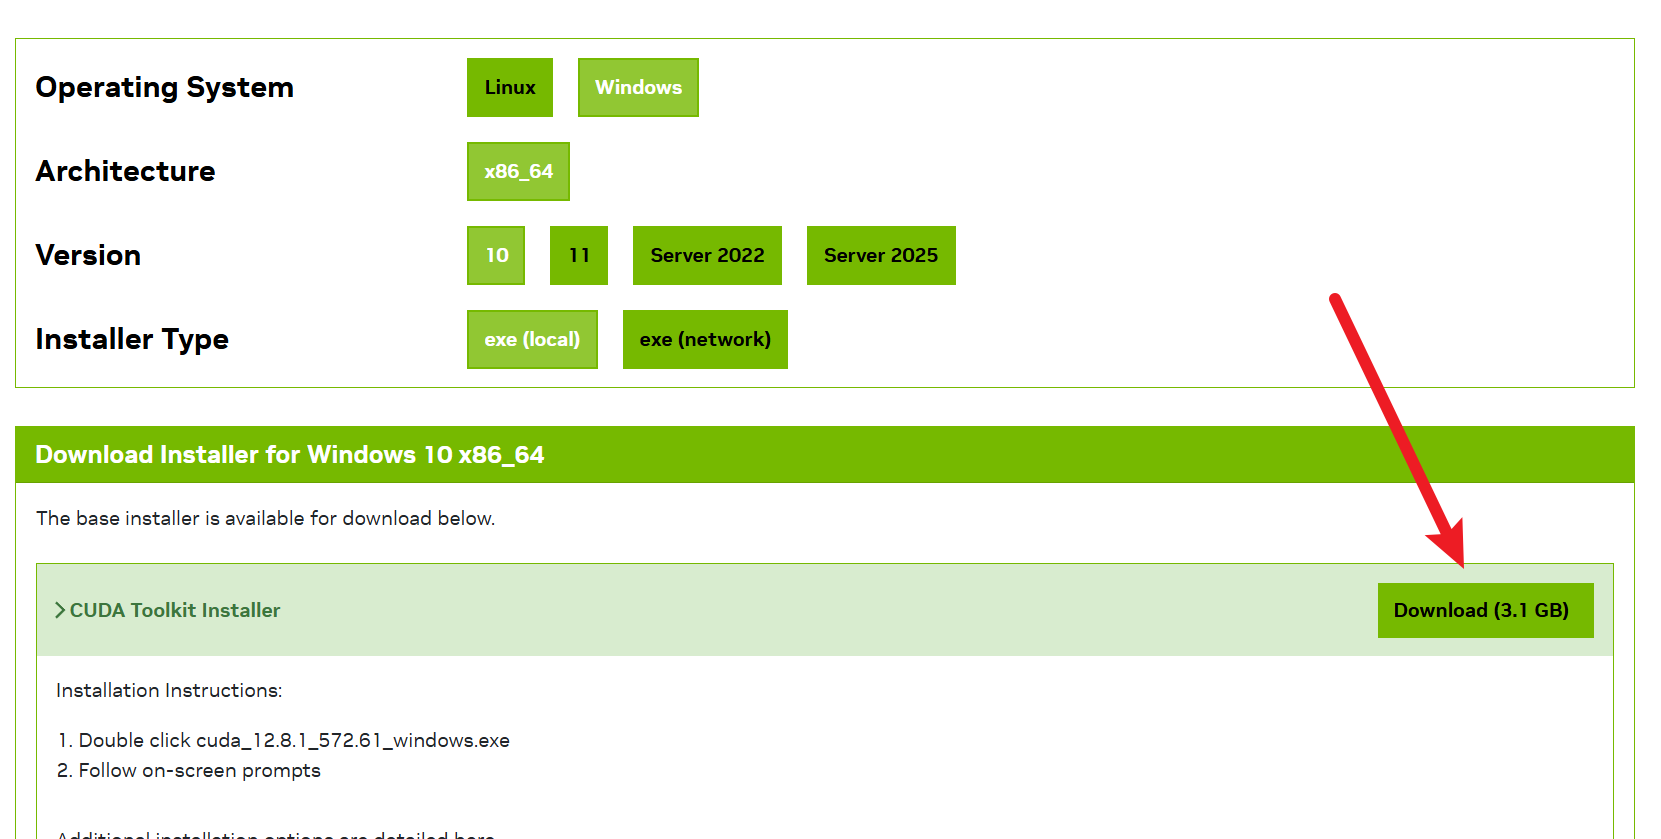
Install CUDA (Custom mode)
Double-click the downloaded file, agree to the license, and click Next.
Choose "Custom (Advanced)" installation, then click Next.
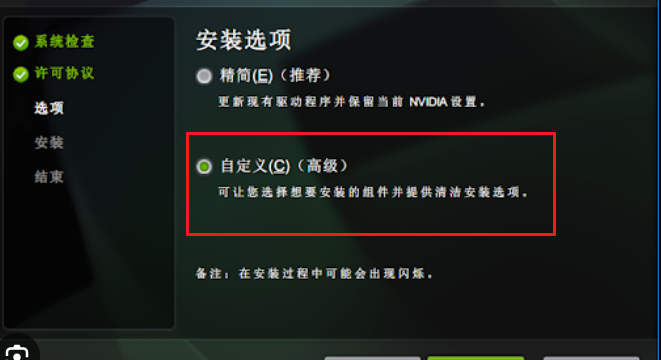
In the options list, only check the first row "CUDA" and uncheck all others to avoid conflicts.
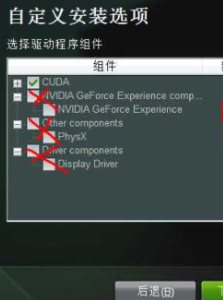
Then click the
+next toCUDAand uncheckVisual Studio Integrationto prevent installation failures.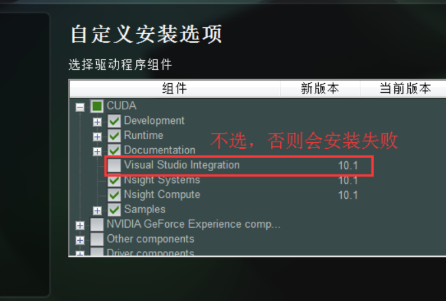
Click "Next" and follow the prompts to complete installation. The default path is
C:\Program Files\NVIDIA GPU Computing Toolkit\CUDA\v12.6.
What to do if there's an error?
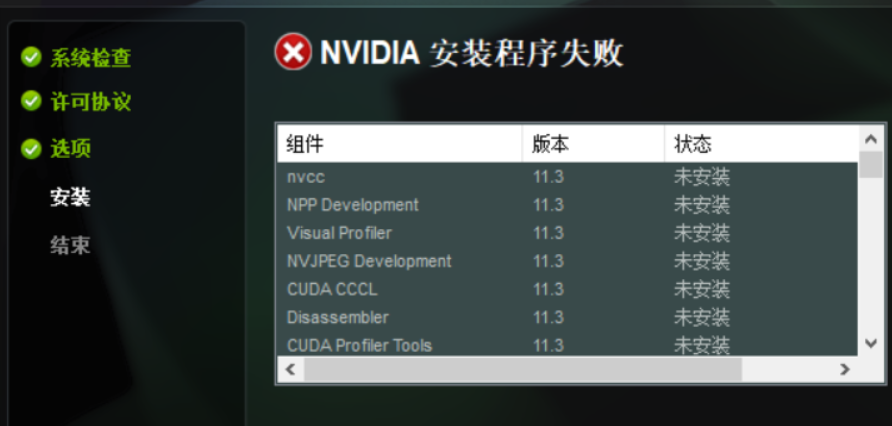
- If installation fails with "Not installed" or "Failed", the options may be incorrect. Rerun the installer, choose custom installation, ensure only the first row "CUDA" is selected, uncheck all others, and under CUDA, uncheck
Visual Studio Integration. - If errors persist, proceed to the next step to install Visual Studio.
- If installation fails with "Not installed" or "Failed", the options may be incorrect. Rerun the installer, choose custom installation, ensure only the first row "CUDA" is selected, uncheck all others, and under CUDA, uncheck
Step 5: Install Visual Studio (if CUDA installation fails)
If you unchecked
Visual Studio Integrationin the previous step, errors should not occur. If they do, follow this to install Visual Studio.
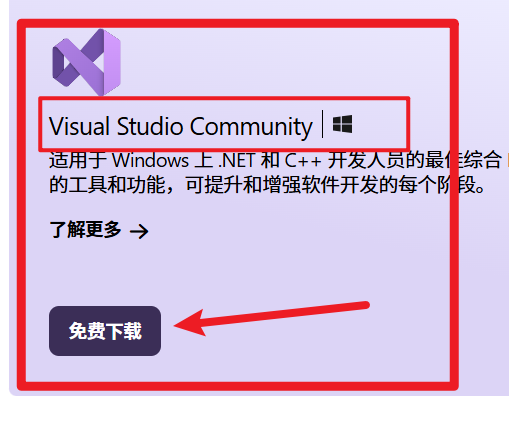
Download Visual Studio Community Edition
- Open a browser and go to: https://visualstudio.microsoft.com/zh-hans/free-developer-offers/
- Click "Free download Visual Studio Community" to download the installer.
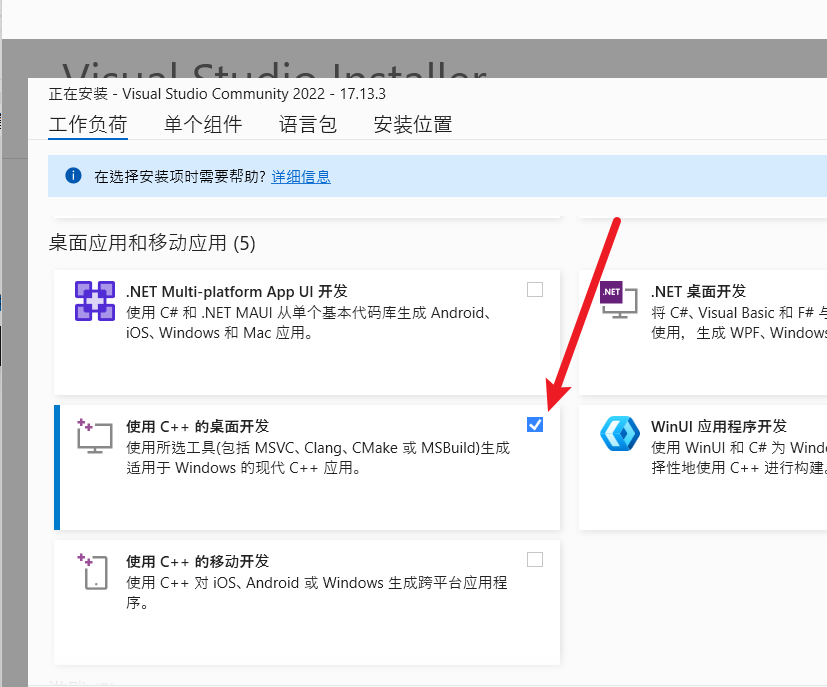
Install C++ development environment
- Double-click the installer, and in the pop-up window, select "Desktop development with C++".
- Click "Install"; it may take several tens of minutes. Restart your computer after installation.
Reinstall CUDA 12.6
- Return to Step 4, rerun the CUDA installer, and in custom mode, select only "Runtime" for installation. It should succeed this time.
Step 6: Verify CUDA installation and configure environment variables
Check if installation was successful
- Open CMD (Windows key + R, type
cmd). - Type:
nvcc -V If it shows Cuda compilation tools, release 12.6, V12.6.xxx, installation was successful. If it says "not recognized as an internal or external command", you need to add environment variables.
- Open CMD (Windows key + R, type
Add CUDA to environment variables (usually set automatically; if not, add manually)
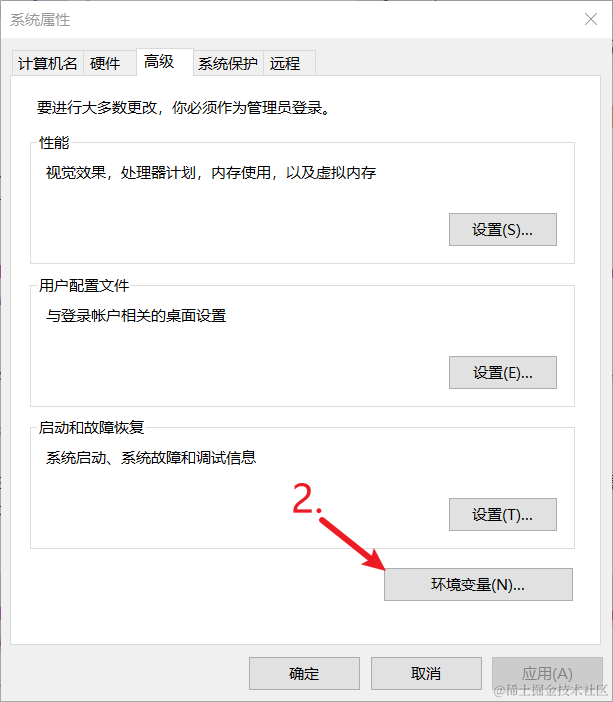
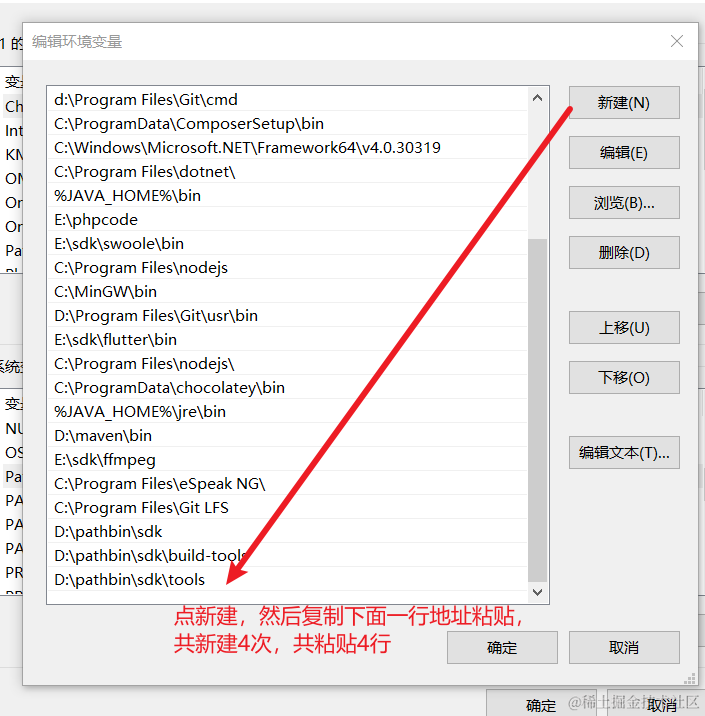
- Right-click "This PC", select "Properties" > "Advanced system settings" > "Environment Variables".
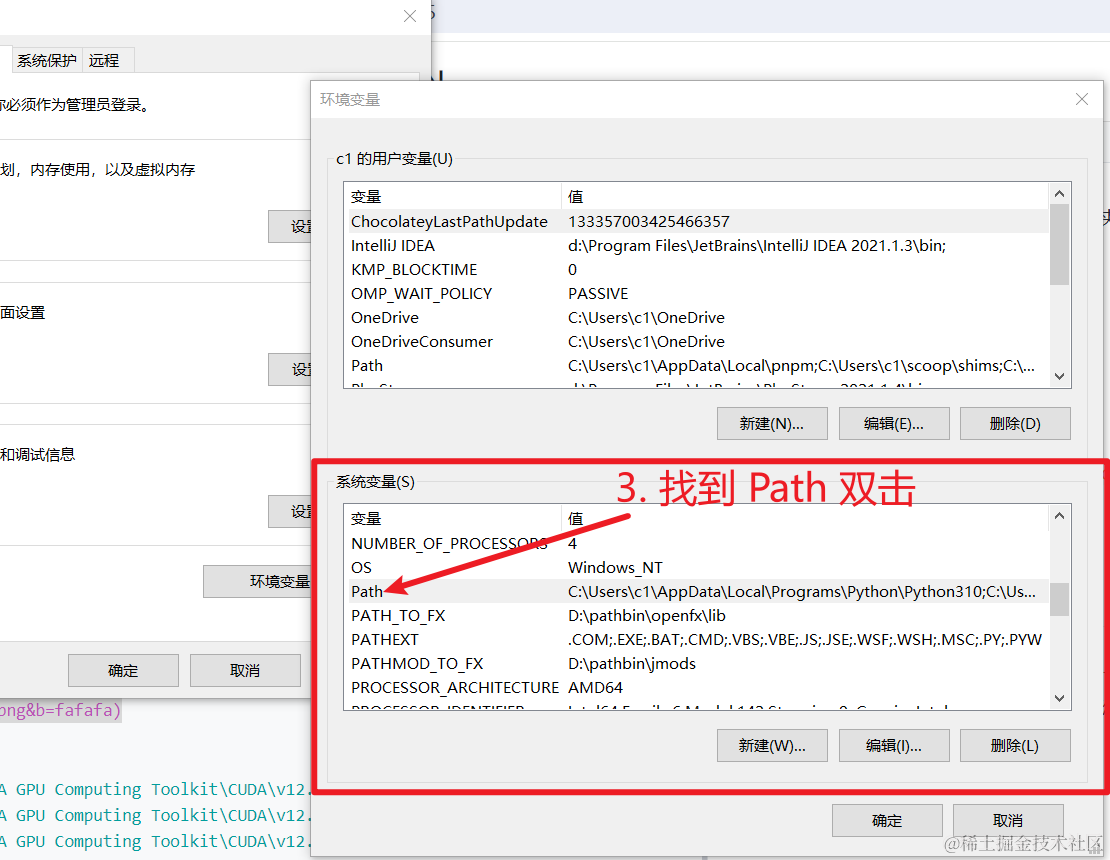
- Under "System variables", find "Path", click "New", and add:
C:\Program Files\NVIDIA GPU Computing Toolkit\CUDA\v12.6\bin C:\Program Files\NVIDIA GPU Computing Toolkit\CUDA\v12.6\lib C:\Program Files\NVIDIA GPU Computing Toolkit\CUDA\v12.6\include C:\Program Files\NVIDIA GPU Computing Toolkit\CUDA\v12.6\libnvvp - Click "OK" to save and close all windows.
- Reopen CMD and type
nvcc -V; you should see the version information now.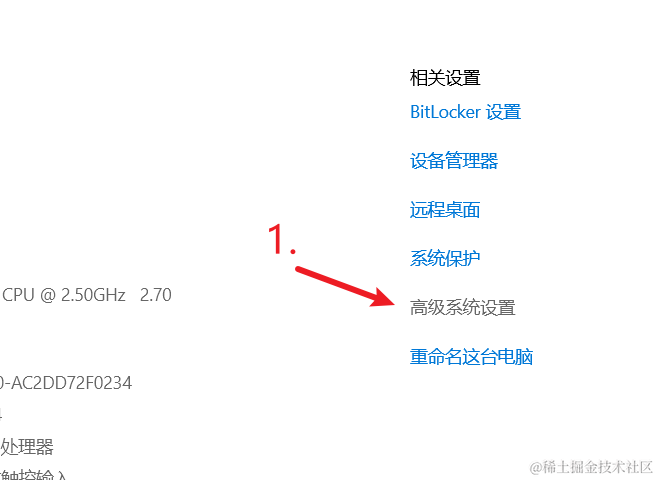
Step 7: Install cuDNN 9.8
Download cuDNN 9.8
- Open a browser and go to: https://developer.nvidia.com/cudnn-downloads?target_os=Windows&target_arch=x86_64&target_version=10&target_type=exe_local
- You may need to log in to your NVIDIA account (register for free if you don't have one).
- Select the "local version" and download the Windows
.exefile.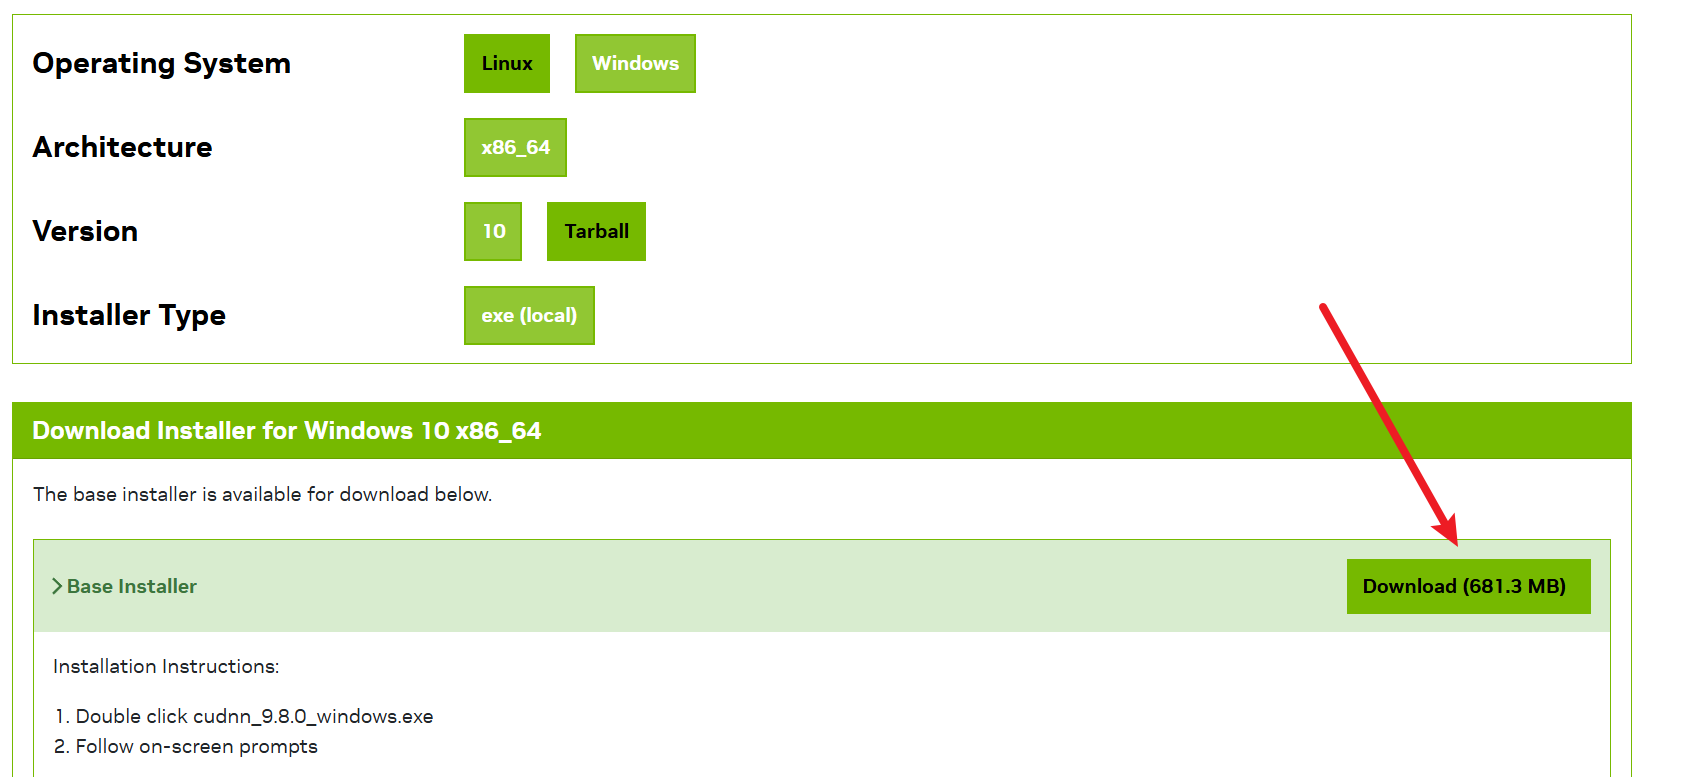
Install cuDNN
- Double-click the downloaded
.exefile and follow the prompts to install.
- Double-click the downloaded
If cuDNN is installed but not working in programs, open the installation directory (default
C:\Program Files\NVIDIA\CUDNN\v9.8), copy thelib,bin, andincludefolders, and paste them intoC:\Program Files\NVIDIA GPU Computing Toolkit\CUDA\v12.6to overwrite existing files.
Finally: All done!
Now CUDA 12.6 and cuDNN 9.8 are installed! You can start running programs that require GPU support. If there are software instructions (e.g., run python script.py), open CMD, navigate to the project folder, and enter the corresponding command to test.