Skip to content

Parakeet-API: Building a Faster and More Accurate Private English Speech Transcription Service Than Whisper

In today's AI applications, speech-to-text (STT) has become a fundamental capability. OpenAI's Whisper model is well-known for its multilingual support and high accuracy, but are there better options for specific scenarios? The answer is yes.

If you need a solution that is faster and more accurate in English recognition and can be fully deployed privately, then NVIDIA's Parakeet model is your best choice.

This article details how to use the Parakeet-TDT-0.6B model to build a high-performance service compatible with the OpenAI API. All code is open-source for easy deployment and use.

Open-source project address: https://github.com/jianchang512/parakeet-api

Why Choose Parakeet Over Whisper?

Choosing the right technology requires weighing the pros and cons. Parakeet is not meant to replace Whisper but offers a better solution in specific scenarios.

Advantages: Faster Speed and Higher English Accuracy

  1. Focus and Optimization: The Parakeet model is deeply optimized for English speech recognition. Compared to Whisper's large multilingual model, Parakeet's architecture is lighter and focused on a single language, often outperforming Whisper in both word error rate and processing speed when handling English audio.
  2. Excellent Timestamps: The model can generate highly accurate word-level and segment-level timestamps, which are crucial for producing high-quality SRT subtitles or subsequent audio analysis.

Disadvantages: English Only

Currently, the core parakeet-tdt-0.6b-v2 model of this project only supports English speech recognition. If your business needs to handle multiple languages, Whisper remains the more suitable choice.

Project Architecture and Technology Stack

The local service configuration uses the following toolchain to achieve an efficient and stable transcription process:

  • Core Model: NVIDIA parakeet-tdt-0.6b-v2
  • Web Framework: Flask
  • Production Server: Waitress (multi-threaded)
  • Format Conversion: FFmpeg
  • API Specification: OpenAI v1/audio/transcriptions compatible

Quick Start: Installation and Environment Setup

Before diving into the code, let's set up the runtime environment.

Step 1: Install System Dependencies (FFmpeg)

FFmpeg is essential for audio and video format conversion. Ensure it is installed on your system.

  • Ubuntu/Debian: sudo apt update && sudo apt install ffmpeg
  • macOS (Homebrew): brew install ffmpeg
  • Windows: Download from the official website and add the bin directory to your system PATH.

Step 2: Configure Python Environment and Install Dependencies

Using a virtual environment is recommended.

bash
# Create and activate a virtual environment
python3 -m venv venv
source venv/bin/activate # (Linux/macOS)
# venv\Scripts\activate # (Windows)

# Install all necessary libraries
pip install numpy waitress flask typing_extensions torch nemo_toolkit["asr"]

Step 3: Key Performance Optimization - Configure CUDA

To maximize model performance, it is strongly recommended to run the service on an environment with an NVIDIA GPU and properly configure CUDA.

If CUDA is not configured, you might see the following log when starting the service for the first time:

The warning [NeMo W] ... Cuda graphs with while loops are disabled... Reason: CUDA is not available indicates: NeMo could not find an available GPU and has automatically fallen back to CPU mode.

  • Impact: The service can run, but transcription speed will be very slow.
  • Solution:
    1. Ensure NVIDIA graphics drivers are installed.
    2. Install the CUDA Toolkit compatible with your drivers.
    3. Install a PyTorch version with CUDA support. This is the step most prone to errors. Visit the PyTorch official website to get the correct installation command based on your CUDA version, for example:
      bash
      # Example: for CUDA 12.1
      pip uninstall -y torch
      pip install torch --index-url https://download.pytorch.org/whl/cu124

After proper configuration, this warning will disappear, and you will experience performance improvements of several times or even dozens of times thanks to the GPU.

Out-of-the-Box Web Interface

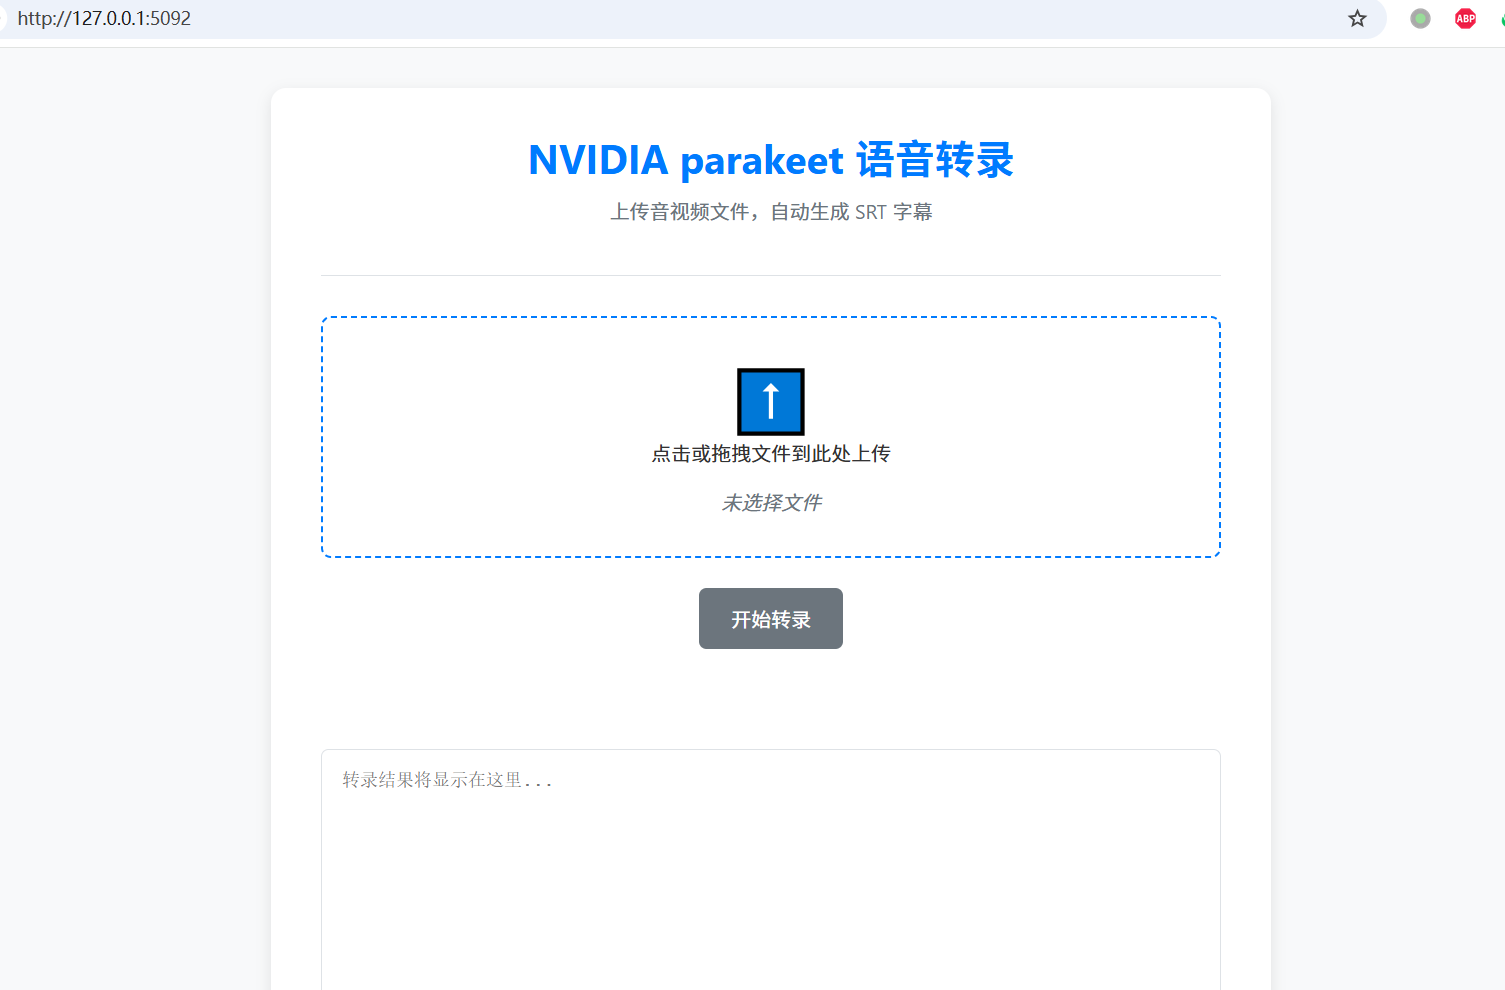
For quick and easy testing, a clean and user-friendly frontend page is built-in. Simply visit the service address (e.g., http://127.0.0.1:5092) in your browser to access all features:

  • Drag-and-Drop Upload: Supports dragging and dropping or clicking to select audio/video files.
  • Real-Time Status: Clearly displays upload, processing, completion, or error statuses.
  • Result Preview: The transcribed SRT subtitles are directly displayed in a text box.
  • One-Click Download: Allows downloading the generated SRT subtitle file locally.

This interface is implemented with native JS and CSS, with no external library dependencies, ensuring fast loading and a smooth experience.

Core Implementation: Compatibility and Performance

  • Model Preloading: The NeMo model is loaded into memory when the service starts, avoiding the significant delay caused by reloading the model for each request.
  • Seamless OpenAI SDK Switching: By pointing the OpenAI client's base_url to our local service, any existing program using the OpenAI SDK can switch to our private API with almost zero cost.

Client Call Example client_test.py:

python
from openai import OpenAI

client = OpenAI(
    base_url="http://localhost:5090/v1", # Point to local service
    api_key="your-dummy-key"             # Any dummy key
)

with open("my_english_audio.mp3", "rb") as audio_file:
    srt_content = client.audio.transcriptions.create(
        model="parakeet",
        file=audio_file,
        response_format="srt"
    )
    print(srt_content)