LocalLLM: Offline Large Language Model Translation
If you have some technical skills, you can deploy a large language model (LLM) locally and use it for translation. This guide will use Tongyi Qianwen (Qwen) as an example to explain the deployment and usage methods.
1. Download and Successfully Run the Executable
Open the website https://ollama.com/download

Click to download. After the download is complete, double-click to open the installation interface, then click Install to complete the process.

After completion, a black or blue window will automatically pop up. Type the 3 words ollama run qwen and press Enter. This will automatically download the Tongyi Qianwen (Qwen) model.

Wait for the model download to finish. No proxy is required, and the speed is quite fast.

Once the model is automatically downloaded, it will run directly. When the progress reaches 100% and displays "Success", it means the model is running successfully. At this point, the installation and deployment of the Tongyi Qianwen (Qwen) large model are fully complete, and you can enjoy using it. Isn't it super simple?

The default API address is http://localhost:11434
What if the window closes? Reopening it is also simple: open your computer's Start menu, find "Command Prompt" or "Windows PowerShell" (or simply press
Win + Qand type "cmd" to search), click to open, and typeollama run qwen. That's it.


2. Direct Use in the Console Command Window
As shown in the image below, when this interface is displayed, you can directly type text into the window to start using it.


3. For a More User-Friendly Interface, Use a UI Application
Open the website https://chatboxai.app/zh and click to download.

After downloading, double-click and wait for the interface window to open automatically.

Click "Start Setup". In the pop-up layer, select "Model" at the top, choose "Ollama" as the AI Model Provider, enter http://localhost:11434 as the API Domain, select Qwen:latest from the model dropdown menu, then save. That's it.

The usage interface displayed after saving. Use your imagination and enjoy!

4. Integrate the API into Video Translation and Dubbing Software
- Open Menu -- Settings -- Local OpenAI-compatible LLMs. Add
,qwento the text box in the middle, as shown below, then select this model.

- In the API URL field, enter
http://localhost:11434. You can enter any value for SK, for example, 1234.
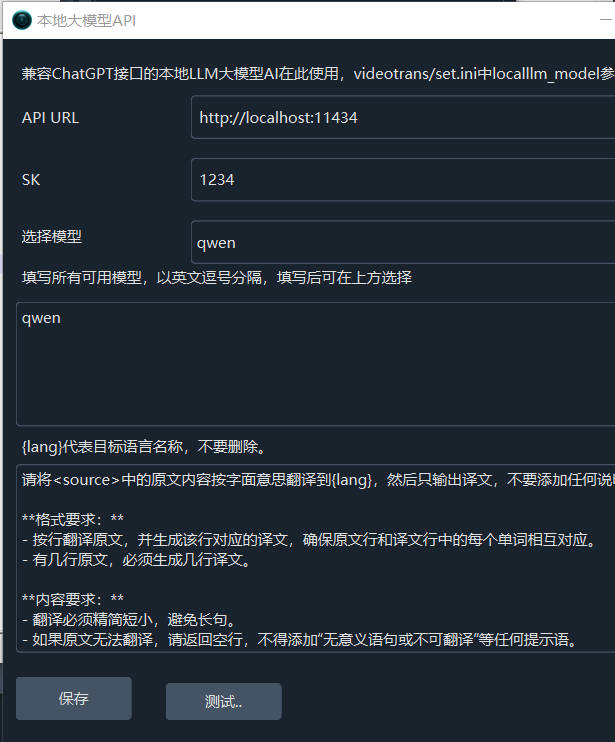
- Test if it's successful. If it is, save and start using it.
5. Call in Code
Ollama provides an OpenAI-compatible API interface. You can call it directly using the OpenAI library; just change the model name to qwen.
from openai import OpenAI

client = OpenAI(
    base_url = 'http://localhost:11434/v1',
    api_key='ollama', # required, but unused
)

response = client.chat.completions.create(
  model="qwen",
  messages=[
    {"role": "system", "content": "你是一个专业的多语言翻译专家."},
    {"role": "user", "content": "将我发送给你的内容翻译为英文,仅返回翻译即可,不要回答问题、不要确认,不要回复本条内容,从下一行开始翻译\n今天天气不错哦!\n挺风和日丽的,我们下午没有课.\n这的确挺爽"}
  ]
)
print(response.choices[0].message.content)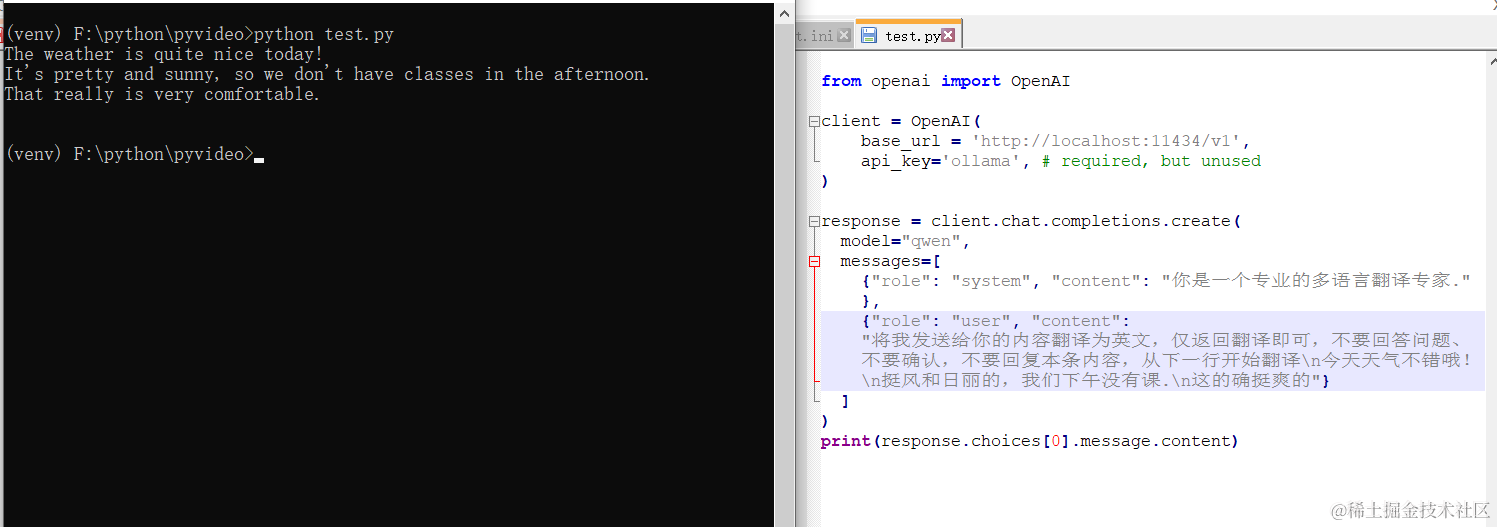
The results are quite good!
7. Other Models You Can Use
Besides Tongyi Qianwen (Qwen), many other models are available. The usage method is just as simple, requiring only 3 words: ollama run [model name].
Open this address https://ollama.com/library to see all available model names. Copy the name of the model you want, then execute ollama run [model name].
Remember how to open the command window? Click the Start menu and find Command Prompt or Windows PowerShell.
For example, if I want to install the openchat model:

Open Command Prompt, type ollama run openchat, press Enter, and wait until "Success" is displayed.


Important Notes:
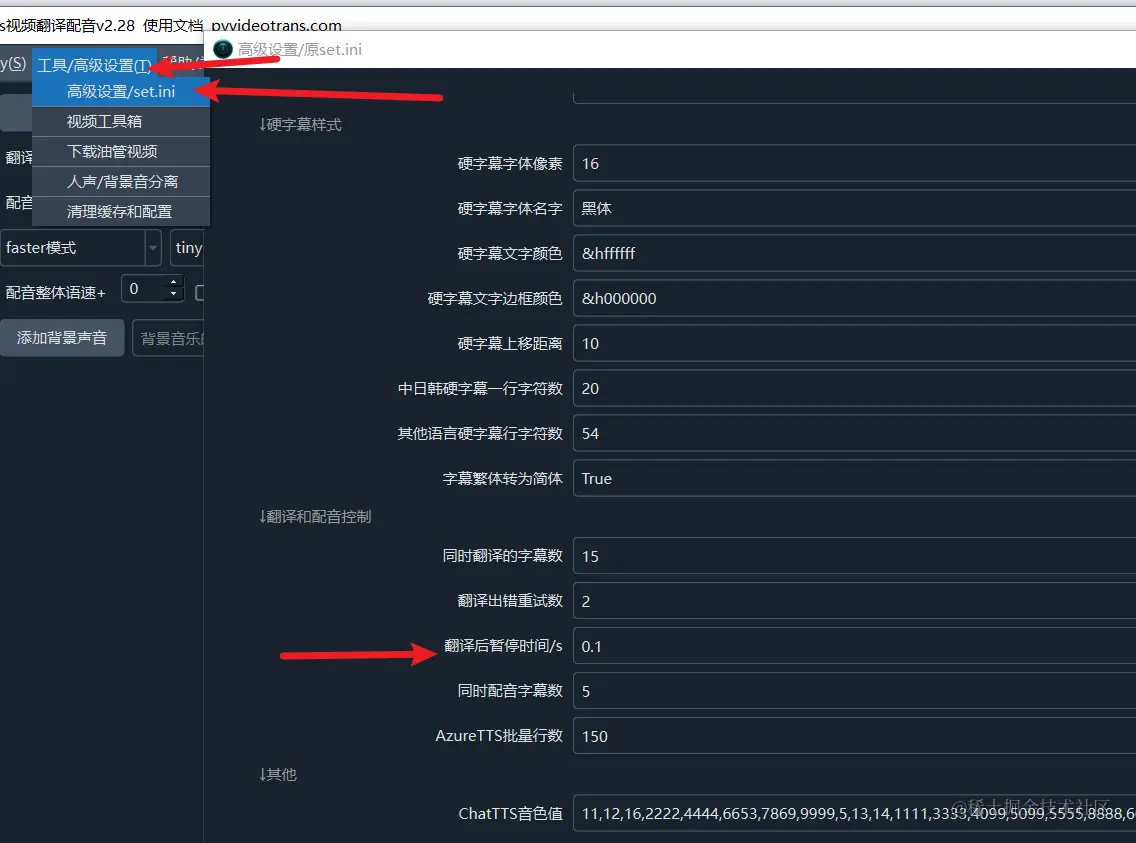
Most AI translation services may limit the number of requests per minute. If you encounter an error indicating that the request frequency has been exceeded, you can set a pause duration (e.g., 30 seconds) in the software via Menu -- Tools/Advanced Settings -- Advanced Settings/set.ini -- Pause Time After Translation. This means the software will wait 30 seconds after each translation before proceeding to the next, helping to avoid rate limit errors.