用 FastAPI 给 Ollama 造个聊天室?手把手教你搭一个可视化界面!
还在命令行里跟 Ollama 模型“尬聊”?是不是想给它配个更直观、更酷炫的聊天界面?好消息!用 Python 的 FastAPI 框架加上一点点前端魔法,我们就能轻松搞定!
这篇指南会带你一步步,从零开始搭建一个基于 FastAPI 的 Ollama 可视化聊天应用。我们会用到 WebSocket 技术来实现实时的、像打字一样的聊天效果。准备好了吗?Let's build something cool!
第一步:蓝图规划 - 看看我们的“工地”长啥样
在动手之前,先熟悉下项目的基本结构。代码都在 handy-ollama 仓库的 fastapi_chat_app 文件夹里。
fastapi_chat_app/
├── app.py             # FastAPI 应用的“大脑”,处理请求和逻辑
├── websocket_handler.py # (如果逻辑复杂,可以单独放这,本例简化在 app.py) - 处理实时聊天消息
├── static/            # 存放静态文件的地方
│   └── index.html     # 我们聊天界面的“脸面” (HTML)
└── requirements.txt # 项目需要的“建材”清单 (Python 库)app.py: FastAPI 应用的核心,负责启动服务、定义访问路径(比如聊天窗口的 WebSocket 连接)。- (本例简化)
websocket_handler.py😗* (如果聊天逻辑复杂,会单独放在这里) 专门处理 WebSocket 连接,负责接收用户消息、发给 Ollama、再把 Ollama 的回复实时传回给前端。 static/index.html: 用户看到的那个聊天窗口页面。requirements.txt: 列出了我们项目需要安装的所有 Python 库。
第二步:开工准备 - 获取代码和“建材”
把代码“搬”回家 (克隆仓库): 打开你的终端(命令行),运行这个命令,把代码下载到你的电脑上:
bashgit clone https://github.com/AXYZdong/handy-ollama进入“施工现场”并安装“建材” (依赖):
bashcd handy-ollama/fastapi_chat_app pip install -r requirements.txt第二条命令会自动读取
requirements.txt文件,帮你把 FastAPI、Ollama Python 库等所有需要的东西都装好。重要前提: 在进行下一步之前,请确保你的 Ollama 服务已经在本地运行了!FastAPI 应用需要连接到它才能工作。
第三步:核心揭秘 - WebSocket 如何让聊天“实时”起来
我们的魔法核心就在 app.py 文件里,它利用 WebSocket 技术实现了浏览器和后端之间的实时双向通信。来看看关键代码:
import ollama # 用于和 Ollama 模型交流
from fastapi import FastAPI, WebSocket # FastAPI 框架 和 WebSocket 支持
from fastapi.staticfiles import StaticFiles # 用于提供静态文件 (我们的 HTML 页面)
import os # 用于处理文件路径

app = FastAPI()

# --- 设置静态文件目录 ---
# 让 FastAPI 知道可以从 'static' 文件夹提供文件
# __file__ 是当前脚本路径, os.path.dirname 获取目录名
# os.path.join 拼接路径,确保跨平台兼容
static_dir = os.path.join(os.path.dirname(__file__), "static")
app.mount("/static", StaticFiles(directory=static_dir), name="static")

@app.get("/") # 增加一个根路径,方便直接访问聊天页面
async def read_root():
    # 可以重定向到聊天页面,或者提供一个简单的欢迎信息
    # 这里我们直接返回 HTML 文件内容 (更推荐用 Jinja2 模板引擎,但为了简单直接返回)
    # 更简单的方式是让用户直接访问 /static/index.html
    from fastapi.responses import FileResponse
    return FileResponse(os.path.join(static_dir, 'index.html'))


# --- WebSocket 聊天核心逻辑 ---
@app.websocket("/ws") # 定义 WebSocket 的连接路径为 /ws
async def websocket_endpoint(websocket: WebSocket):
    print("客户端尝试连接 WebSocket...")
    await websocket.accept()  # 接受来自浏览器的 WebSocket 连接请求
    print("WebSocket 连接已建立!")
    try:
        # 进入一个循环,持续等待和处理来自客户端的消息
        while True:
            user_input = await websocket.receive_text()  # 等待接收用户发来的文本消息
            print(f"收到用户消息: {user_input}")

            # 调用 Ollama API,进行流式聊天
            stream = ollama.chat(
                model='llama3.1',  # 你想用的 Ollama 模型,确保本地有
                messages=[{'role': 'user', 'content': user_input}],
                stream=True  # 关键!开启流式响应
            )

            print("正在从 Ollama 获取流式响应...")
            # 接收 Ollama 的流式回复,并逐块发回给前端
            try:
                full_response = "" # 可以选择累积完整回复再打印,或者直接流式打印
                for chunk in stream:
                    model_output_chunk = chunk['message']['content']
                    full_response += model_output_chunk
                    # 把这一小块回复,立刻通过 WebSocket 发送回浏览器
                    await websocket.send_text(model_output_chunk)
                    # print(f"发送块: {model_output_chunk}") # 可以在后台看到发送的内容
                print(f"Ollama 回复完毕: {full_response[:100]}...") # 打印部分完整回复到后台
            except Exception as e:
                error_msg = f"与 Ollama 交互出错: {e}"
                print(error_msg)
                await websocket.send_text(error_msg) # 把错误信息也发给前端
                # 可以在这里决定是否断开连接 break
    except Exception as e:
        # 处理 WebSocket 连接本身可能出现的错误,比如客户端突然断开
        print(f"WebSocket 连接出错: {e}")
    finally:
        # 无论如何,最后都尝试关闭连接
        print("正在关闭 WebSocket 连接...")
        await websocket.close()
        print("WebSocket 连接已关闭。")

# --- (可选) 添加启动命令说明,方便直接运行 ---
if __name__ == "__main__":
    import uvicorn
    print("启动 FastAPI 应用,访问 http://localhost:8000 或 http://localhost:8000/static/index.html")
    # 允许所有来源访问(开发时方便,生产环境需要更严格设置)
uvicorn.run(app, host="0.0.0.0", port=8000)代码亮点解读:
import: 引入 FastAPI、WebSocket 和 Ollama 库。app = FastAPI(): 创建 FastAPI 应用实例。app.mount("/static", ...): 告诉 FastAPI 把static文件夹里的内容(比如index.html)作为静态文件提供服务。@app.get("/"): 添加了一个根路径处理,方便用户直接访问http://localhost:8000就能看到聊天页面(虽然直接访问/static/index.html也行)。@app.websocket("/ws"): 这是魔法发生的地方!它定义了一个处理 WebSocket 连接的函数。浏览器里的 JavaScript 会连接到这个/ws路径。await websocket.accept(): 握手成功,浏览器和服务器建立了持久的 WebSocket 连接。while True和await websocket.receive_text(): 服务器持续监听,等待用户在浏览器里输入消息并发送过来。ollama.chat(..., stream=True): 把用户消息发给 Ollama 模型,并告诉它我们要流式接收回复。for chunk in stream: 遍历 Ollama 返回的一小块一小块的回复。await websocket.send_text(model_output_chunk): 核心! 把拿到的每一小块回复,立刻通过 WebSocket 发回给浏览器。前端 JavaScript 收到后就能实时更新聊天界面,实现打字效果。try...except...finally: 健壮性处理,确保程序出错或连接断开时能妥善处理。
简单说,就是:浏览器发消息 -> FastAPI 接收 -> 转发给 Ollama -> Ollama 流式回复 -> FastAPI 逐块接收 -> 逐块发回浏览器 -> 浏览器实时显示。
第四步:点火启动!让应用跑起来
确保你在正确的目录: 你的终端应该还在
handy-ollama/fastapi_chat_app目录下。启动 FastAPI 应用:
bashuvicorn app:app --reload --host 0.0.0.0 --port 8000uvicorn是一个高性能的 ASGI 服务器,专门用来跑 FastAPI 这种异步应用。app:app指的是运行app.py文件里的那个名为app的 FastAPI 实例。--reload是个开发时的好帮手,当你修改代码保存后,它会自动重启服务,不用手动停掉再启动。--host 0.0.0.0让局域网内的其他设备也能访问你的应用(如果需要的话),只在本机访问用127.0.0.1或不指定也行。--port 8000指定服务监听的端口,你可以换成别的,只要没被占用。
打开你的浏览器: 在浏览器地址栏输入
http://localhost:8000(或者你启动时指定的 IP 和端口)。如果一切顺利,你应该能看到那个简洁的聊天界面了!开始聊天吧! 在输入框里输入你的问题,回车或点击发送。见证奇迹的时刻:Ollama 的回复会像打字一样,实时出现在聊天窗口里!
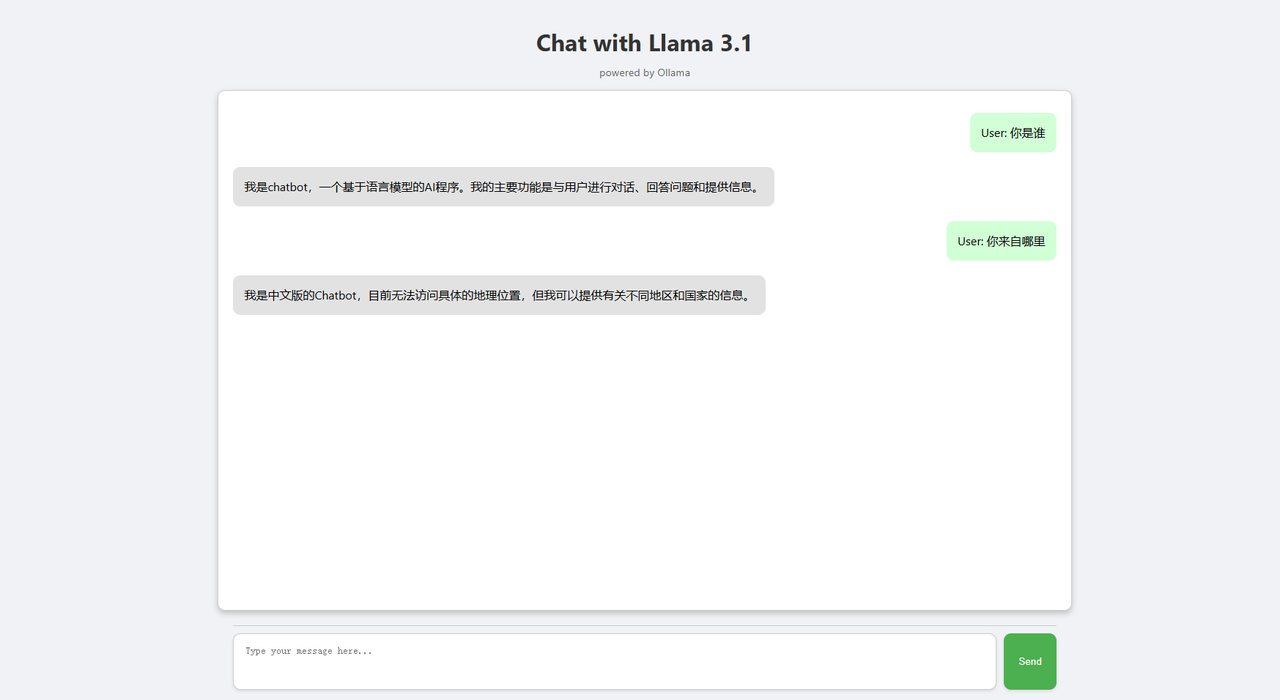
看看效果:
- 前端界面大概长这样:
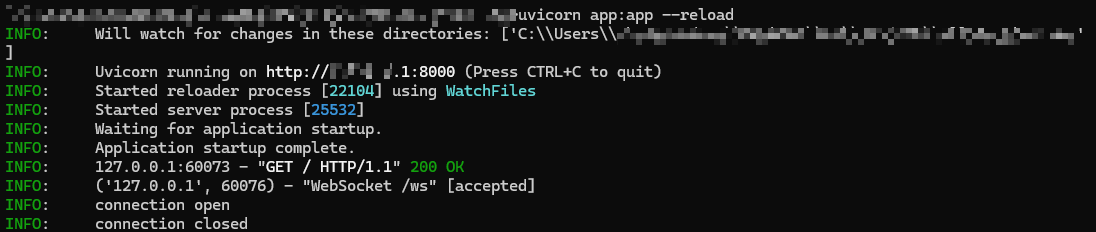
- 你的终端(后台)会打印出类似这样的日志: