F5-TTS 是上海交通大学开源的一款声音克隆工具,效果卓越。最初版本仅支持中文和英文克隆,但最新版本 v1 已经扩展支持法语、意大利语、印地语、日语、俄语、西班牙语、芬兰语等多种语言。
本文主要介绍如何使用官方源码安装、启动 F5-TTS,并将其与 pyVideotrans 项目对接。此外,还将介绍如何通过修改源码实现局域网内的调用。
同时,由于精力有限,我将不再维护之前的个人整合包和 API 接口,转而统一使用官方接口与 pyVideotrans 项目对接。官方接口的局限性在于只能本机调用,无法在局域网内调用。解决方法请参阅本文局域网使用部分。
前置条件
您的系统必须已安装 Python 3.10 版本。虽然 3.11/3.12 版本理论上可能可行,但未经实际测试,因此建议使用 3.10 版本。
如果尚未安装 Python:
Windows 系统安装教程:https://pvt512.com/20250313/pythoninstall
Mac 系统安装:若未安装,请访问 Python 官网下载 pkg 安装包 https://www.python.org/downloads/macos,选择
3.10.11版本。
检查 Python 是否已安装:
- Windows 系统:按下 Win+R 键,在弹出的窗口中输入
cmd并回车。在打开的黑色窗口中输入python --version。如果显示3.10.xx,则表示已安装;如果提示“python 不是内部或外部命令”,则表示未安装或未将 Python 添加到 Path 环境变量,需要重新安装。 - Mac 系统:在终端中直接执行
python3 --version。如果输出3.10.x,则表示已安装;否则需要安装。
下载 F5-TTS 源码
首先,在合适的位置创建一个空文件夹。建议选择非系统盘、非需要特殊权限的位置,例如 D 盘等。避免将其放置在 C:/Program Files 这类目录下(建议所在位置和各级文件夹都使用由纯数字或字母组成的名称),以免遇到潜在问题。例如D:/f5/v1是个好位置,而D:/开源 f5/f5 v1有空格、中文则不建议使用。
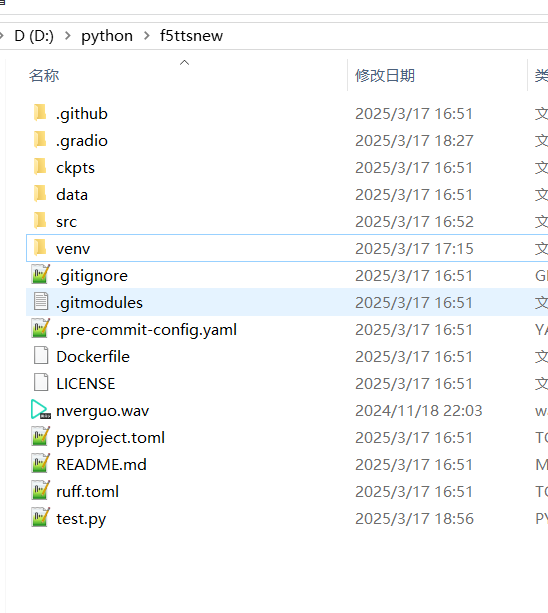
本文以将 F5-TTS 安装在 Windows10 系统的 D:/python/f5ttsnew 文件夹为例。
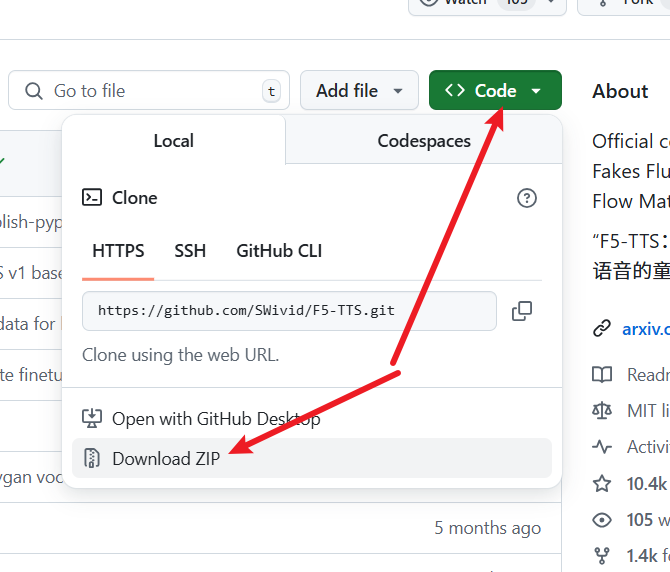
打开网址:https://github.com/SWivid/F5-TTS
按照下图所示,点击下载源码:
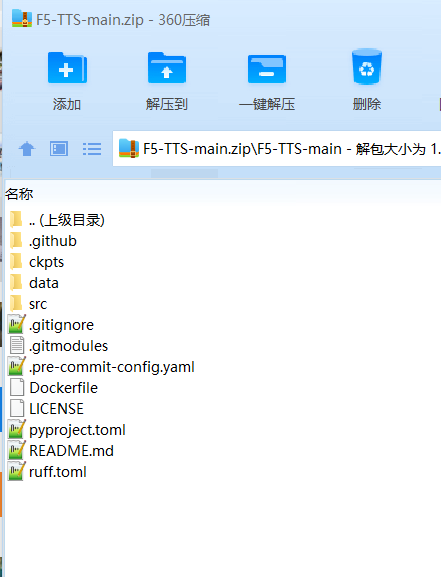
下载完成后,解压压缩包,将 F5-TTS-main 文件夹内的所有文件复制到 D:/python/f5ttsnew 文件夹内,如下图所示:
创建虚拟环境
强烈建议创建虚拟环境,除非您的计算机上没有其他 Python 项目或 AI 项目。虚拟环境可以有效避免许多潜在的错误。
在刚刚创建的文件夹 D:/python/f5ttsnew 的地址栏中输入 cmd 并回车(Mac 系统请使用终端进入该文件夹)。
执行以下命令创建虚拟环境:python -m venv venv。执行完毕后,文件夹内会新增一个名为 venv 的文件夹。
接下来,激活虚拟环境(注意空格和点符号):
- Windows 系统:
.\venv\scripts\activate - Mac 系统:
. ./venv/bin/activate
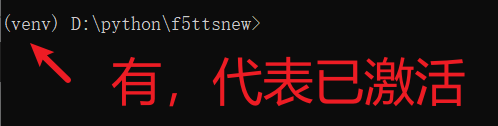
虚拟环境激活后,命令行提示符前会增加 (venv) 字样。请务必确保后续所有操作都在此虚拟环境下进行,每次操作前都请检查命令行提示符前是否带有 (venv)。
安装依赖
在已激活虚拟环境的终端中,继续输入以下命令(注意空格和点符号):
pip install -e .
等待安装完成。如果需要 CUDA 加速,请继续执行以下命令(这是一行命令,不要换行):
# Install pytorch with your CUDA version, e.g.
pip install torch==2.4.0+cu124 torchaudio==2.4.0+cu124 --extra-index-url https://download.pytorch.org/whl/cu124配置科学上网环境
重要提示: F5-TTS 需要在线从 huggingface.co 网站下载模型。由于该网站在国内已被屏蔽,无法直接连接,因此在启动前,您必须配置好科学上网环境,并开启全局或系统代理。
如果您使用的 VPN 工具提供了 HTTP 端口(如下图所示):
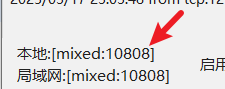
请在终端中输入以下命令设置代理:
- Windows 系统:
set https_proxy=http://127.0.0.1:10808(请将端口号替换为您实际使用的端口) - Mac 系统:
https_proxy=http://127.0.0.1:10808(请将端口号替换为您实际使用的端口)
您也可以直接修改代码来设置代理,避免每次在终端中手动输入。打开 F5-TTS 根目录/src/f5_tts/infer/infer_gradio.py 文件,在文件顶部添加以下代码:
import os
os.environ['https_proxy']='http://127.0.0.1:10808' # 根据您的实际代理地址填写启动 WebUI 界面
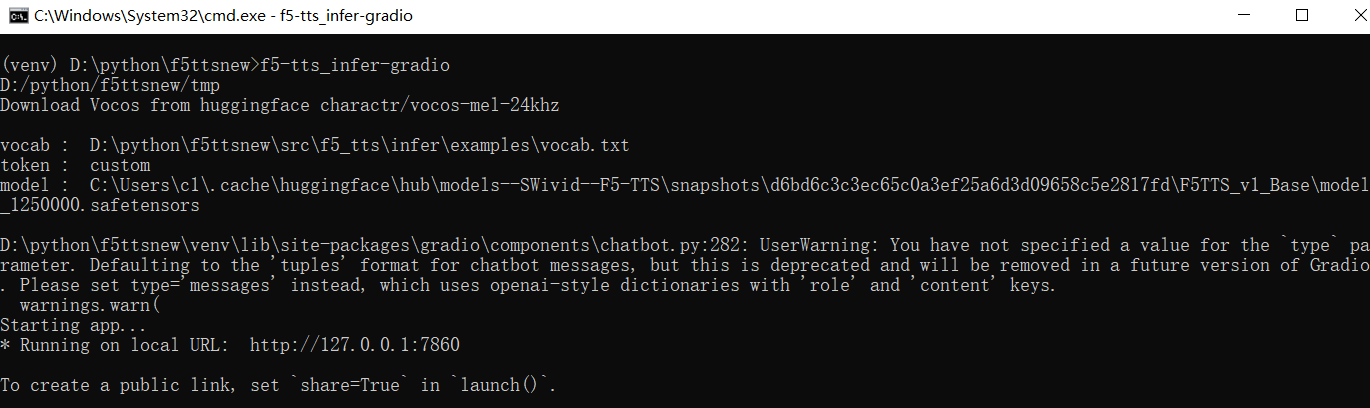
配置好科学上网环境后,在终端中输入以下命令启动 WebUI:
f5-tts_infer-gradio
首次启动时,程序会自动下载模型,过程可能较慢,请耐心等待。后续启动时,程序可能仍会连接 huggingface.co 进行检测,建议保持代理开启,以避免出错。
启动成功后,终端会显示 IP 地址和端口号,如下图所示:
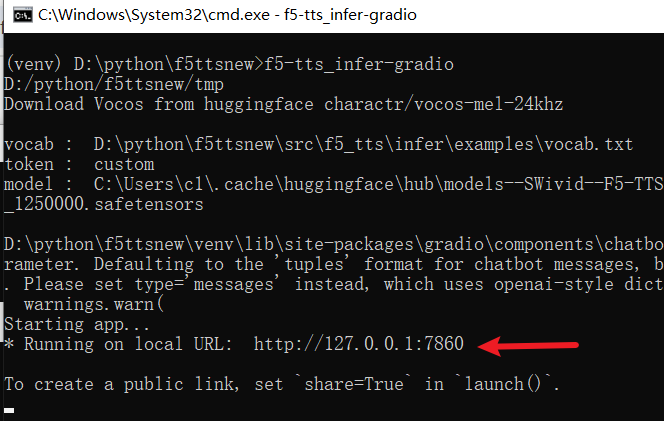
在浏览器中打开显示的地址,默认为 http://127.0.0.1:7860。
对接 pyVideoTrans 的 API
为了在视频翻译软件中使用 F5-TTS,您需要先启动 F5-TTS,并保持终端窗口处于打开状态。
然后,打开视频翻译软件,在菜单中依次选择“TTS 设置”->“F5-TTS API”,填写 F5-TTS 的启动地址,默认为 http://127.0.0.1:7860。如果您的启动地址不是默认地址,请按照实际地址填写。
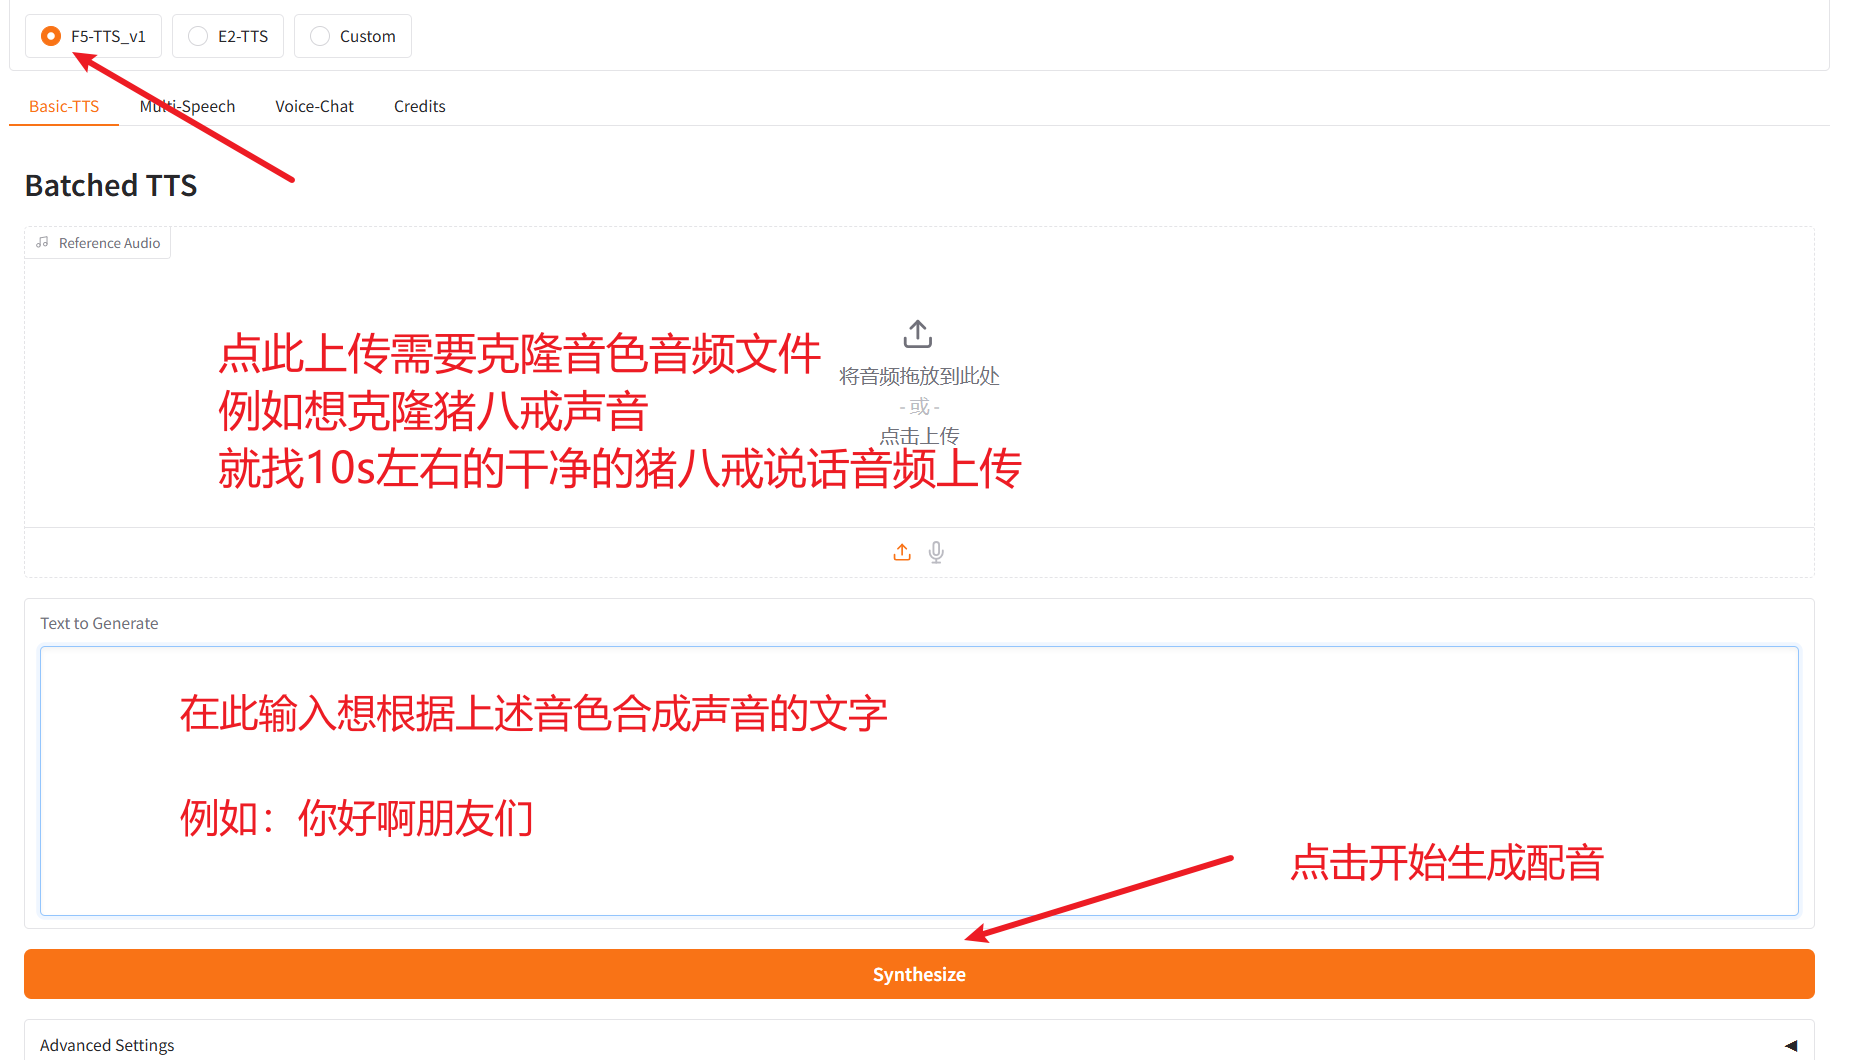
在“参考音频”一栏中,填写以下内容:
想要使用的音频文件名#该音频文件中对应的文字
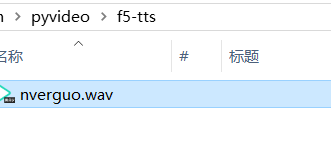
注意: 请将参考音频文件放置在 pyVideotrans 项目根目录下的 f5-tts 文件夹内。如果该文件夹不存在,请手动创建。例如,您可以将参考音频文件命名为 nverguo.wav。
填写示例如下:
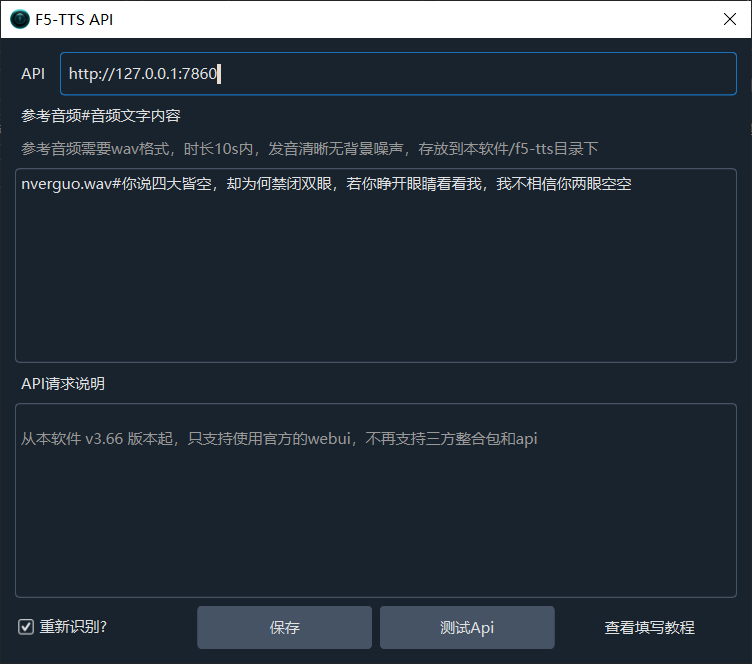
重新识别?: 默认情况下将把参考音频(克隆时识别出的字幕)一同发给F5-TTS,避免F5-TTS启动whisper做语音识别,节省时间提高效率,但有时可能想让F5-TTS重新识别,能一定程度上提高克隆质量,此时可选中该复选框,但注意,选中后如果是第一次这么做,F5-TTS将从 huggingface.co 在线下载openai-whisper-v3模型,请确保已科学上网。
解决局域网问题
如果您的 F5-TTS 部署在局域网内的另一台计算机上,您需要修改 F5-TTS 的代码以支持局域网访问。
打开 F5-TTS 项目目录/src/f5_tts/infer/infer_gradio.py 文件,在第 16 行下方新增以下代码:
# 新增 局域网start
import os
from pathlib import Path

ROOT=Path(os.getcwd()).as_posix()
TMP=f'{ROOT}/tmp'
Path(TMP).mkdir(exist_ok=True)
os.environ['GRADIO_TEMP_DIR']=TMP
gr.set_static_paths(paths=[TMP,tempfile.gettempdir()])
print(TMP)

## 新增局域网end代码新增位置示意图: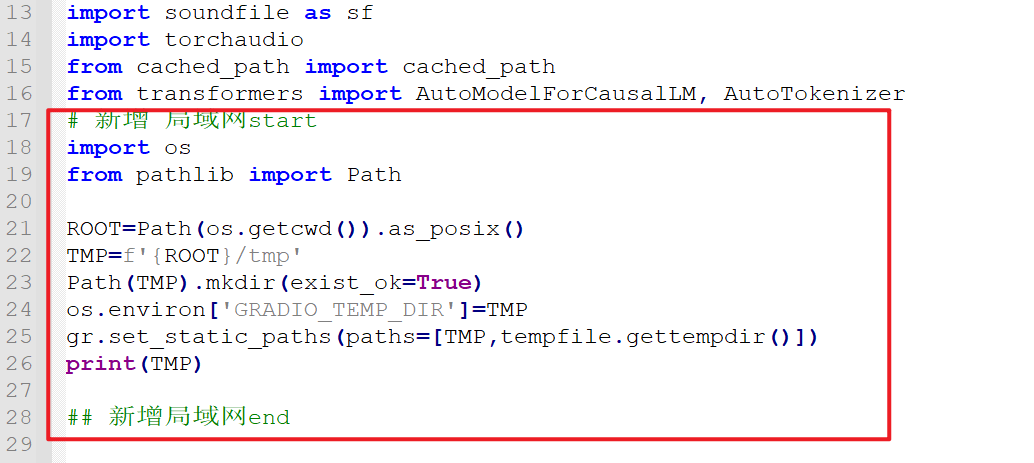
保存修改后,重新启动 F5-TTS。然后在 pyVideotrans 中填写 F5-TTS 启动后的 IP 地址和端口号,例如 http://192.168.0.12:7860。
增加其他语言
如果您需要使用其他语言的模型,也需要修改 F5-TTS 项目目录/src/f5_tts/infer/infer_gradio.py 文件。
找到大约第 59 行的代码:
DEFAULT_TTS_MODEL_CFG = [
    "hf://SWivid/F5-TTS/F5TTS_v1_Base/model_1250000.safetensors",
    "hf://SWivid/F5-TTS/F5TTS_v1_Base/vocab.txt",
    json.dumps(dict(dim=1024, depth=22, heads=16, ff_mult=2, text_dim=512, conv_layers=4)),
]代码位置示意图:
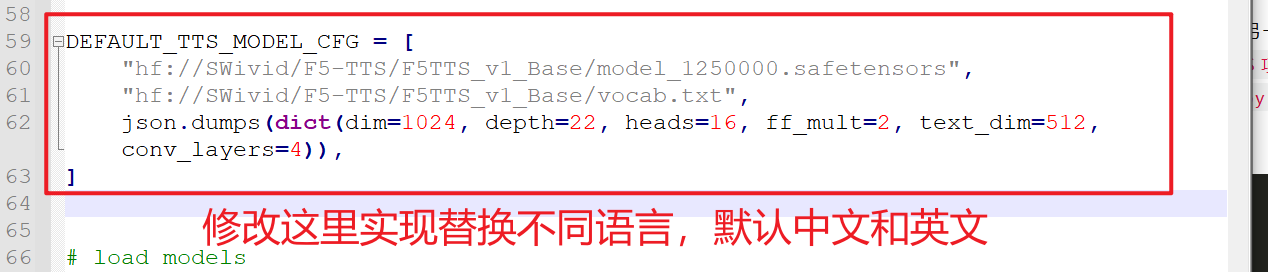
默认情况下,这里配置的是官方的中文和英文模型。 如果您需要使用其他语言的模型,请按照以下说明进行修改。 修改完成后,需要重新启动 F5-TTS,并确保已配置好科学上网环境,以便程序在线下载新的语言模型。 下载成功后,先通过 WebUI 克隆一个音色进行测试,然后再通过 pyVideoTrans 使用。
重要提示:在使用前,请确保 pyVideoTrans 中的配音文字语言与 F5-TTS 中选择的模型语言一致。
以下是各语言模型的配置信息:
法语:
pythonDEFAULT_TTS_MODEL_CFG = [ "hf://RASPIAUDIO/F5-French-MixedSpeakers-reduced/model_last_reduced.pt", "hf://RASPIAUDIO/F5-French-MixedSpeakers-reduced/vocab.txt", json.dumps({"dim": 1024, "depth": 22, "heads": 16, "ff_mult": 2, "text_dim": 512, "text_mask_padding": False, "conv_layers": 4, "pe_attn_head": 1}), ]印地语:
pythonDEFAULT_TTS_MODEL_CFG = [ "hf://SPRINGLab/F5-Hindi-24KHz/model_2500000.safetensors", "hf://SPRINGLab/F5-Hindi-24KHz/vocab.txt", json.dumps({"dim": 768, "depth": 18, "heads": 12, "ff_mult": 2, "text_dim": 512, "text_mask_padding": False, "conv_layers": 4, "pe_attn_head": 1}) ]意大利语:
pythonDEFAULT_TTS_MODEL_CFG = [ "hf://alien79/F5-TTS-italian/model_159600.safetensors", "hf://alien79/F5-TTS-italian/vocab.txt", json.dumps({"dim": 1024, "depth": 22, "heads": 16, "ff_mult": 2, "text_dim": 512, "text_mask_padding": False, "conv_layers": 4, "pe_attn_head": 1}) ]日语:
pythonDEFAULT_TTS_MODEL_CFG = [ "hf://Jmica/F5TTS/JA_25498980/model_25498980.pt", "hf://Jmica/F5TTS/JA_25498980/vocab_updated.txt", json.dumps({"dim": 1024, "depth": 22, "heads": 16, "ff_mult": 2, "text_dim": 512, "text_mask_padding": False, "conv_layers": 4, "pe_attn_head": 1}) ]俄语:
pythonDEFAULT_TTS_MODEL_CFG = [ "hf://hotstone228/F5-TTS-Russian/model_last.safetensors", "hf://hotstone228/F5-TTS-Russian/vocab.txt", json.dumps({"dim": 1024, "depth": 22, "heads": 16, "ff_mult": 2, "text_dim": 512, "text_mask_padding": False, "conv_layers": 4, "pe_attn_head": 1}) ]西班牙语:
pythonDEFAULT_TTS_MODEL_CFG = [ "hf://jpgallegoar/F5-Spanish/model_last.safetensors", "hf://jpgallegoar/F5-Spanish/vocab.txt", json.dumps({"dim": 1024, "depth": 22, "heads": 16, "ff_mult": 2, "text_dim": 512, "conv_layers": 4}) ]芬兰语:
pythonDEFAULT_TTS_MODEL_CFG = [ "hf://AsmoKoskinen/F5-TTS_Finnish_Model/model_common_voice_fi_vox_populi_fi_20241206.safetensors", "hf://AsmoKoskinen/F5-TTS_Finnish_Model/vocab.txt", json.dumps({"dim": 1024, "depth": 22, "heads": 16, "ff_mult": 2, "text_dim": 512, "text_mask_padding": False, "conv_layers": 4, "pe_attn_head": 1})]
可关注官方更新,其他语言可使用类似方式增加,地址:https://github.com/SWivid/F5-TTS/blob/main/src/f5_tts/infer/SHARED.md
常见错误和注意事项
API 使用过程中,您可以关闭浏览器中的 WebUI 界面,但不能关闭启动 F5-TTS 的终端窗口。
能否动态切换 F5-TTS 中的模型? 不可以。您需要按照上述方式手动修改代码,然后重启 WebUI。
频频出现这类错误
    raise ConnectTimeout(e, request=request)
requests.exceptions.ConnectTimeout: (MaxRetryError("HTTPSConnectionPool(host='huggingface.co', port=443): Max retries exceeded with url: /SWivid/F5-TTS/resolve/main/F5TTS_v1_Base/vocab.txt (Caused by ConnectTimeoutError(<urllib3.connection.HTTPSConnection object at 0x000002174796DF60>, 'Connection to huggingface.co timed out. (connect timeout=10)'))"), '(Request ID: 0458b571-90ab-4edd-ae59-b93bd603cdd0)')梯子问题,请科学上网,并使用流畅的梯子,参照上方配置科学上网环境
- 如何禁止每次连接 huggingface.co?
请确保已至少成功克隆过一次,模型已下载 打开
F5-TTS根目录/src/f5_tts/infer/utils_infer.py
搜索 snapshot_download,找到如图这行代码

修改为
local_path = snapshot_download(repo_id="nvidia/bigvgan_v2_24khz_100band_256x", cache_dir=hf_cache_dir,local_files_only=True)再搜索 hf_hub_download,找到如图2行代码

修改为
config_path = hf_hub_download(repo_id=repo_id, cache_dir=hf_cache_dir, filename="config.yaml",local_files_only=True)
model_path = hf_hub_download(repo_id=repo_id, cache_dir=hf_cache_dir, filename="pytorch_model.bin",local_files_only=True)其实就是在这3行代码调用的地方加了新参数
,local_files_only=True请确保模型已下载到本地,否则会报找不到模型错误
- F5-TTS 部署后正常,但pyVideotrans 里测试返回
{detail:"Not found"}- 检查是否有其他AI项目占用端口,一般有界面的AI项目多使用 gradio 界面,默认也是7860,关闭其他,重启F5-TTS
- 如果pyVideotrans是源码部署的,请执行
pip install --upgrade gradio_client然后重试 - 重启F5-TTS,使用命令
f5-tts_infer-gradio --api启动