从零到一:构建一个 Chatterbox-TTS API 服务
最近,在研究 Chatterbox-TTS 这个项目,它不仅效果出色,还支持声音克隆(Voice Cloning),这为个性化语音合成打开了想象空间,唯一可惜仅仅支持英语。
为了能更方便地在各种项目中使用它,我决定为其封装一个稳定、高效、易于集成的 API 服务。这篇文章详细记录我从零开始构建这个服务的全过程——从最初的技术选型、API 设计,到踩坑、填坑,再到最终形成一个可供多人使用的健壮系统。
想要一个怎样的 TTS 服务?
在敲下第一行代码前,清晰的目标至关重要。我希望这个服务不仅仅是一个能跑起来的脚本,而是一个具备“准生产级”质量的项目。我的核心需求如下:
- 功能强大:
- 基础 TTS: 提供标准的文字转语音功能。
- 声音克隆: 支持上传参考音频,生成具有相同音色的语音。
- 接口友好:
- 兼容性: 提供一个与 OpenAI TTS API 完全兼容的接口,这样任何支持 OpenAI SDK 的应用都能无缝迁移过来。
- 专用性: 提供一个功能更全面的专用接口,用于声音克隆。
- 易于使用:
- Web UI: 一个直观的前端界面,让非开发者也能快速上手体验。
- 一键部署: 特别是为 Windows 用户,提供一个开箱即用的解决方案。
- 稳定高效:
- 性能过得去的服务器: 使用
waitress代替 Flask 自带的开发服务器,以支持多线程并发。 - 健壮性: 必须处理好环境依赖(如
ffmpeg)、文件 I/O、跨平台兼容性等问题。 - 性能: 支持 GPU 加速,并提供便捷的升级方式。
- 性能过得去的服务器: 使用
技术选型与架构设计
基于以上目标,我确定了项目的技术栈和基本架构:
- 后端框架: Flask。轻量、灵活,非常适合快速构建 API 服务。
- WSGI 服务器: Waitress。一个纯 Python 实现的生产级服务器,跨平台且易于部署。
- 核心 TTS 引擎: Chatterbox TTS。
- 前端: 原生 JS/HTML/CSS。为了保持项目的轻量和零依赖,我决定不引入任何前端框架。
- 核心依赖:
ffmpeg用于音频格式转换,torch和torchaudio作为 TTS 模型的底层支持。
API 接口设计
POST /v1/audio/speech: OpenAI 兼容接口。接收 JSON 数据,核心字段为input(文本)。为了增强兼容性,我决定利用speed和instructions这两个 OpenAI 不常用的参数来传递cfg_weight和exaggeration。POST /v2/audio/speech_with_prompt: 声音克隆接口。接收multipart/form-data,包含input(文本) 和audio_prompt(参考音频文件) 等字段。
核心实现与踩坑实录
构建过程并非一帆风顺,下面是我遇到的几个关键问题以及我的解决思路和最终实现。
1. 坑一:Windows 上的文件锁定 PermissionError
这是我在开发过程中遇到的第一个,也是最棘手的一个问题。
问题复现: 在声音克隆接口中,我需要接收用户上传的音频文件,保存为临时文件,然后传递给 Chatterbox 模型。我最初的代码是这样的:
# 最初的错误代码
with tempfile.NamedTemporaryFile(suffix=".mp3") as temp_audio:
    # 接收到的文件对象 audio_file (werkzeug.FileStorage)
    audio_file.save(temp_audio.name) # <--- 第一次尝试,Windows下报错
    # ...
model.generate(text, audio_prompt_path=temp_audio.name) # <--- 第二次尝试,还是报错在 Windows 上,这段代码会直接抛出 PermissionError: [Errno 13] Permission denied。
原因分析: 这个问题的根源在于 Windows 的文件锁定机制。tempfile.NamedTemporaryFile 在 with 语句块内会一直保持文件句柄为打开状态。而 audio_file.save() 或 librosa.load()(被 model.generate 内部调用)都试图以写入或读取模式重新打开这个已经被锁定的文件,从而导致权限错误。Linux 和 macOS 的文件锁定机制更宽松,所以这个问题在这些平台上并不明显。
解决方案: 放弃在 with 块内操作。我必须采用一种“手动管理”临时文件的模式,确保在一个操作(如保存或读取)完成并关闭文件后,再进行下一个操作。
最终代码:
import tempfile
import uuid
import os

# ... 在 API 路由函数内 ...
temp_upload_path = None
temp_wav_path = None
try:
    # 1. 生成唯一的临时文件路径(此时不创建文件)
    temp_dir = tempfile.gettempdir()
    temp_upload_path = os.path.join(temp_dir, f"{uuid.uuid4()}.mp3")

    # 2. 调用 .save()。这个方法会打开、写入、然后自动关闭文件,释放锁。
    audio_file.save(temp_upload_path)

    # 3. 将上传文件转换为模型需要的WAV格式
    temp_wav_path = os.path.join(temp_dir, f"{uuid.uuid4()}.wav")
    convert_to_wav(temp_upload_path, temp_wav_path) # 自定义转换函数

    # 4. 此刻,temp_wav_path 是一个已关闭的文件,可以安全地传递给模型
    wav_tensor = model.generate(text, audio_prompt_path=temp_wav_path)
    # ...
finally:
    # 5. 无论成功与否,都确保清理掉所有临时文件
    if temp_upload_path and os.path.exists(temp_upload_path):
        os.remove(temp_upload_path)
    if temp_wav_path and os.path.exists(temp_wav_path):
os.remove(temp_wav_path)这个 try...finally 结构保证了代码的健壮性和资源的及时释放,是处理这类问题的最佳实践。
2. 坑二:subprocess 在 Windows 上的编码地狱 UnicodeDecodeError
在实现 ffmpeg 音频转换功能时,我再次遇到了 Windows 特有的问题。
问题复现: 我的 ffmpeg 调用函数最初是这样的:
# 导致编码错误的代码
subprocess.run(
    command,
    check=True,
    capture_output=True,
    text=True  # <--- 问题根源
)在中文 Windows 系统上,这行代码会随机抛出 UnicodeDecodeError: 'gbk' codec can't decode byte ...。
原因分析: text=True 会让 subprocess 使用系统默认编码(在中文 Windows 上是 gbk)来解码 ffmpeg 的 stderr 输出流。但 ffmpeg 的进度条和一些日志信息包含的特殊字节在 gbk 编码中是非法的,从而导致解码失败。
解决方案: 直接告诉 subprocess 我们想要用什么编码。这是最直接、最优雅的解决方式。
最终代码:
subprocess.run(
    command,
    check=True,
    capture_output=True,
    text=True,            # 保持 text=True 的便利性
    encoding='utf-8',     # 明确指定使用 UTF-8 解码
    errors='replace'      # 如果遇到解码错误,用'�'替换,而不是崩溃
)通过添加 encoding='utf-8' 和 errors='replace',我强制使用通用的 UTF-8 编码,并增加了错误容忍度。这使得函数在任何语言环境下都能稳定运行。
3. 坑三:二进制流与文本流的抉择
在将生成的 wav_tensor 转换为 MP3 时,我需要通过管道(pipe)将 WAV 字节流传递给 ffmpeg,并接收 ffmpeg 输出的 MP3 字节流。
原因分析: 这里的关键是,标准输入(stdin)和标准输出(stdout)都是二进制数据,而标准错误(stderr)是文本信息。如果在 subprocess.run 中错误地使用了 text=True,Python 就会尝试去解码 MP3 的二进制数据,导致数据损坏或程序崩溃。
解决方案: 在处理这种混合流时,不使用 text=True。让 subprocess 返回原始的 bytes 对象,然后在 except 块中,我们只对 e.stderr 这个字节串进行手动解码以供调试打印。
最终代码:
def convert_wav_to_mp3(wav_tensor, sample_rate):
    # ...
    try:
        result = subprocess.run(
            command,
            input=wav_data_bytes, # input 接收字节数据
            capture_output=True,  # stdout 和 stderr 都是字节
            check=True
        )
        return io.BytesIO(result.stdout) # result.stdout 是 MP3 二进制数据
    except subprocess.CalledProcessError as e:
        # 只在需要显示错误时,才解码 stderr
        stderr_output = e.stderr.decode('utf-8', errors='ignore')
# ...如何使用我的服务?
经过一番打磨,这个 TTS 服务已经非常易于使用。
1. Web 界面
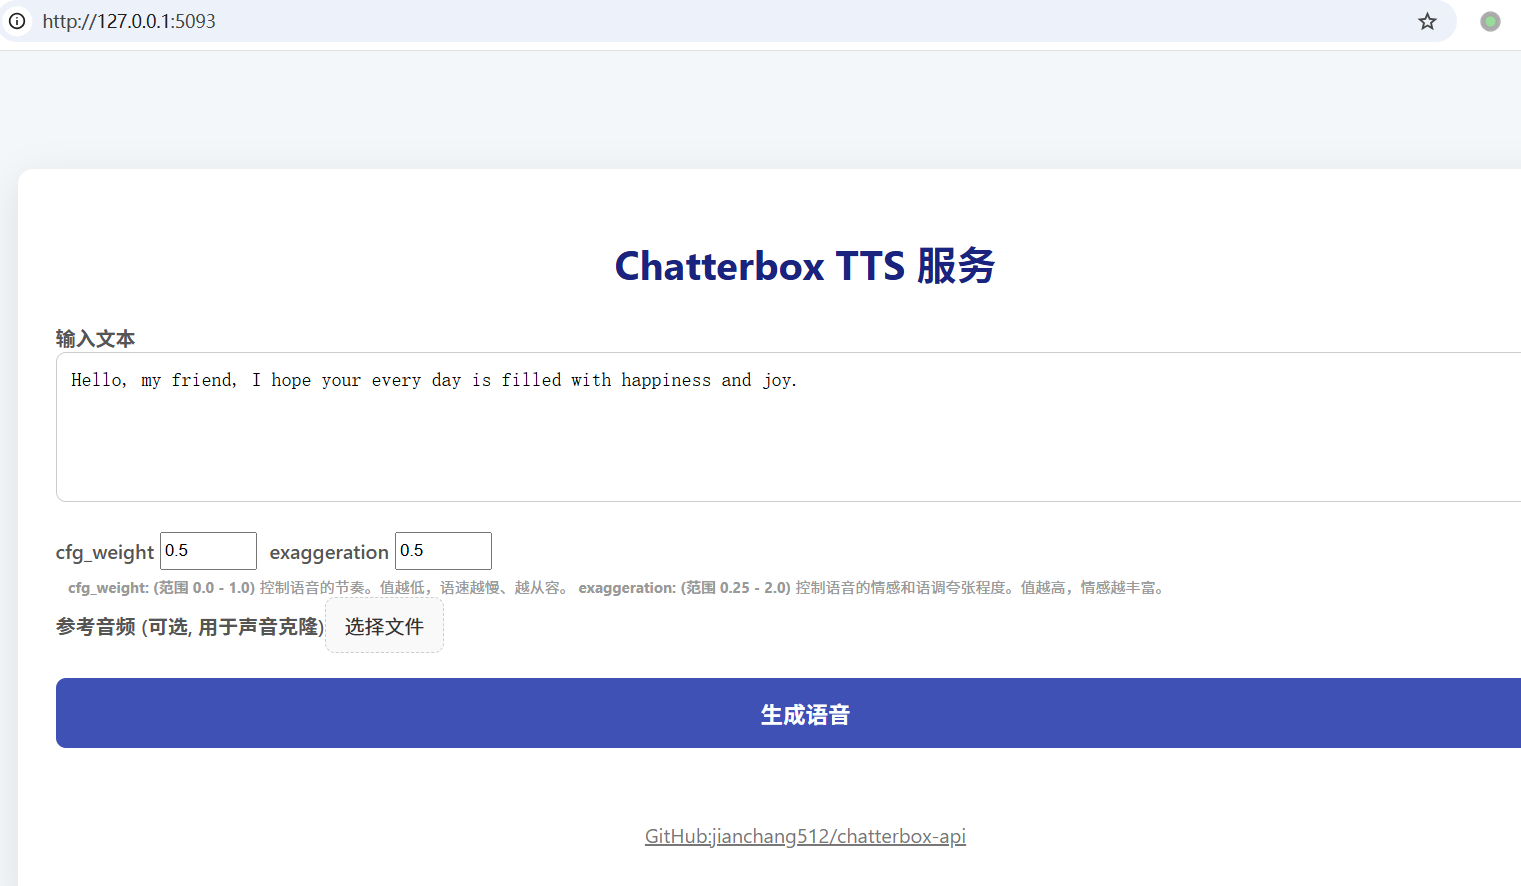
最简单的方式。启动服务后,在浏览器打开 http://127.0.0.1:5093。输入文本,(可选)上传一段你的声音作为参考音频,点击生成,即可听到克隆出的声音。
2. API 调用 (for Developers)
无参考音频 (OpenAI SDK):
pythonfrom openai import OpenAI client = OpenAI(base_url="http://127.0.0.1:5093/v1", api_key="any") response = client.audio.speech.create( model="chatterbox", input="Hello, this is a test.", response_format="mp3" ) response.stream_to_file("output.mp3")有参考音频的声音克隆 (requests):
pythonimport requests with open("my_voice.wav", "rb") as f: response = requests.post( "http://127.0.0.1:5093/v2/audio/speech_with_prompt", data={'input': 'This voice sounds like me!'}, files={'audio_prompt': f} ) with open("cloned_output.mp3", "wb") as f: f.write(response.content)
3. 与 pyVideoTrans 集成:
对于视频创作者来说,这个服务还能与 pyVideoTrans 无缝集成,为视频提供高质量的英文配音。只需在 pyVideoTrans 的设置中填入本服务的 API 地址即可。
从一个简单的想法,到一个功能完善、文档齐全、部署友好的开源项目,这个过程充满了挑战,也带来了巨大的成就感。通过解决 Windows 文件锁定、跨平台编码等一系列棘手的问题,我不仅加深了对 Python 底层 I/O 和进程管理的理解,也打造出了一个真正“能用”且“好用”的工具。