从CMD到PowerShell, 解决powershell上无法运行ps1脚本问题(Scripts Activate.ps1)
对于许多 Windows 上的 Python 开发者来说,CMD (命令提示符) 就像一位忠诚的老朋友,它朴实无华,几乎从不出错。但随着我们对效率和功能的追求,PowerShell使用的越来越多。
然而,当你满怀期待地在 PowerShell 中敲下熟悉的命令时,却可能遭遇一个无情的红色错误,仿佛新世界在对你说“不”:
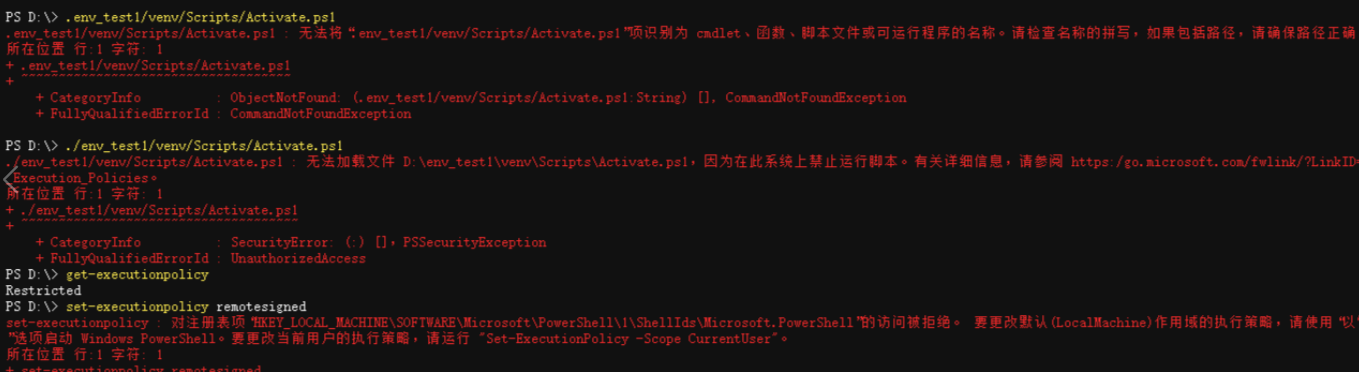
PS C:\my_project> .\venv\Scripts\activate
.\venv\Scripts\activate : 无法加载文件 activate.ps1 ... 因为在此系统上禁止运行脚本。
+ ~~~~~~~~~~~~~~~~~~~~~~~~~~~~~~~~~~~~~
    + CategoryInfo          : SecurityError: (:) [],PSSecurityException
+ FullyQualifiedErrorId : UnauthorizedAccess为什么会这样呢,继续往下阅读
CMD 的舒适区:为什么它“从不出错”?
让我们先回顾一下在 CMD 中的美好时光。激活虚拟环境的命令通常是这样的:

C:\my_project> venv\Scripts\activate
(venv) C:\my_project>为什么这么简单?因为你实际上运行的是一个名为 activate.bat 的批处理文件。CMD 的设计哲学就是执行批处理命令,它的安全模型非常宽松,默认允许你运行这些 .bat 文件。它简单,可靠,但功能也相对基础。
为什么要切换到 PowerShell?
既然 CMD 这么省心,我们为什么还要“自找麻烦”呢?因为 PowerShell 带来的效率提升是巨大的:
- 智能的 Tab 自动补全:比 CMD 的补全功能强大得多,能提示命令、参数、路径等。
- Linux 化的命令别名:可以直接使用
ls,clear,cp,mv等熟悉的命令,无缝切换开发环境。 - 强大的管道和对象操作:可以将一个命令的输出(作为结构化对象)传递给另一个命令,进行复杂的处理,这是 CMD 无法比拟的。
- 优秀的终端体验:在 Windows Terminal 中,PowerShell 可以实现多窗格、多标签页、丰富的颜色和自定义配置,颜值和功能兼备。
结论是:绝对值得! 最初的这一点点配置麻烦,将换来长期的开发效率提升。
PowerShell 的“考验”:理解执行策略
当你从 CMD 切换到 PowerShell 后,激活虚拟环境的命令也发生了变化。你不再运行 .bat 文件,而是运行一个为 PowerShell 专门准备的脚本:activate.ps1。
这就是问题的核心。
PowerShell 将所有 .ps1 文件都视为脚本,并引入了一个重要的安全机制——执行策略 (Execution Policy)。它像一个“安全门卫”,默认情况下,它的策略是 Restricted (受限制的),即禁止运行任何脚本,以防你意外执行恶意代码。
所以,当你运行 .\venv\Scripts\activate 时,实际上是请求“门卫”放行 activate.ps1 这个脚本。门卫一看:“不行,我的规则是禁止所有脚本”,于是拒绝了你,并给出了那段红色的错误提示。
一次性解决:为你的 PowerShell “开绿灯”
开头的问题就在这里解决,核心是调整策略为 RemoteSigned
要解决这个问题,我们只需要调整“门卫”的规则,告诉他:“我自己写的、本地的脚本是安全的,请允许运行”。我们推荐使用 RemoteSigned 策略,它在安全和便利之间取得了完美平衡。
RemoteSigned 策略意味着:
- 允许运行你本地创建的所有脚本(如
activate.ps1)。 - 从网络下载的脚本,则必须有数字签名才能运行。
操作步骤(一劳永逸)
修改系统级的执行策略需要管理员权限。
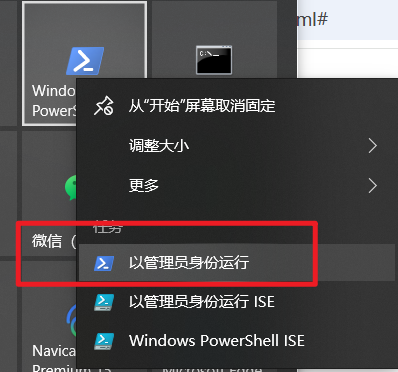
1. 以管理员身份打开 PowerShell
- 在开始菜单搜索
powershell。 - 右键点击“Windows PowerShell”,选择 “以管理员身份运行”。
2. 执行修改命令 在弹出的管理员窗口中,输入以下命令并按回车:
Set-ExecutionPolicy RemoteSigned
3. 确认更改 系统会询问你是否确认更改。输入 Y 然后按回车。
执行策略更改
...
[Y] 是(Y)  [A] 全是(A)  [N] 否(N)  [L] 全否(L)  [S] 暂停(S)  [?] 帮助 (默认值为“N”): Y
如果没有报错,说明你已成功!现在可以关闭这个管理员窗口了。
备选方案(如果无管理员权限)
如果你没有管理员权限,也可以只为当前用户修改策略。在普通 PowerShell 窗口中执行:
Set-ExecutionPolicy -Scope CurrentUser RemoteSigned同样输入 Y 确认即可。
拥抱新流程:在 PowerShell 中丝滑操作
现在,你的 PowerShell 已经准备就绪。让我们来体验一下全新的、高效的 Python 虚拟环境工作流。
- 创建python虚拟环境 (
cd到项目目录后):powershellpython -m venv venv - 激活环境:powershell看!命令行提示符前出现了
.\venv\Scripts\activate(venv),成功了!powershell(venv) PS C:\my_project> - 退出环境:powershell
(venv) PS C:\my_project> deactivate
cmd与PowerShell异同快速参考
从 CMD 到 PowerShell 的转变,可能会因为执行策略而遇到一个小小的坎,但这更像是一个“成年礼”。一旦你完成了这个一次性的配置,你将打开一扇通往更高效、更愉悦的开发体验的大门。
| 操作 | CMD (老朋友) | PowerShell (新伙伴) |
|---|---|---|
| 激活命令 | venv\Scripts\activate | .\venv\Scripts\activate |
| 运行文件 | activate.bat (批处理) | activate.ps1 (脚本) |
| 首次遇阻 | 几乎不会 | 常见,因执行策略 |
| 解决方案 | 无需 | 以管理员身份运行 Set-ExecutionPolicy RemoteSigned |
欢迎来到 PowerShell 的世界,享受它带来的强大与便捷吧!