告别CUDA配置噩梦:从一次经典的“版本不匹配”问题谈起
对于每一位使用或开发AI工具的朋友来说,NVIDIA CUDA的配置几乎是无法绕开的第一道门槛。它强大,但有时也显得“娇气”。一次小小的疏忽,就可能导致数小时的排错。
今天,我们将通过一个非常真实的安装失败案例,深入剖析其中最常见的一个“陷阱”——NVIDIA驱动版本与CUDA工具包版本不匹配,并以此为契机,全面梳理CUDA配置中的关键注意事项。
案例分析:当 nvcc 和 nvidia-smi “各执一词”
让我们来看一张典型的“事故现场”截图:
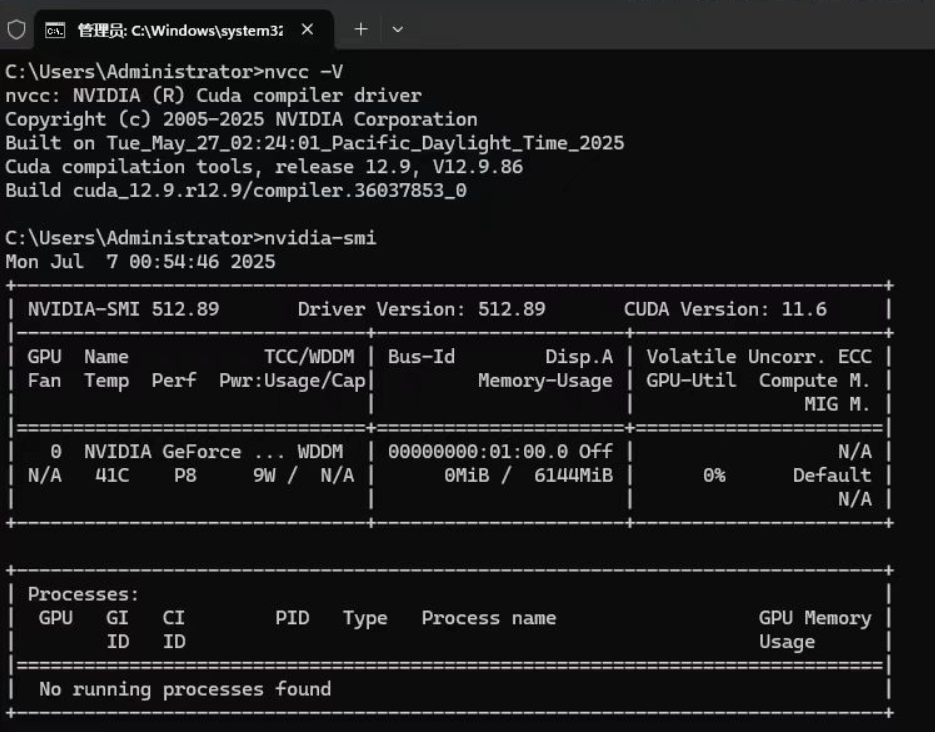
这位用户在命令行中执行了两个关键命令,却得到了看似矛盾的结果:
nvcc -V命令的输出C:\Users\Administrator>nvcc -V nvcc: NVIDIA (R) Cuda compiler driver ... Cuda compilation tools, release 12.9, V12.9.86 ...这个命令告诉我们,用户在他的系统中安装的CUDA工具包(CUDA Toolkit)版本是 12.9。CUDA工具包包含了编译器(nvcc)、开发库(cuBLAS, cuFFT等)和API,是我们用来编译和开发CUDA程序的“工具箱”。
nvidia-smi命令的输出+-----------------------------------------------------------------------------+ | NVIDIA-SMI 512.89 Driver Version: 512.89 CUDA Version: 11.6 | +-----------------------------------------------------------------------------+这个命令则展示了显卡驱动层面的信息。这里有两个关键信息点:
Driver Version: 512.89: 当前系统的NVIDIA显卡驱动版本是 512.89。CUDA Version: 11.6: 这是最容易让人困惑的地方! 这里的CUDA版本不是指你安装的工具包版本,而是指你当前的驱动程序(512.89)最高能够支持的CUDA运行时(Runtime)版本。
问题的核心:驱动与工具包的“代沟”
现在,我们将两条线索拼凑起来,问题就水落石出了:
您试图在一个最高只支持CUDA 11.6运行时的旧驱动环境上,使用需要CUDA 12.9运行时的新版工具包。
打个比方:这就像你用最新的蓝光播放器软件(CUDA Toolkit 12.9)去播放一张蓝光碟,但你的电脑里装的还是一个只认识DVD光盘的老旧光驱驱动(NVIDIA Driver for 11.6)。当你点击“播放”时,系统自然会告诉你:“对不起,我不认识这个新格式。”
在实际应用中,这意味着任何你用CUDA 12.9工具包编译的程序,在运行时都会因为找不到匹配的驱动支持而失败,通常会抛出类似 CUDA driver version is insufficient for CUDA runtime version 的致命错误。
解决方案:两种路径,一个最优选
方案一:升级NVIDIA驱动程序(强烈推荐)
这是最直接、最正确、最一劳永逸的方法。保持驱动程序更新,可以享受到最新的性能优化、bug修复和对新硬件/软件的支持。
- 访问官网:前往 NVIDIA官方驱动下载页面。
- 选择型号:准确选择你的显卡型号(如 GeForce RTX 4090)、操作系统(如 Windows 11)和驱动类型(通常选择 Game Ready Driver 或 Studio Driver 均可)。
- 下载安装:下载最新的驱动程序。在安装过程中,推荐选择“自定义安装”,并勾选“执行清洁安装”选项。这会移除旧的驱动文件,避免潜在的冲突。
- 验证结果:安装完成后,重启电脑。再次打开命令行输入
nvidia-smi,你会发现Driver Version已经更新,并且右上角的CUDA Version也已经提升到了12.x或更高,问题解决!
(通常,支持CUDA 12.x的驱动版本号需要达到525.xx或更高。)
方案二:降级CUDA工具包(备用方案)
在某些特殊情况下,比如你的项目强制要求使用某个旧版本的CUDA,或者你的硬件已经不再受新驱动支持,你才需要考虑这个方案。
- 卸载当前工具包:在系统的“添加或删除程序”中,卸载所有与CUDA 12.9相关的组件。
- 下载旧版本:访问 NVIDIA CUDA Toolkit Archive,找到与你驱动兼容的版本(根据
nvidia-smi显示,可以选择11.6或更低版本)。 - 重新安装:安装下载好的旧版本CUDA工具包。
举一反三:CUDA配置的黄金法则
为了避免未来再次陷入类似的困境,请记住以下几条黄金法则:
- 先驱动,后工具包:安装顺序至关重要。始终先安装或更新好你的NVIDIA显卡驱动,再安装CUDA工具包。
- 理解两个“CUDA版本”:
nvidia-smi里的CUDA Version:是驱动程序能支持的最高CUDA运行时版本,代表了**“能力上限”**。nvcc -V里的Cuda version:是你安装的CUDA工具包的版本,代表了**“当前需求”**。- 法则:前者的版本号必须大于或等于后者的版本号。
- 检查兼容性:在安装前,可以查阅CUDA工具包的发行说明(Release Notes),里面会明确指出所需的最低驱动版本。
- 配置好环境变量:安装CUDA工具包后,确保系统环境变量
CUDA_HOME和Path已被正确设置。通常安装程序会自动处理,但有时需要手动检查和修改,以确保系统能找到nvcc等命令。 - 验证安装:安装完成后,除了运行
nvidia-smi和nvcc -V,最好的验证方式是编译并运行CUDA Samples。进入CUDA工具包的安装目录(如C:\Program Files\NVIDIA GPU Computing Toolkit\CUDA\v12.x\extras\demo_suite),运行deviceQuery.exe和bandwidthTest.exe。如果两者都成功运行并显示Result = PASS,那么恭喜你,你的CUDA环境已经准备就绪!