Everyone knows that Microsoft Edge has a powerful text-to-speech feature that supports dozens of languages, each with different voice options for pronunciation, delivering excellent results.
Based on this, developers have created a Python package called edge-tts. This package allows the use of Microsoft's TTS service in programs for dubbing text or subtitles. For example, the video translation software pyVideoTrans integrates edge-tts, enabling users to select it directly in the dubbing channel.
Unfortunately, there has been significant misuse of Microsoft TTS by users in China, including using it for commercial dubbing sales. This has led Microsoft to restrict access from China. If used too frequently, you may encounter a 403 error, and only switching IPs or connecting to a stable VPN outside China can restore access.
So, is it possible to set up a simple relay service on a foreign server for personal use? This approach can improve stability and make the interface compatible with OpenAI TTS, allowing direct use in the OpenAI SDK.
The answer is yes. I recently took the time to create a Docker image that can be easily pulled and started on a server.
Once started, the service interface is fully compatible with OpenAI. Simply change the API address to http://your-server-ip:7899/v1 to seamlessly replace OpenAI TTS. Additionally, it can be used directly in video translation software.
The following details how to deploy and use it:
Step 1: Purchase and activate a US server
Step 2: Open port 7899 in the firewall
Step 3: Connect to the server via terminal
Step 4: Install Docker
Step 5: Pull the edge-tts-api image and start the API service
If you already have a server with Docker installed, skip to Step 5 to pull the image.
Step 1: Purchase and Activate a US Server
It is recommended to choose a server in the US region due to fewer or no restrictions. The server OS can be a Linux distribution; the following uses Debian 12 as an example, with Yecaoyun as the provider. The reason for choosing it is simple: it's cheap and relatively stable, sufficient for a dubbing relay.
If you already have a Linux server in Europe or the US, you can skip this section and proceed to the next. If not, continue reading.
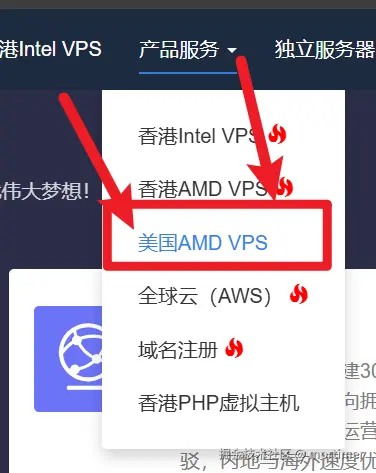
Then, choose any of the top four configurations; any should be sufficient.
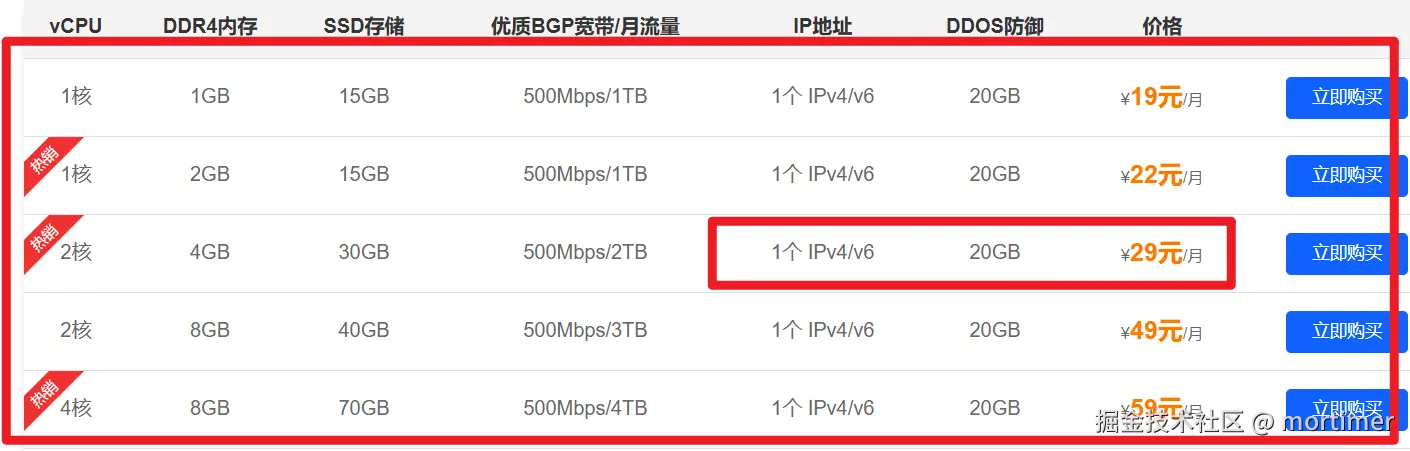
I personally use the 29 RMB/month configuration.
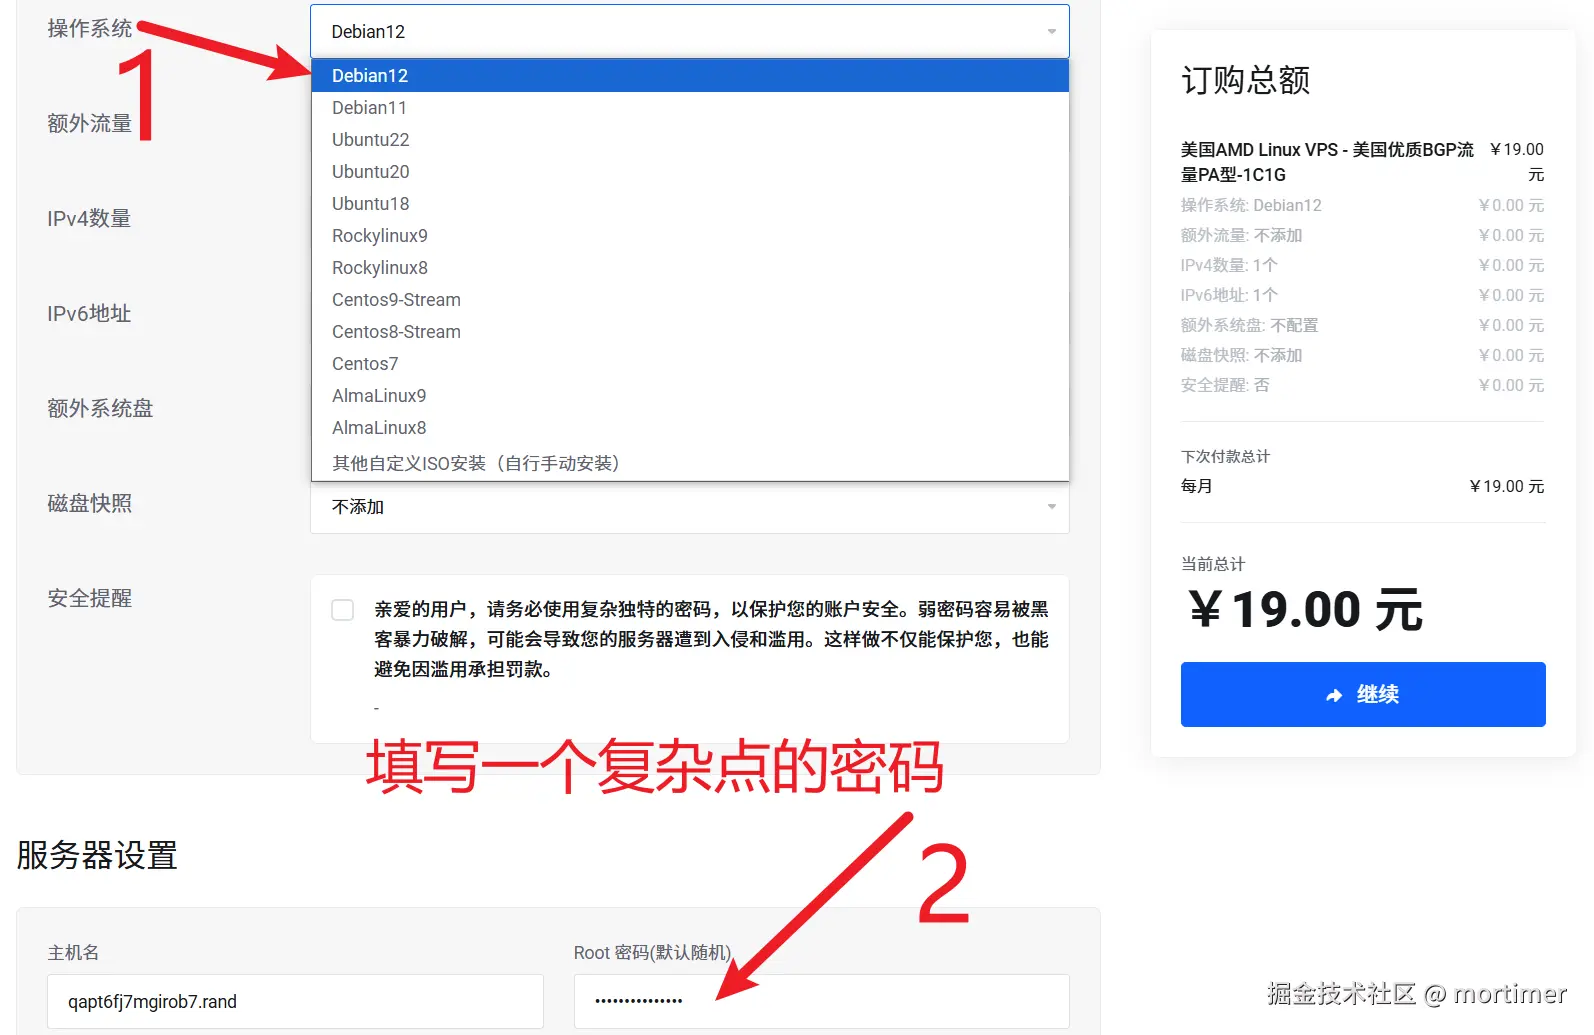
Click the "Buy Now" button to go to the configuration page. Here, select the server OS as Debian 12, set the server password, and keep the rest as default.
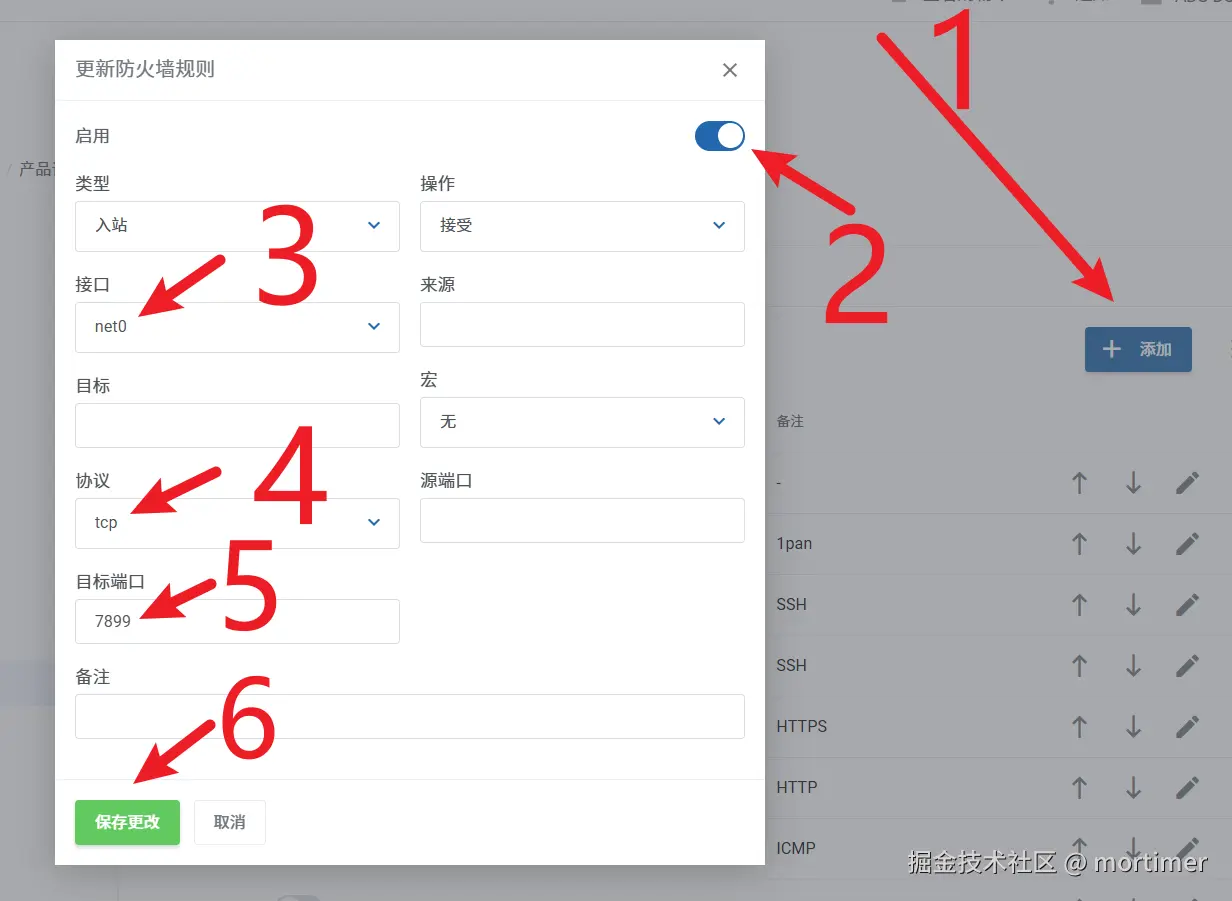
After payment, wait a few minutes for the server to be created and started. Next, you need to configure the firewall to open port 7899. Only by opening this port can you connect to the service for dubbing.
Step 2: Open Port 7899 in the Firewall
If you plan to use a domain name and configure Nginx reverse proxy, you don't need to open the port. If you're not familiar with these, for simplicity, it's recommended to open the port directly.
Firewall settings vary across different servers and panels. The following uses Yecaoyun's panel as an example; other panels can be referenced similarly. If you know how to open a port, skip this section and proceed to the next.
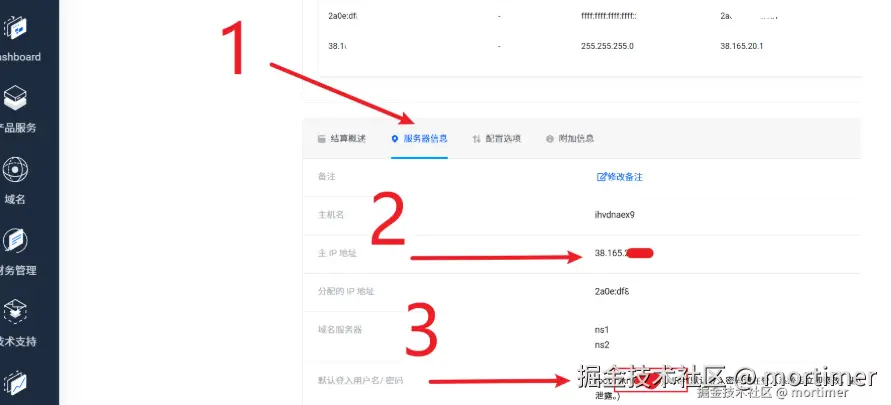
First, in "My Products & Services," click on the product you just activated to enter the product information and management page.
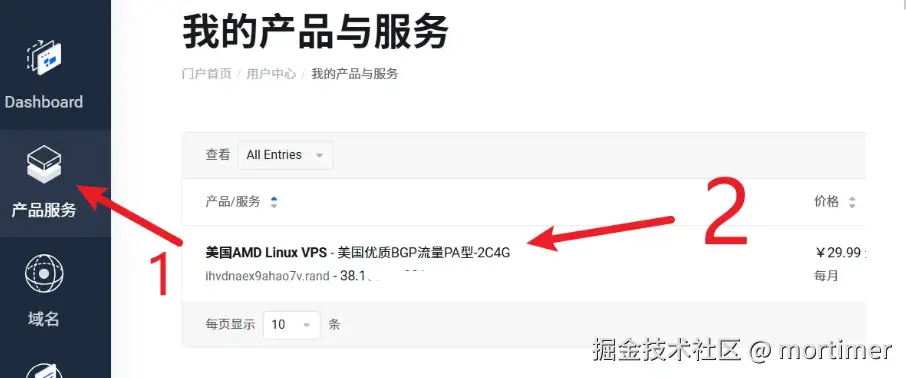
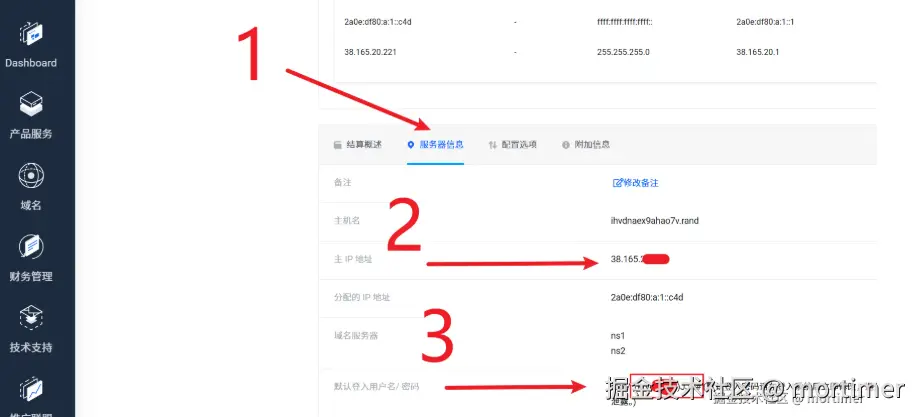
On this page, you can find the server's IP address, password, and other information.
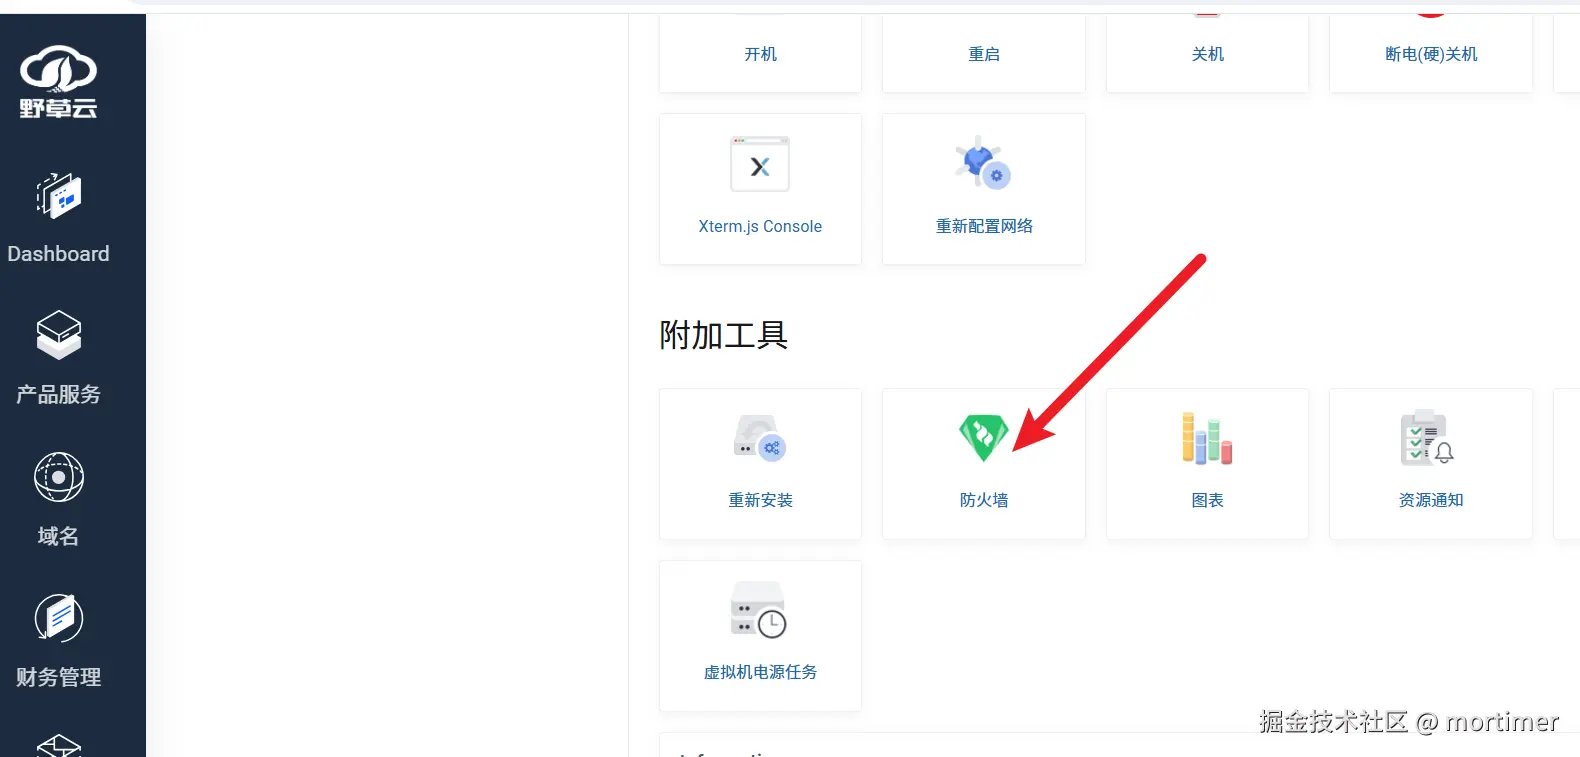
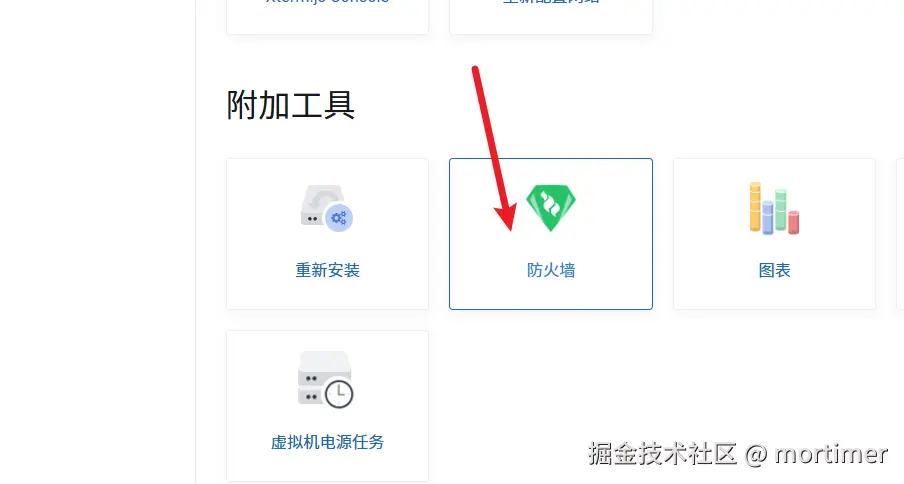
Find "Firewall" under "Additional Tools" and click to open it.
Then open port 7899 as shown below:
Step 3: Connect to the Server via Terminal
If you already know how to connect via terminal or have other SSH terminals like Xshell, skip this step and proceed to the next section.
On the product information page, find Xterm.js Console and click it. Then follow the steps below:
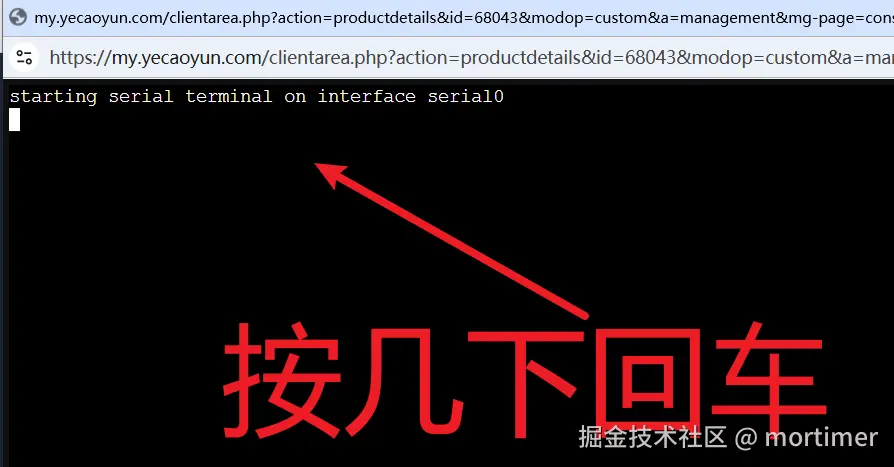
When the above appears, press Enter a few times.
When Login: appears, type root after it and press Enter. 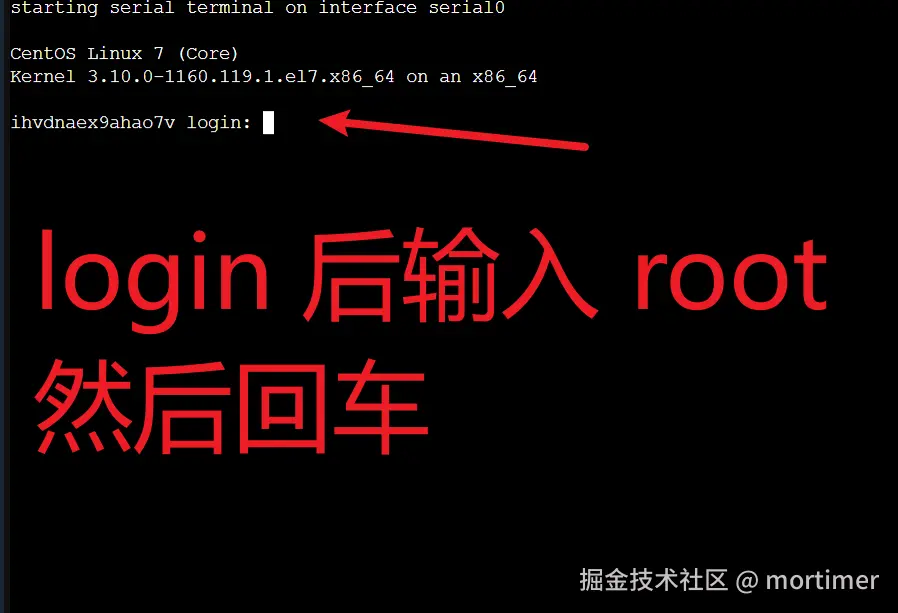
Then Password: will appear. Paste the password you copied (if forgotten, you can find it on the product information page).
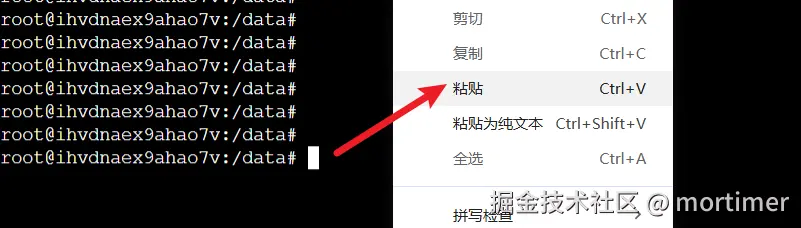
Note: Do not use Ctrl+V or right-click to paste, as this may add extra spaces or line breaks, causing password errors.
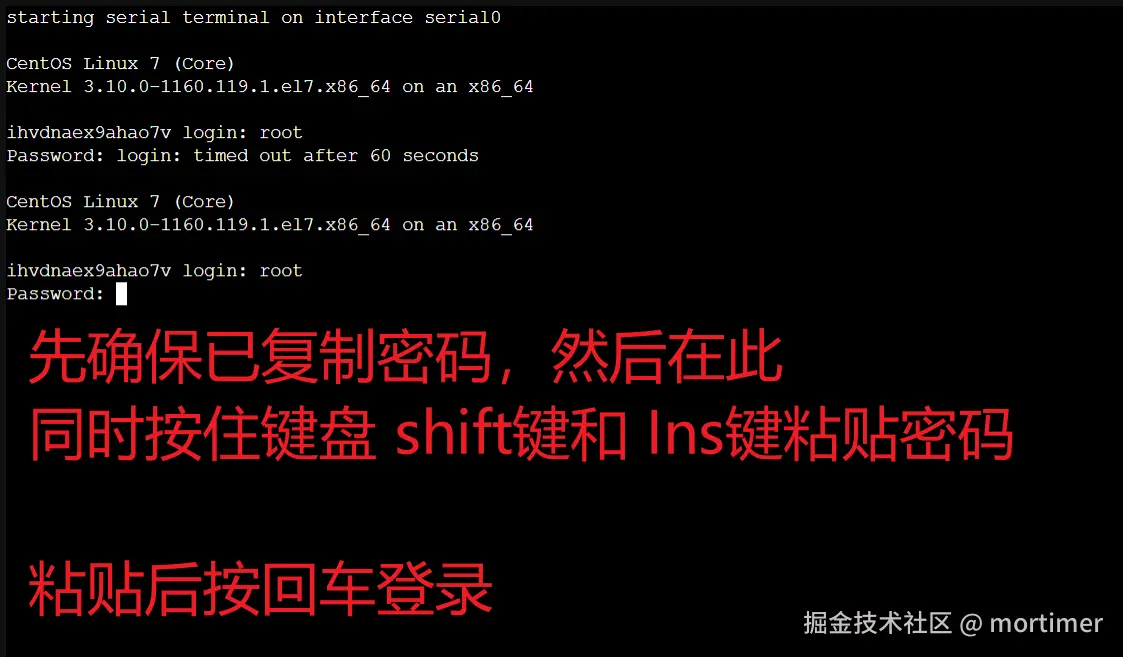
Hold Shift + Insert to paste the password to avoid login issues, then press Enter.

After successful login, it will look like the image below.

Step 4: Install Docker
If Docker is already installed on your server or you know how to install it, skip this step.
Execute the following 5 commands in order, ensuring each command completes successfully before running the next. These commands are for Debian 12 series servers.
After [root@xxxxxx~]#, right-click to paste the command, then press Enter to execute.

Command 1: sudo apt update && sudo apt install -y apt-transport-https ca-certificates curl gnupg
Command 2: curl -fsSL https://download.docker.com/linux/debian/gpg | sudo gpg --dearmor -o /usr/share/keyrings/docker-archive-keyring.gpg
Command 3: echo "deb [arch=$(dpkg --print-architecture) signed-by=/usr/share/keyrings/docker-archive-keyring.gpg] https://download.docker.com/linux/debian $(lsb_release -cs) stable" | sudo tee /etc/apt/sources.list.d/docker.list > /dev/null
Command 4: sudo apt update && sudo apt install -y docker-ce docker-ce-cli containerd.io docker-buildx-plugin
Command 5: Start Docker service. sudo systemctl start docker && sudo systemctl enable docker && sudo usermod -aG docker $USER
You can right-click to paste this command, then press Enter.
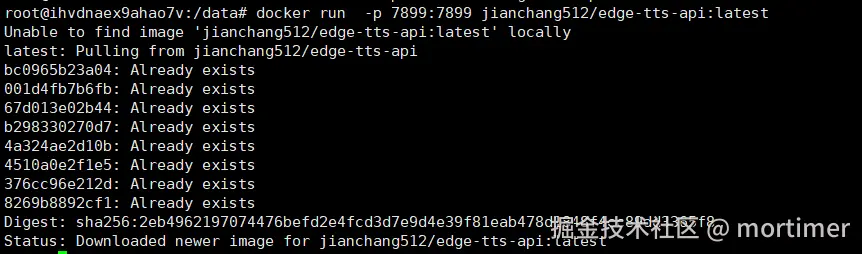
Step 5: Pull the edge-tts-api Image and Start the API Service
Enter the following command to automatically pull the image and start the service. Once started successfully, you can use it in video translation software or other tools that support OpenAI TTS.
docker run -p 7899:7899 jianchang512/edge-tts-api:latest

Press Ctrl+C repeatedly to stop the service.
Note: This command runs in the foreground. If you close the terminal window, the service will stop.
You can use the following command instead to start the service in the background, allowing you to safely close the terminal after execution.
docker run -d -p 7899:7899 jianchang512/edge-tts-api:latest
If there are no errors, the service has started successfully. You can verify by opening http://your-ip:7899/v1/audio/speech in a browser. If you see a result similar to the image below, it means the service is running.

Using in Video Translation Software
Please upgrade the software to v3.40 to use this feature. Download the upgrade from https://pyvideotrans.com/downpackage.
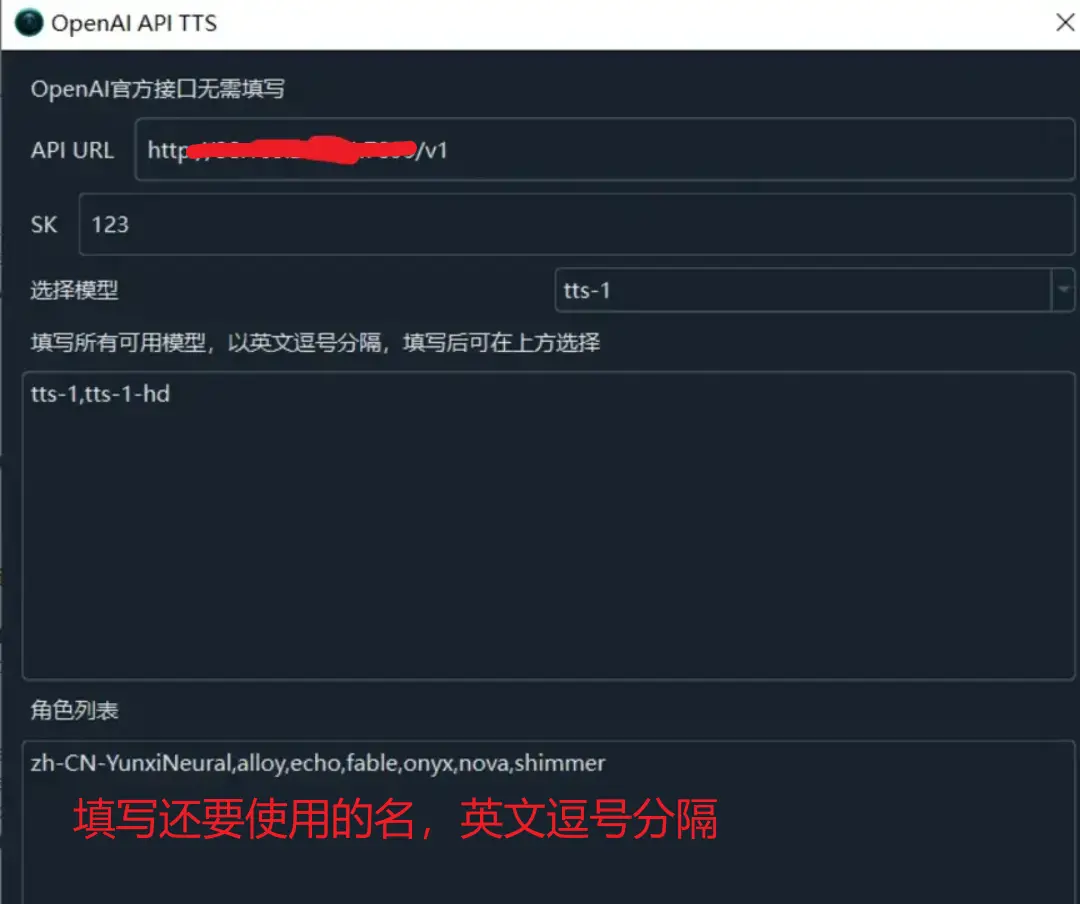
Open the menu, go to TTS Settings -> OpenAI TTS, and change the interface address to http://your-ip:7899/v1.
SK can be filled arbitrarily, as long as it's not empty. In the voice list, enter the voices you want to use, separated by English commas.
Available Voices
Below is the list of available voices. Note that the text language and voice must match.

Chinese Voices:
    zh-HK-HiuGaaiNeural
    zh-HK-HiuMaanNeural
    zh-HK-WanLungNeural
    zh-CN-XiaoxiaoNeural
    zh-CN-XiaoyiNeural
    zh-CN-YunjianNeural
    zh-CN-YunxiNeural
    zh-CN-YunxiaNeural
    zh-CN-YunyangNeural
    zh-CN-liaoning-XiaobeiNeural
    zh-TW-HsiaoChenNeural
    zh-TW-YunJheNeural
    zh-TW-HsiaoYuNeural
    zh-CN-shaanxi-XiaoniNeural

English Voices:
    en-AU-NatashaNeural
    en-AU-WilliamNeural
    en-CA-ClaraNeural
    en-CA-LiamNeural
    en-HK-SamNeural
    en-HK-YanNeural
    en-IN-NeerjaExpressiveNeural
    en-IN-NeerjaNeural
    en-IN-PrabhatNeural
    en-IE-ConnorNeural
    en-IE-EmilyNeural
    en-KE-AsiliaNeural
    en-KE-ChilembaNeural
    en-NZ-MitchellNeural
    en-NZ-MollyNeural
    en-NG-AbeoNeural
    en-NG-EzinneNeural
    en-PH-JamesNeural
    en-PH-RosaNeural
    en-SG-LunaNeural
    en-SG-WayneNeural
    en-ZA-LeahNeural
    en-ZA-LukeNeural
    en-TZ-ElimuNeural
    en-TZ-ImaniNeural
    en-GB-LibbyNeural
    en-GB-MaisieNeural
    en-GB-RyanNeural
    en-GB-SoniaNeural
    en-GB-ThomasNeural
    en-US-AvaMultilingualNeural
    en-US-AndrewMultilingualNeural
    en-US-EmmaMultilingualNeural
    en-US-BrianMultilingualNeural
    en-US-AvaNeural
    en-US-AndrewNeural
    en-US-EmmaNeural
    en-US-BrianNeural
    en-US-AnaNeural
    en-US-AriaNeural
    en-US-ChristopherNeural
    en-US-EricNeural
    en-US-GuyNeural
    en-US-JennyNeural
    en-US-MichelleNeural
    en-US-RogerNeural
    en-US-SteffanNeural

Japanese Voices:
    ja-JP-KeitaNeural
    ja-JP-NanamiNeural

Korean Voices:
    ko-KR-HyunsuNeural
    ko-KR-InJoonNeural
    ko-KR-SunHiNeural

French Voices:
    fr-BE-CharlineNeural
    fr-BE-GerardNeural
    fr-CA-ThierryNeural
    fr-CA-AntoineNeural
    fr-CA-JeanNeural
    fr-CA-SylvieNeural
    fr-FR-VivienneMultilingualNeural
    fr-FR-RemyMultilingualNeural
    fr-FR-DeniseNeural
    fr-FR-EloiseNeural
    fr-FR-HenriNeural
    fr-CH-ArianeNeural
    fr-CH-FabriceNeural

German Voices:
    de-AT-IngridNeural
    de-AT-JonasNeural
    de-DE-SeraphinaMultilingualNeural
    de-DE-FlorianMultilingualNeural
    de-DE-AmalaNeural
    de-DE-ConradNeural
    de-DE-KatjaNeural
    de-DE-KillianNeural
    de-CH-JanNeural
    de-CH-LeniNeural

Spanish Voices:
    es-AR-ElenaNeural
    es-AR-TomasNeural
    es-BO-MarceloNeural
    es-BO-SofiaNeural
    es-CL-CatalinaNeural
    es-CL-LorenzoNeural
    es-ES-XimenaNeural
    es-CO-GonzaloNeural
    es-CO-SalomeNeural
    es-CR-JuanNeural
    es-CR-MariaNeural
    es-CU-BelkysNeural
    es-CU-ManuelNeural
    es-DO-EmilioNeural
    es-DO-RamonaNeural
    es-EC-AndreaNeural
    es-EC-LuisNeural
    es-SV-LorenaNeural
    es-SV-RodrigoNeural
    es-GQ-JavierNeural
    es-GQ-TeresaNeural
    es-GT-AndresNeural
    es-GT-MartaNeural
    es-HN-CarlosNeural
    es-HN-KarlaNeural
    es-MX-DaliaNeural
    es-MX-JorgeNeural
    es-NI-FedericoNeural
    es-NI-YolandaNeural
    es-PA-MargaritaNeural
    es-PA-RobertoNeural
    es-PY-MarioNeural
    es-PY-TaniaNeural
    es-PE-AlexNeural
    es-PE-CamilaNeural
    es-PR-KarinaNeural
    es-PR-VictorNeural
    es-ES-AlvaroNeural
    es-ES-ElviraNeural
    es-US-AlonsoNeural
    es-US-PalomaNeural
    es-UY-MateoNeural
    es-UY-ValentinaNeural
    es-VE-PaolaNeural
    es-VE-SebastianNeural

Arabic Voices:
    ar-DZ-AminaNeural
    ar-DZ-IsmaelNeural
    ar-BH-AliNeural
    ar-BH-LailaNeural
    ar-EG-SalmaNeural
    ar-EG-ShakirNeural
    ar-IQ-BasselNeural
    ar-IQ-RanaNeural
    ar-JO-SanaNeural
    ar-JO-TaimNeural
    ar-KW-FahedNeural
    ar-KW-NouraNeural
    ar-LB-LaylaNeural
    ar-LB-RamiNeural
    ar-LY-ImanNeural
    ar-LY-OmarNeural
    ar-MA-JamalNeural
    ar-MA-MounaNeural
    ar-OM-AbdullahNeural
    ar-OM-AyshaNeural
    ar-QA-AmalNeural
    ar-QA-MoazNeural
    ar-SA-HamedNeural
    ar-SA-ZariyahNeural
    ar-SY-AmanyNeural
    ar-SY-LaithNeural
    ar-TN-HediNeural
    ar-TN-ReemNeural
    ar-AE-FatimaNeural
    ar-AE-HamdanNeural
    ar-YE-MaryamNeural
    ar-YE-SalehNeural

Bengali Voices:
    bn-BD-NabanitaNeural
    bn-BD-PradeepNeural
    bn-IN-BashkarNeural
    bn-IN-TanishaaNeural

Czech Voices:
    cs-CZ-AntoninNeural
    cs-CZ-VlastaNeural

Dutch Voices:
    nl-BE-ArnaudNeural
    nl-BE-DenaNeural
    nl-NL-ColetteNeural
    nl-NL-FennaNeural
    nl-NL-MaartenNeural

Hebrew Voices:
    he-IL-AvriNeural
    he-IL-HilaNeural

Hindi Voices:
    hi-IN-MadhurNeural
    hi-IN-SwaraNeural

Hungarian Voices:
    hu-HU-NoemiNeural
    hu-HU-TamasNeural

Indonesian Voices:
    id-ID-ArdiNeural
    id-ID-GadisNeural

Italian Voices:
    it-IT-GiuseppeNeural
    it-IT-DiegoNeural
    it-IT-ElsaNeural
    it-IT-IsabellaNeural

Kazakh Voices:
    kk-KZ-AigulNeural
    kk-KZ-DauletNeural

Malay Voices:
    ms-MY-OsmanNeural
    ms-MY-YasminNeural

Polish Voices:
    pl-PL-MarekNeural
    pl-PL-ZofiaNeural

Portuguese Voices:
    pt-BR-ThalitaNeural
    pt-BR-AntonioNeural
    pt-BR-FranciscaNeural
    pt-PT-DuarteNeural
    pt-PT-RaquelNeural

Russian Voices:
    ru-RU-DmitryNeural
    ru-RU-SvetlanaNeural

Swahili Voices:
    sw-KE-RafikiNeural
    sw-KE-ZuriNeural
    sw-TZ-DaudiNeural
    sw-TZ-RehemaNeural

Thai Voices:
    th-TH-NiwatNeural
    th-TH-PremwadeeNeural

Turkish Voices:
    tr-TR-AhmetNeural
    tr-TR-EmelNeural

Ukrainian Voices:
    uk-UA-OstapNeural
    uk-UA-PolinaNeural

Vietnamese Voices:
    vi-VN-HoaiMyNeural
vi-VN-NamMinhNeuralUsing in OpenAI SDK
Install the openai library: pip install openai
from openai import OpenAI

client = OpenAI(api_key='12314', base_url='http://your-ip:7899/v1')
with client.audio.speech.with_streaming_response.create(
                    model='tts-1',
                    voice='zh-CN-YunxiNeural',
                    input='Hello, dear friends',
                    speed=1.0
                ) as response:
    with open('./test.mp3', 'wb') as f:
       for chunk in response.iter_bytes():
f.write(chunk)Directly Using requests to Call
import requests
res = requests.post('http://your-ip:7899/v1', data={"voice": "zh-CN-YunxiNeural",
                    "input": "Hello, dear friends",
                    "speed": 1.0})
with open('./test.mp3', 'wb') as f:
    f.write(res.content)