MaxKB Beginner's Step-by-Step Tutorial: From Zero to One, Build Your Own AI Knowledge Base Assistant
Have you ever wanted an AI chatbot that only answers questions about your specific domain knowledge? A smart customer service agent that can answer product questions for your clients 24/7 or provide internal document queries for your employees? MaxKB is a powerful, open-source tool that can help you easily achieve this.
This article is an extremely detailed guide for beginners. It will walk you through the installation and configuration of MaxKB, delve into how to create and optimize your knowledge base, and finally provide a detailed breakdown of its most powerful "Advanced Application" feature, enabling you to truly master this tool.
1. Installing MaxKB: Three Simple Steps, Even for Beginners
For newcomers, configuring the server environment is often the first hurdle. Don't worry, we'll use the Pagoda Panel (Baota) to simplify everything.
Prepare the Docker Environment Log in to your Pagoda Panel, find and click
Dockerin the left menu bar. If it's your first time using it, the system will prompt you to install Docker. This is a fully automated process; you just need to click confirm, make a cup of tea, and wait for the installation to complete.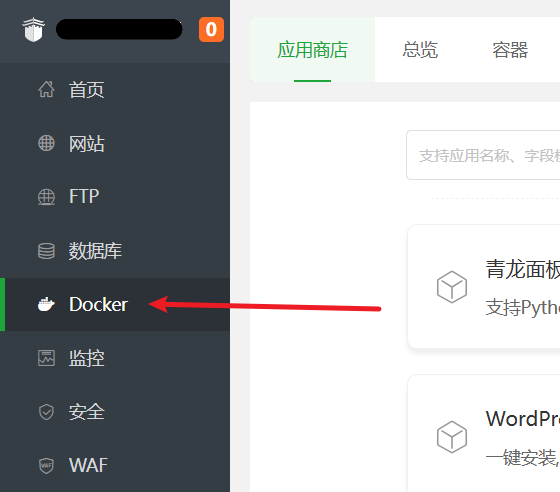
Execute the Installation Command Once the Docker environment is ready, click
Terminalon the left panel, which opens a command input window. Copy the following command, paste it in, and press Enter.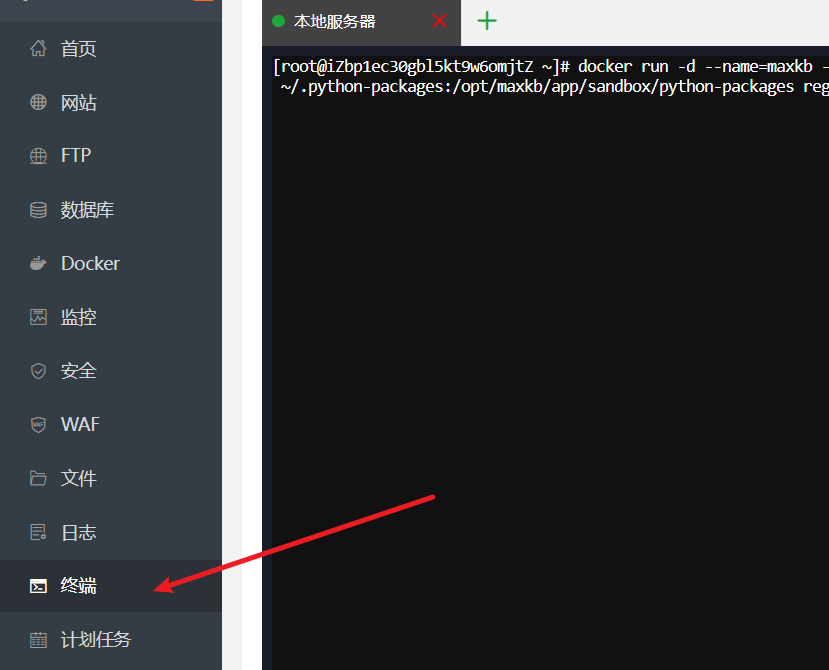 bash
bashdocker run -d --name=maxkb --restart=always -p 8080:8080 -v ~/.maxkb:/var/lib/postgresql/data -v ~/.python-packages:/opt/maxkb/app/sandbox/python-packages registry.fit2cloud.com/maxkb/maxkbWhat is this command doing?
docker run: This tells Docker to run a new container.-d: Runs the container in the background (detached mode).
--name=maxkb: Gives your container the namemaxkbfor easy management.--restart=always: Ensures the container automatically restarts if the server reboots.-p 8080:8080: Maps the server's port 8080 to the container's port 8080, allowing us to access MaxKB.-v ...: This is the most crucial step. It saves the container's data (like the database and Python packages) to your server's local storage, so your data won't be lost even if the container is deleted.
Verify the Installation Wait for the command to finish executing. Go back to the
Dockermanagement interface in the Pagoda Panel and clickContainer List. If you see a container namedmaxkbwith a status of "Running," congratulations! MaxKB has been successfully installed and started!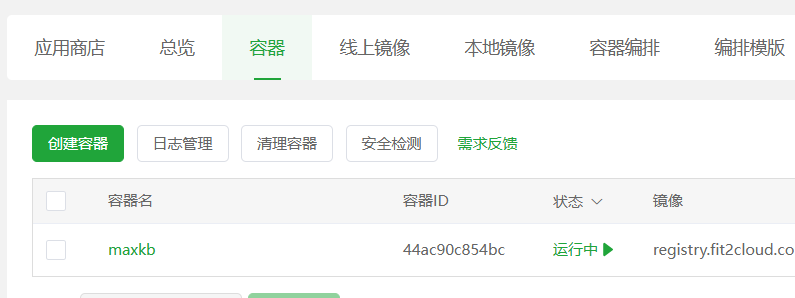
2. Configuring Nginx Reverse Proxy: Professional Access
By default, you need to access MaxKB via an address like http://your-server-ip:8080, which is neither easy to remember nor professional. Let's configure it so you can access it via your own domain name (e.g., ai.xxx.com).
Create a Site In the
Websitessection of the Pagoda Panel, clickAdd Site. Create a pure static site, fill in your prepared domain name (e.g.,ai.xxx.com), the root directory will be automatically generated (e.g.,/www/wwwroot/ai.xxx.com), just create it.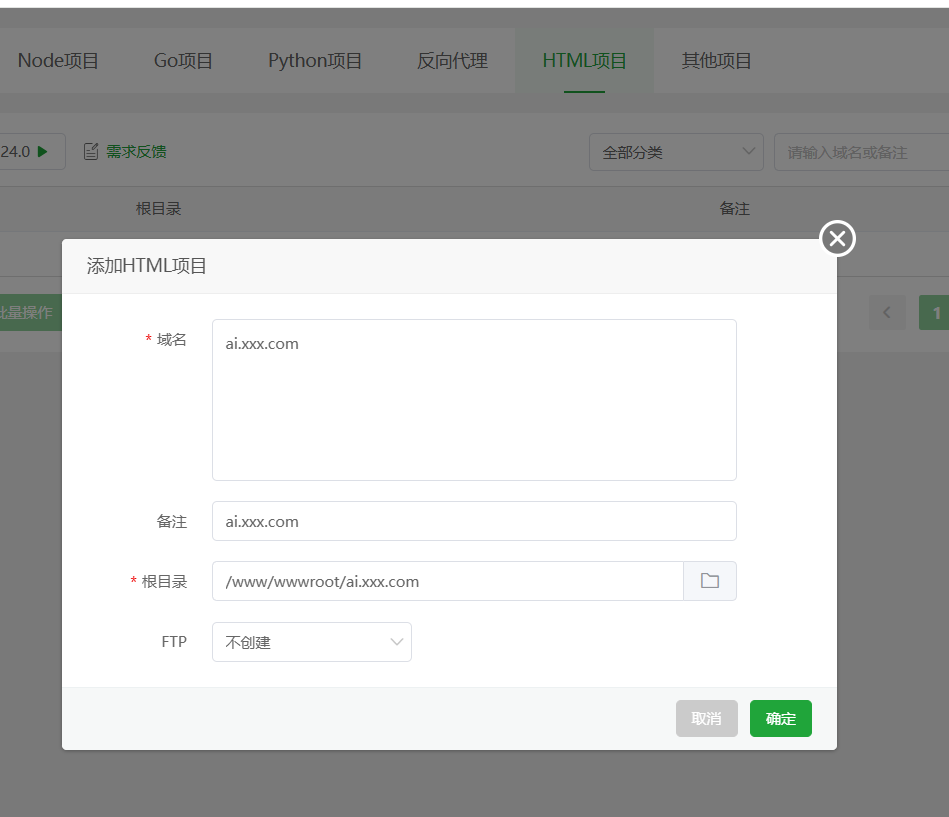 After successful creation, enter the root directory of this website (
/www/wwwroot/ai.xxx.com), and manually create an empty folder nameduiinside it.Modify the Nginx Configuration File Go back to the website list, click
Settingsnext to the site you just created, switch to theConfiguration Filetab. Find the lineroot /www/wwwroot/ai.xxx.com;, and right below it, paste the following pre-prepared configuration code:nginx# CORS settings add_header Access-Control-Allow-Origin '*' always; add_header Access-Control-Allow-Methods 'GET,POST,OPTIONS' always; add_header Access-Control-Allow-Headers 'DNT,X-Mx-ReqToken,Keep-Alive,User-Agent,X-Requested-With,If-Modified-Since,Cache-Control,Content-Type,Authorization,Access-Token,Token,formhash,shebei,token' always; # Handle OPTIONS preflight requests if ($request_method = 'OPTIONS') { return 204; } # Rule 1: Prioritize static UI resources, proxy if not found location ^~ /ui/ { add_header Cache-Control "public, max-age=2592000, immutable"; proxy_hide_header Content-Disposition; try_files $uri $uri/ @backend_proxy; } # Rule 2: Catch all other API requests location / { # Directly jump to the named location for proxying try_files $uri @backend_proxy; } location @backend_proxy { proxy_pass http://127.0.0.1:8080; proxy_set_header Host $http_host; proxy_set_header X-Real-IP $remote_addr; proxy_set_header X-Real-Port $remote_port; proxy_set_header X-Forwarded-For $proxy_add_x_forwarded_for; proxy_set_header X-Forwarded-Proto $scheme; proxy_set_header X-Forwarded-Host $host; proxy_set_header X-Forwarded-Port $server_port; proxy_set_header REMOTE-HOST $remote_addr; proxy_connect_timeout 60s; proxy_send_timeout 600s; proxy_read_timeout 600s; proxy_http_version 1.1; proxy_set_header Upgrade $http_upgrade; proxy_set_header Connection $connection_upgrade; }After pasting, click Save.
Add Docker Volume Mapping (Crucial Step) The purpose of this step is to allow Nginx to directly access the front-end interface files inside the MaxKB container, achieving separation of static and dynamic content, which can significantly speed up page loading.
- Go to Pagoda Panel
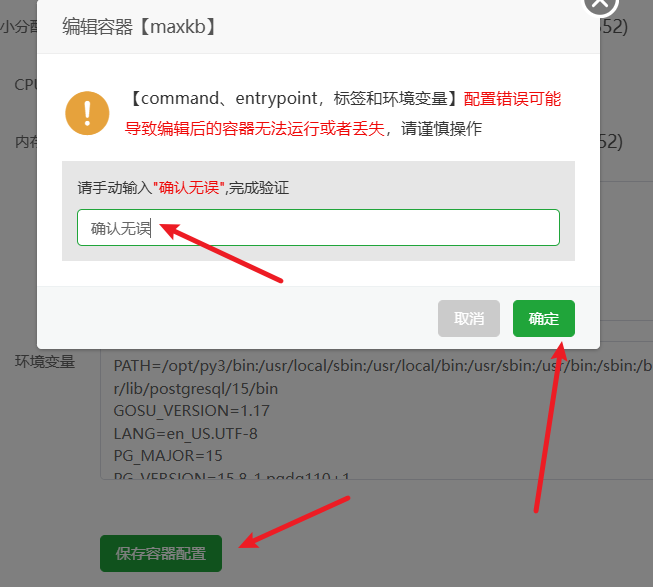
Docker->Containers-> Find themaxkbcontainer -> ClickManage->Edit Container. - Click
More settings, click to view, find theMount/Mappingsection. - Click
Host Directory, add a new mapping rule:- Host Directory: Enter
/www/wwwroot/ai.xxx.com/ui(theuifolder you created in step 1) - Container Directory: Enter
/opt/maxkb/app/ui/dist/ui(This is the fixed path for UI files inside the MaxKB container, just copy and paste it)

- Host Directory: Enter
- Scroll to the bottom of the page and click Save. The container will automatically restart to apply the new settings.
All set! Now, open your browser, enter your domain name
http://ai.xxx.com/ui, and you should see the MaxKB login interface.- Go to Pagoda Panel
3. Using a Custom Vector Model: m3e-base
What is a vector model? Simply put, it's like a "translator" that converts our text (like your documents and user questions) into a mathematical language (vectors) that computers can understand. Only with accurate "translation" can the computer accurately find the most relevant content in your knowledge base.
Although MaxKB comes with a built-in vector model, we can replace it with a model that performs better on Chinese text, such as m3e-base.
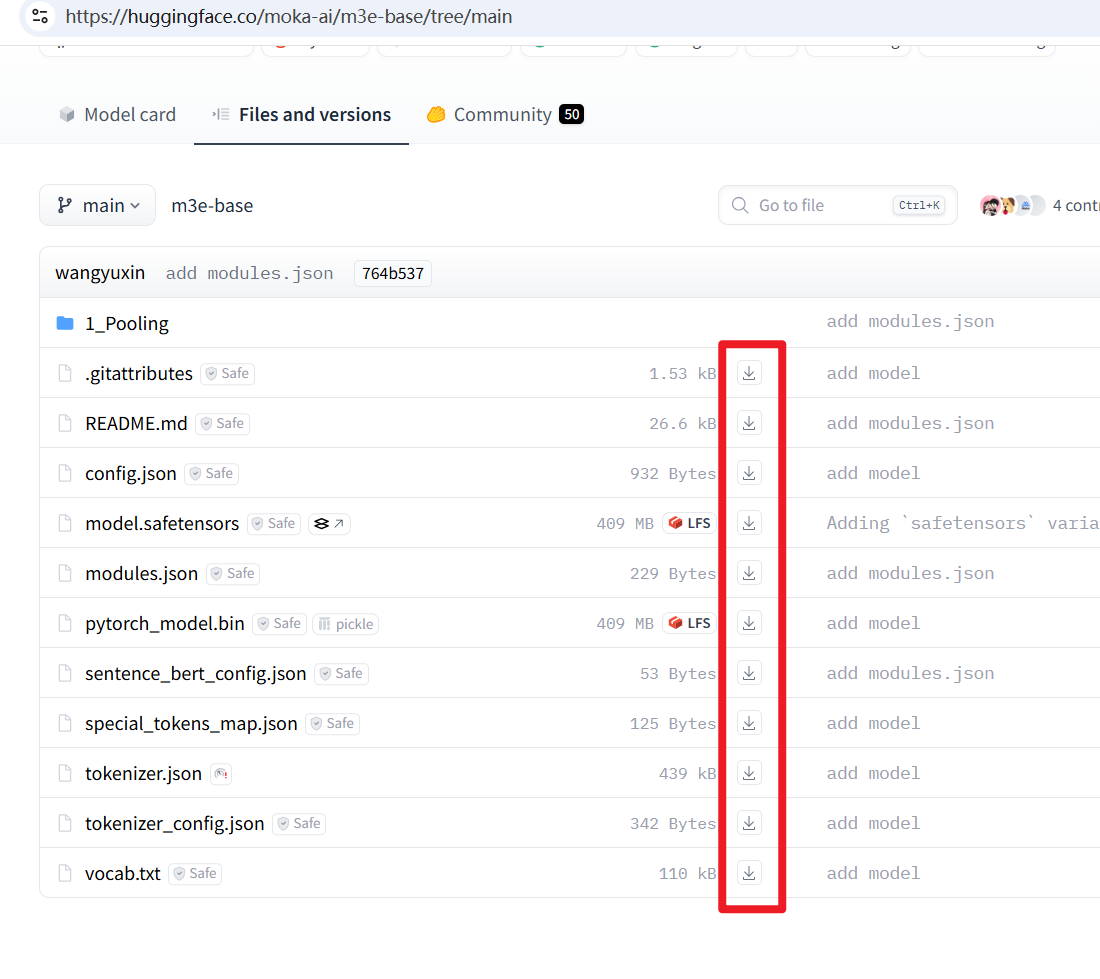
- Download the Model Files: Visit the Hugging Face model page https://huggingface.co/moka-ai/m3e-base/tree/main, download all the files you see on the page to your computer.
- Create and Upload the Model on the Server:
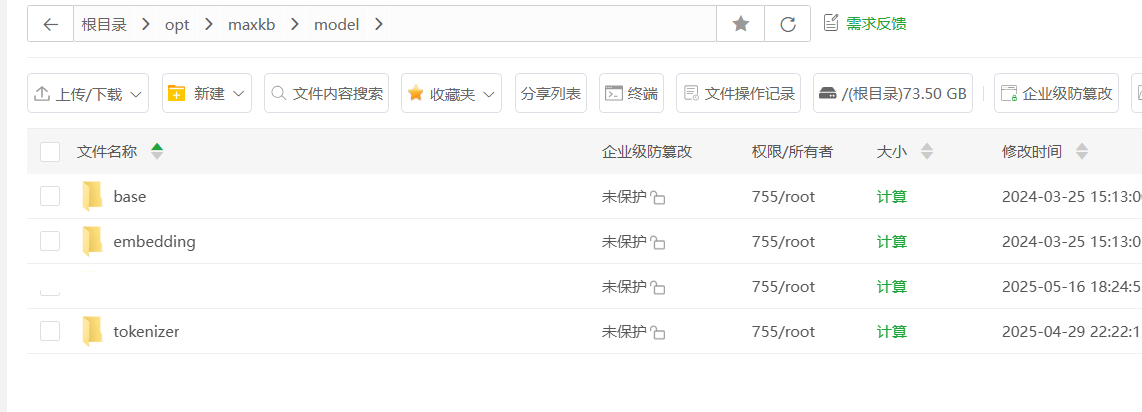
- In the Pagoda Panel
Filemanager, go to the root directory/, then sequentially create the directories/opt/maxkb/model.
- (Optional but recommended) Go back to the terminal, execute the command
cd /opt/maxkb && docker cp maxkb:/opt/maxkb/model .to copy the default model from the container as a backup.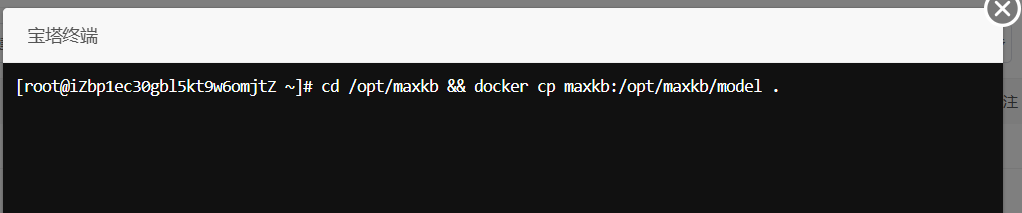
- In the
/opt/maxkb/modeldirectory, create a new folder with the hierarchymodels--moka-ai--m3e-base, then upload all them3e-basemodel files you downloaded in the first step into this newly createdm3e-basefolder.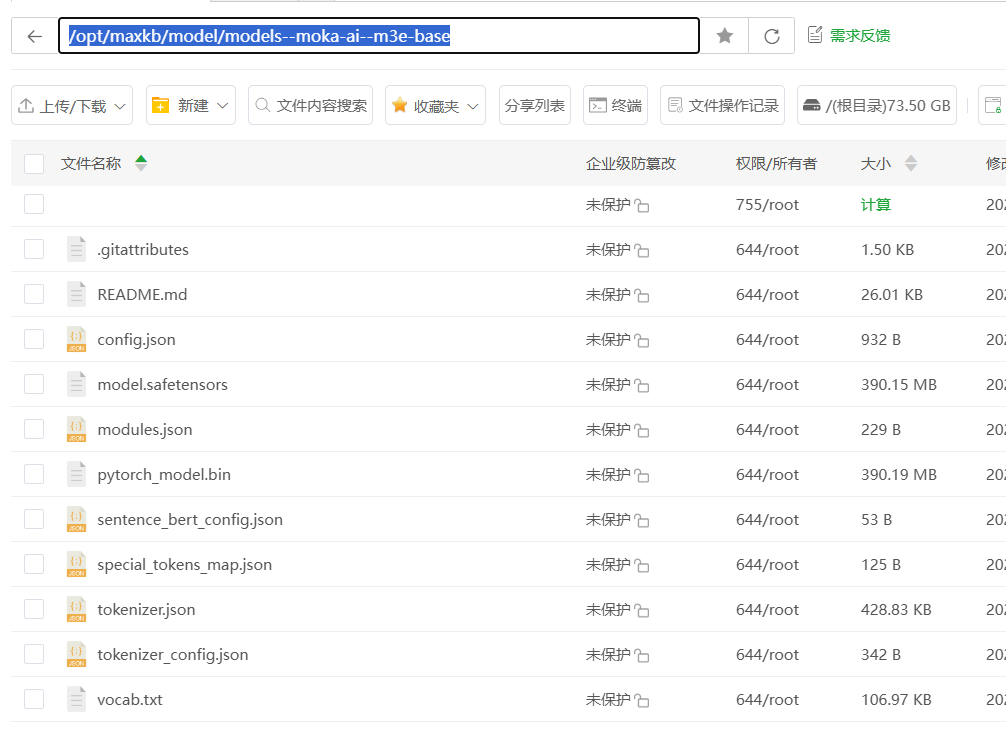
- In the Pagoda Panel
If you find downloading the models one by one too troublesome, you can use a script to download them directly. Ensure your server has Python 3.8+ and git installed, then execute the following commands sequentially:
git clone https://github.com/LetheSec/HuggingFace-Download-Accelerator.git
cd  HuggingFace-Download-Accelerator
python3  hf_download.py --model moka-ai/m3e-base --save_dir  m3e-base
# After downloading, copy the `models--moka-ai--m3e-base` folder to the `/opt/maxkb/models` directory
If your machine has higher configuration, you can also use the m3e-small model for better performance, just replace all instances of base in the above example with small.
Mount the Model Directory to the Container: Similar to the previous step, edit the
maxkbcontainer again, add a new volume mapping:- Host Directory:
/opt/maxkb/model - Container Directory:
/opt/maxkb/model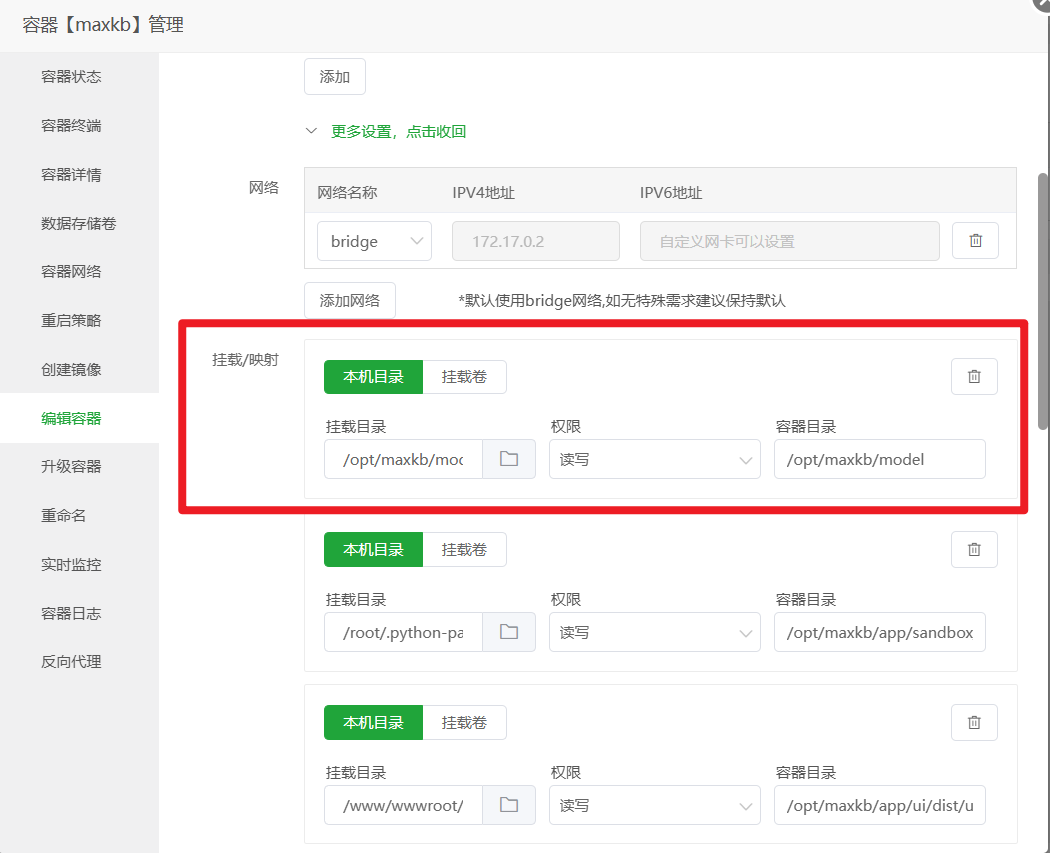 Save and wait for the container to restart.
- Host Directory:
Add the New Model in the MaxKB Backend: Log in to MaxKB, go to
System Settings->Model Settings->Add Model, selectLocal Model.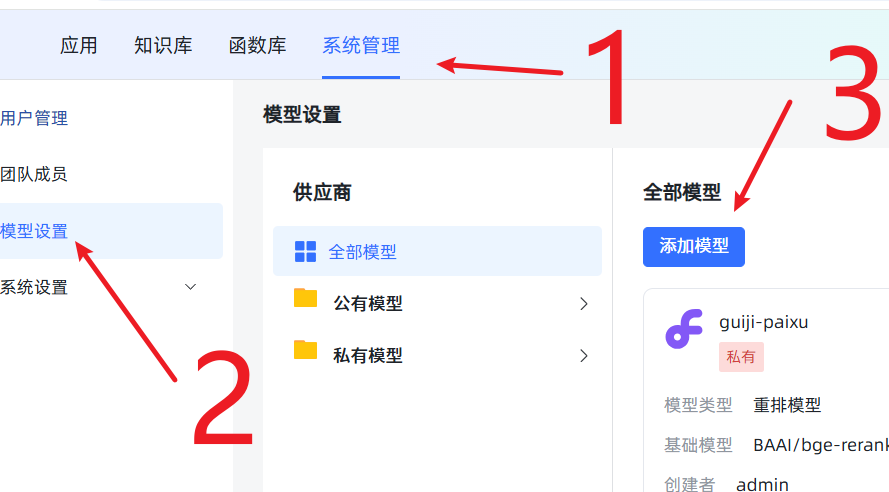
- Model Name: Can be anything, e.g.,
m3e. - Model Type: Must select
Vector Model. - Base Model and Model Directory: Both should be filled with the absolute path to your uploaded model:
/opt/maxkb/model/models--moka-ai--m3e-base. To avoid errors, it's recommended to copy and paste this path directly. Click Save. If there are no errors, it means the addition was successful! If there is an error, 99% of the time it's because the path you entered does not match the actual path on the server, please check carefully.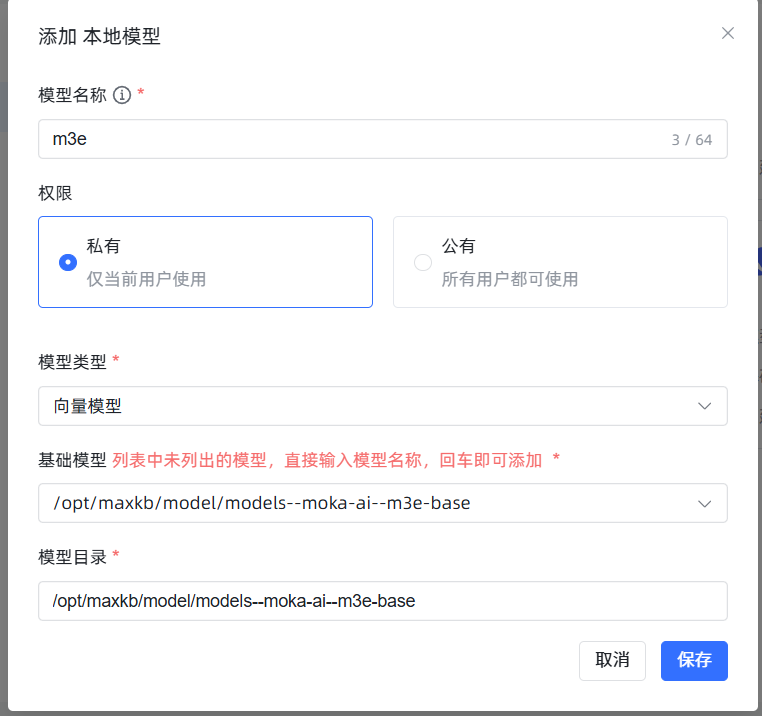 Successful result:
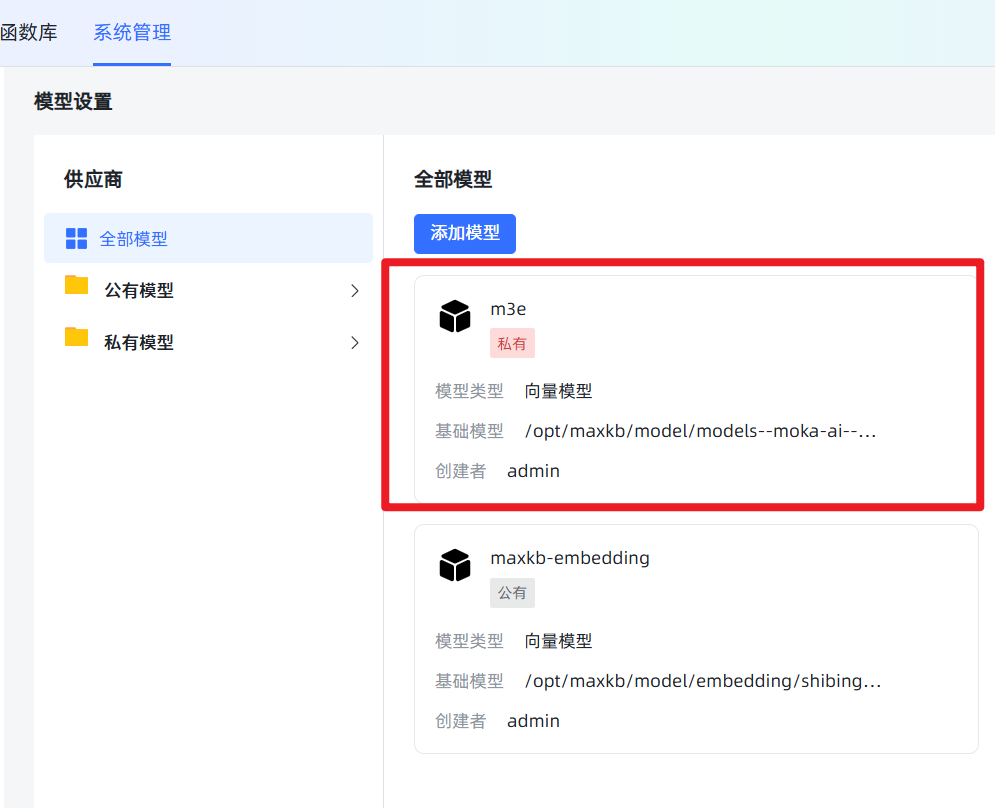
- Model Name: Can be anything, e.g.,
4. Adding the DeepSeek Large Language Model
If the vector model is the "librarian" that helps you find materials, then the Large Language Model (LLM) is the "expert" that reads the materials and organizes the language to answer you. Here we'll add a cost-effective DeepSeek model.
In Model Settings, click Add Model, select DeepSeek. Fill in a custom name (e.g., deepseek-chat), select the model deepseek-chat, then enter the API Key obtained from the DeepSeek official website. 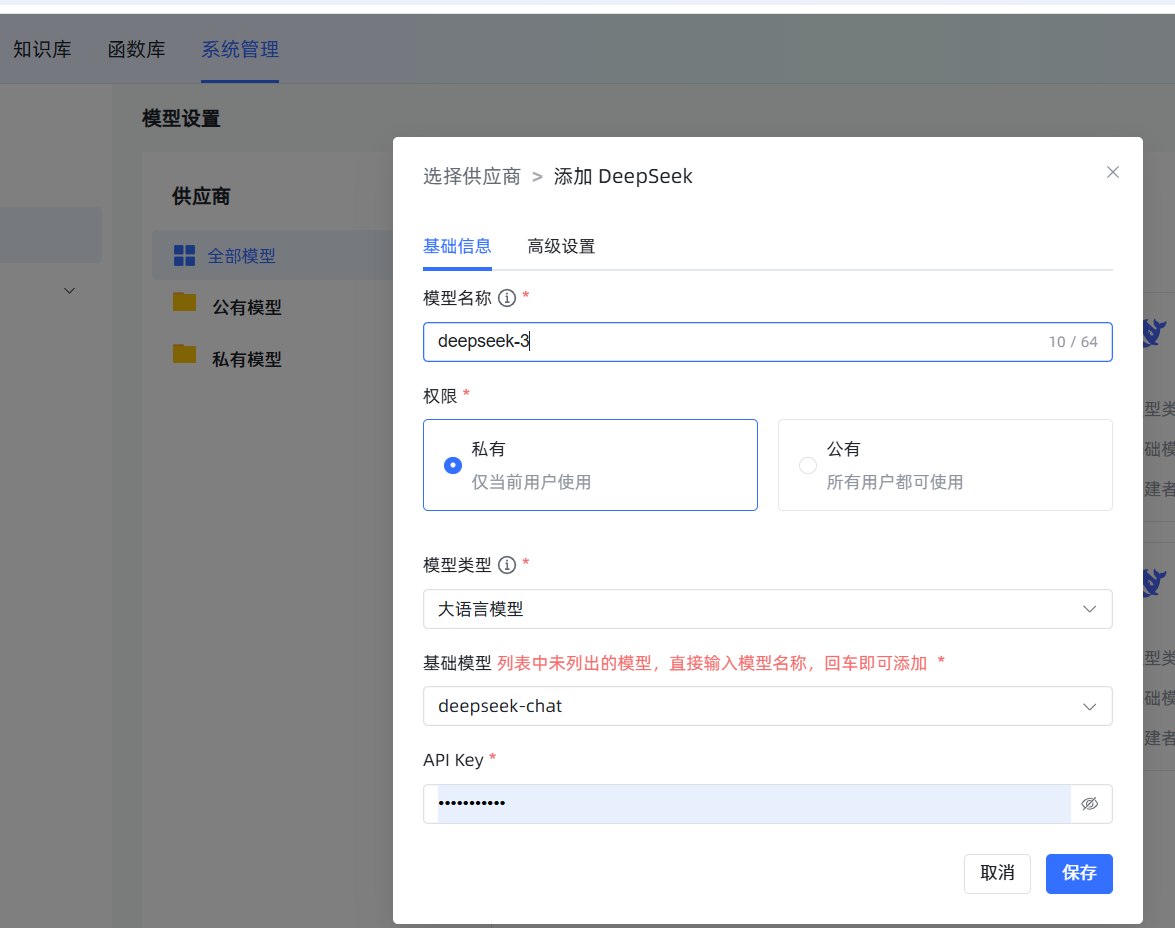
5. Creating a Knowledge Base and Key Considerations
This is the core part. The quality of your knowledge base directly determines the "IQ" of your AI assistant.
Choose the Correct Vector Model When Creating: Click
Knowledge Base->New Knowledge Base. On the creation interface, the most important step is the selection of theVector Model; please select them3emodel we just added. Once a knowledge base is created and documents are imported, changing the model later means all documents must be deleted and re-imported, which is very time-consuming and labor-intensive!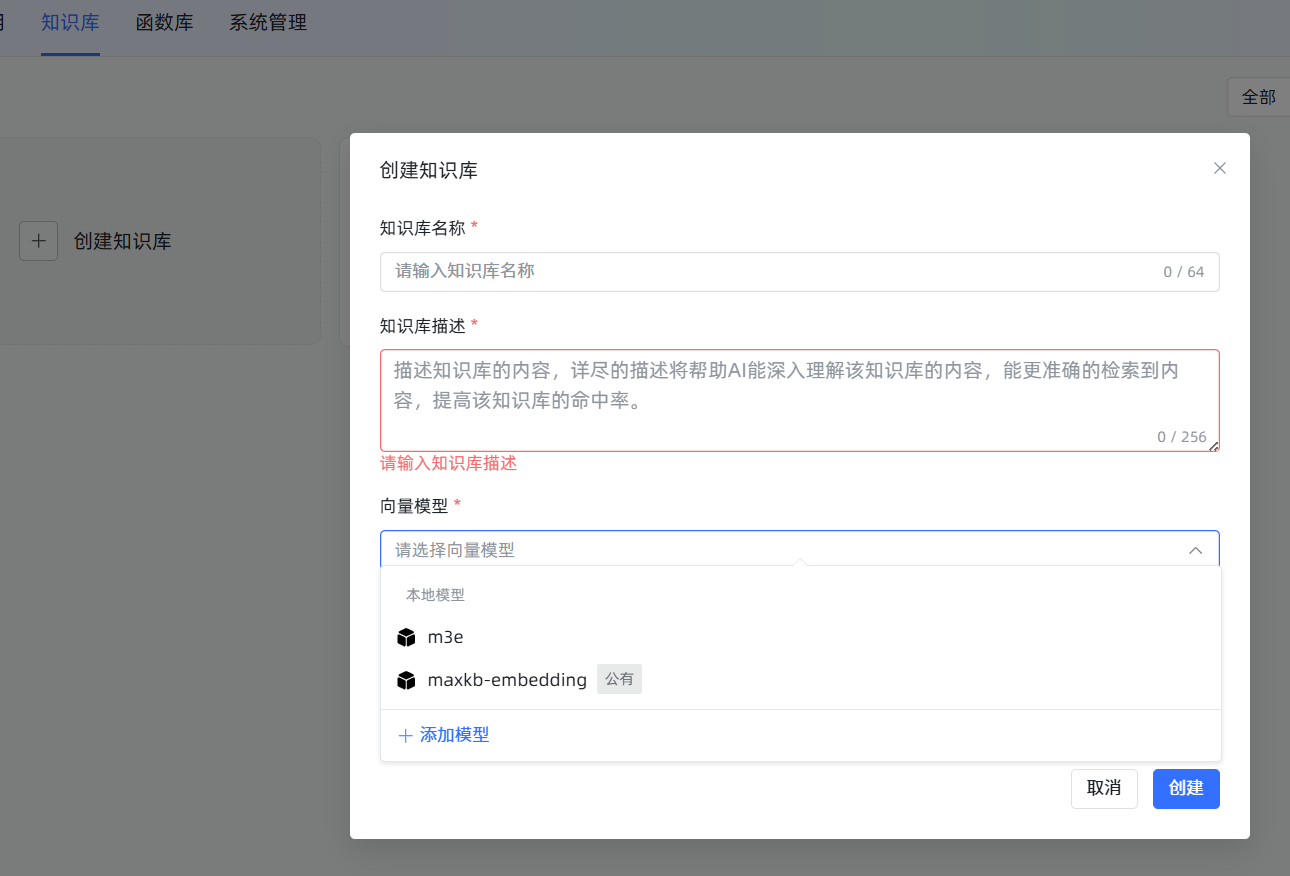
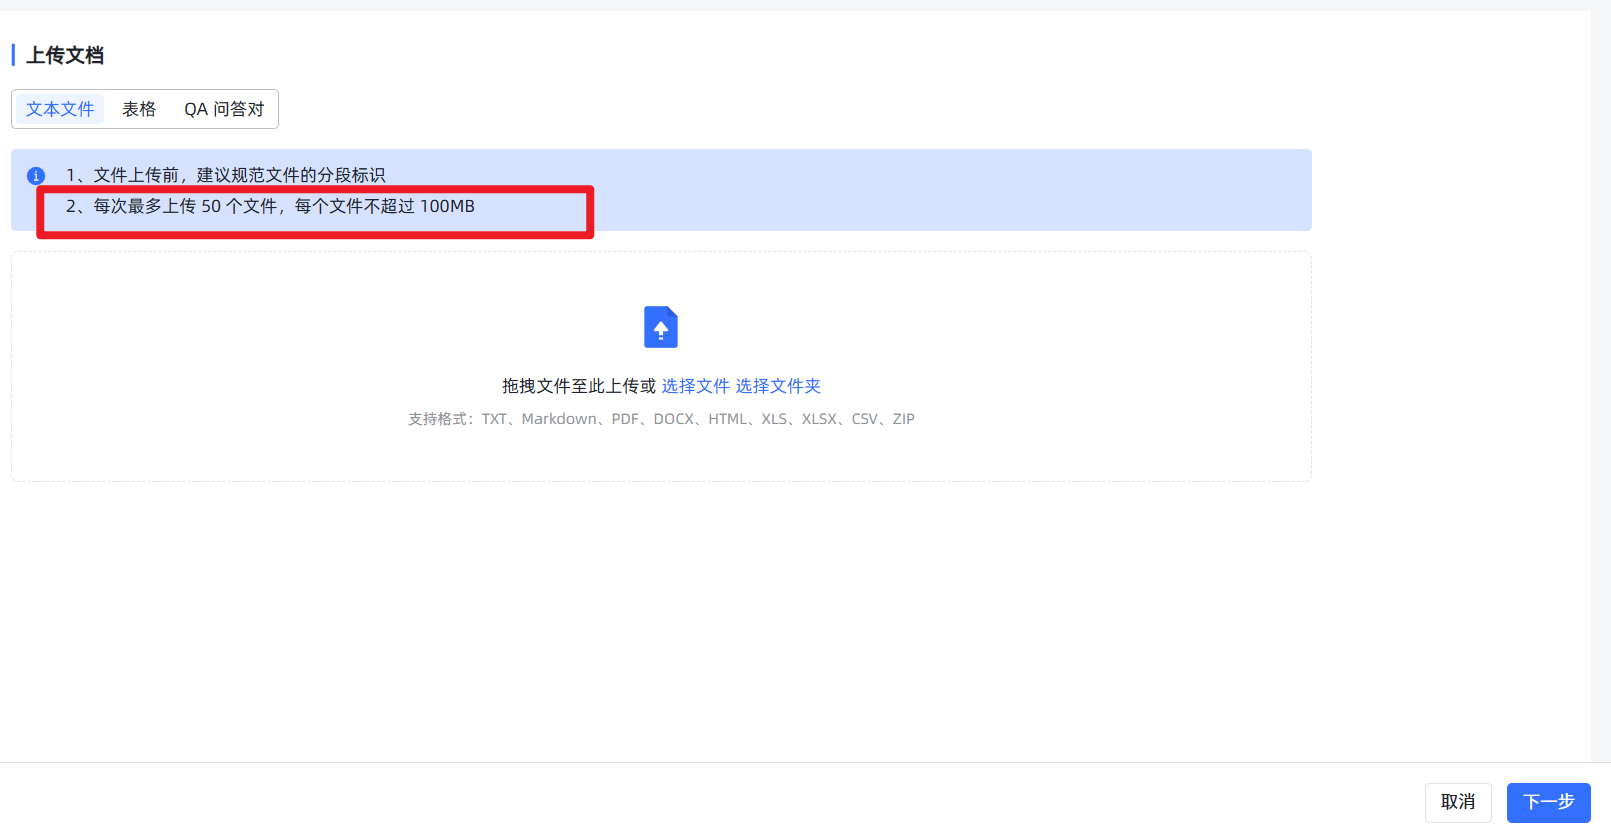
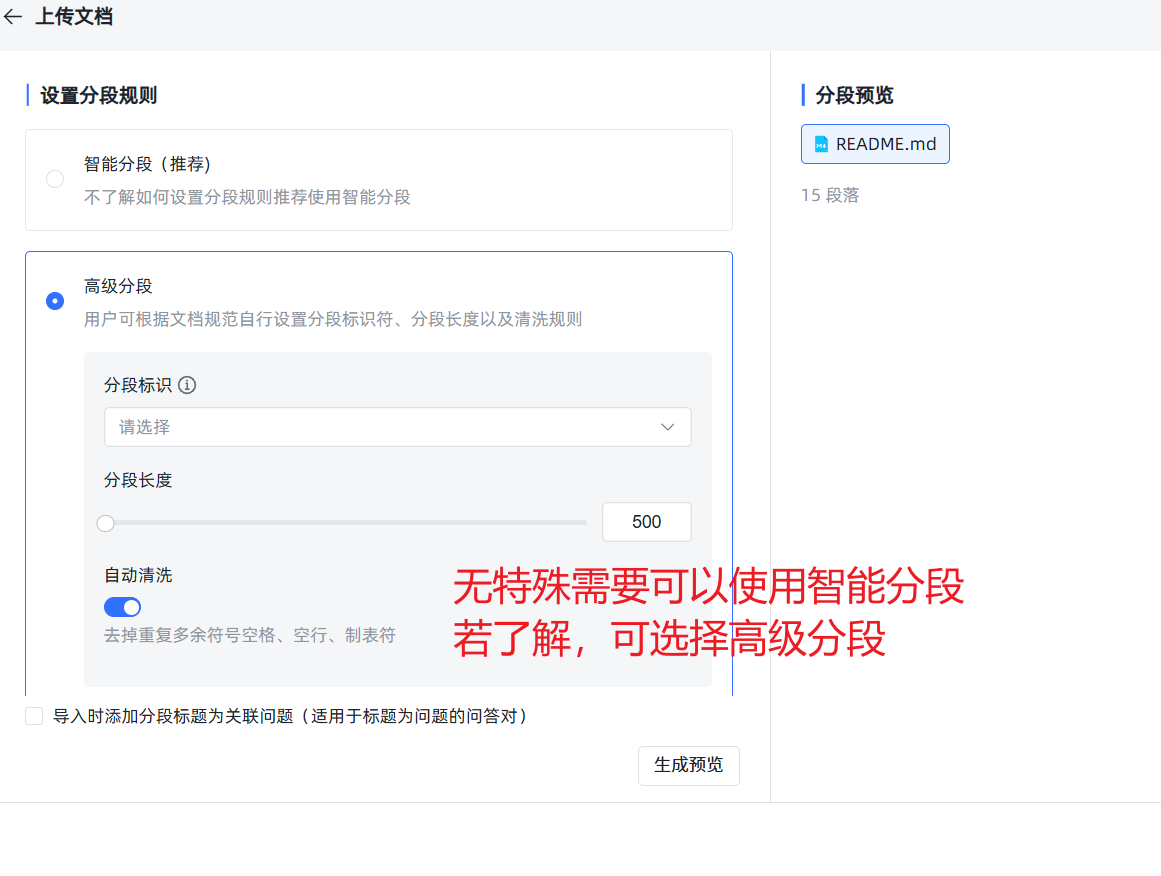
Knowledge Base Upload Rules:
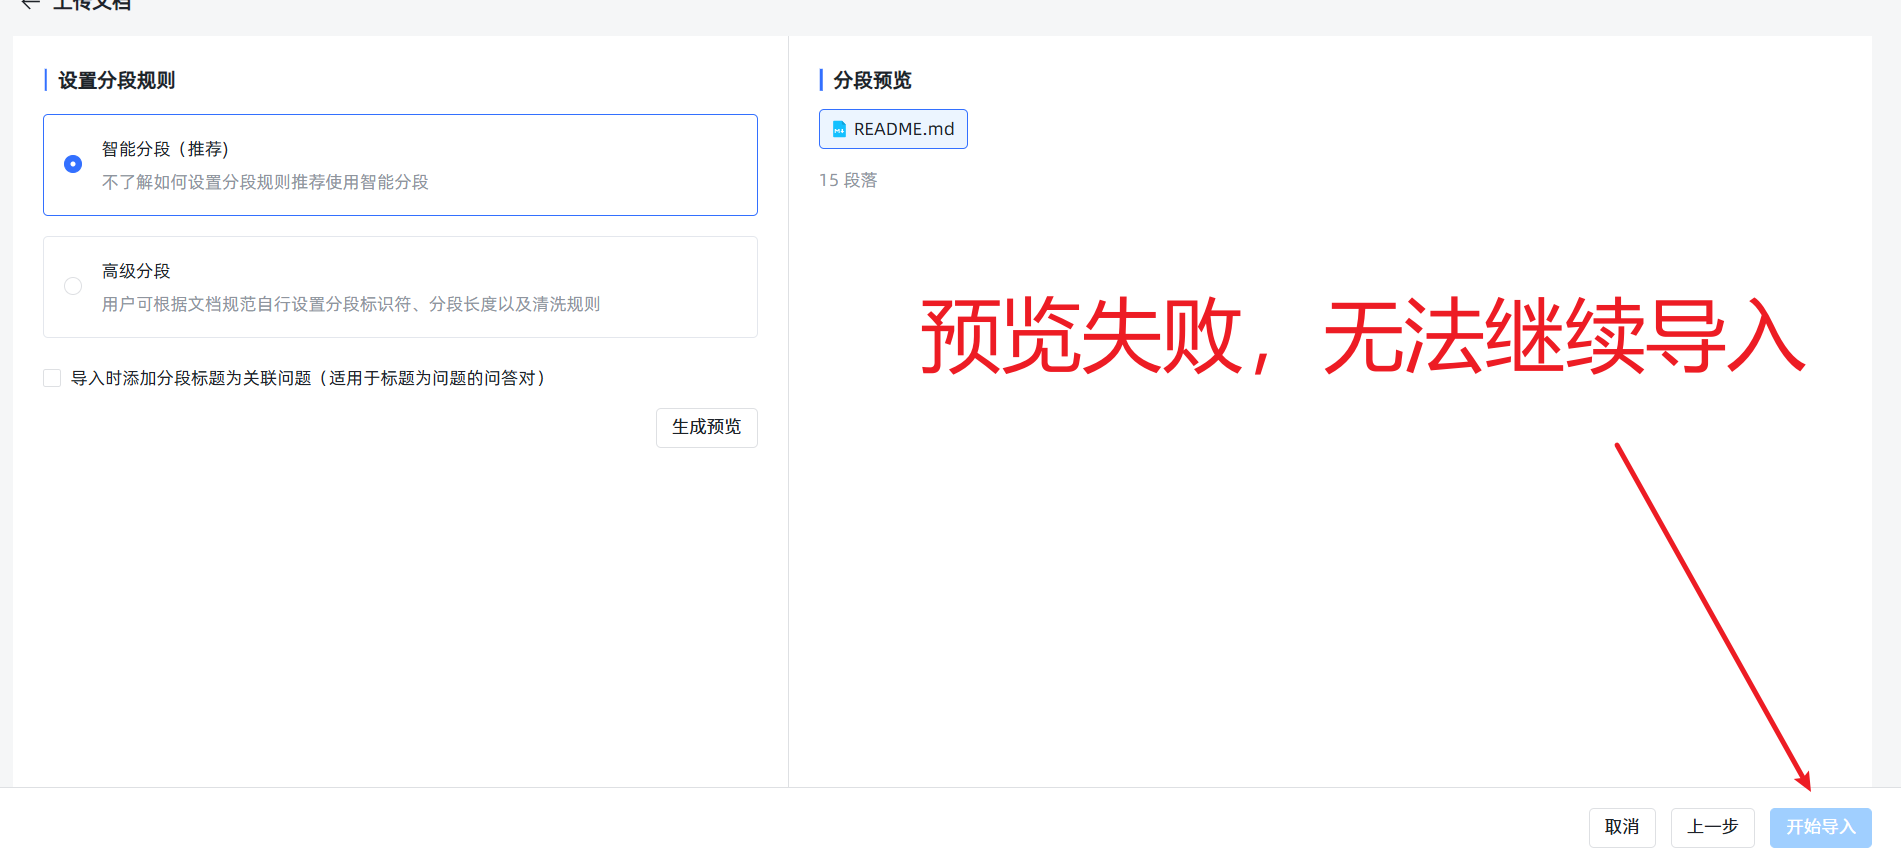
- Rule 1: Small files, upload in batches. Although the system allows uploading large files, unless your server is a supercomputer, always manually split large documents (e.g., files over 20MB) into multiple smaller files. It's also best to limit the number of files uploaded at once to 5 or fewer; otherwise, the subsequent preview might fail, preventing import.
- Rule 2: Ignore "false failures," check the real progress. When you upload slightly larger files and start the import, the front-end page might show a red
Failedprompt due to a timeout. Don't panic! This is often an illusion! The backend vectorization task is likely still running diligently. You can ignore this prompt and go directly to the knowledge base's file list page, which will show the real processing progress. Of course, the best strategy is to follow Rule 1 and avoid this issue from the start.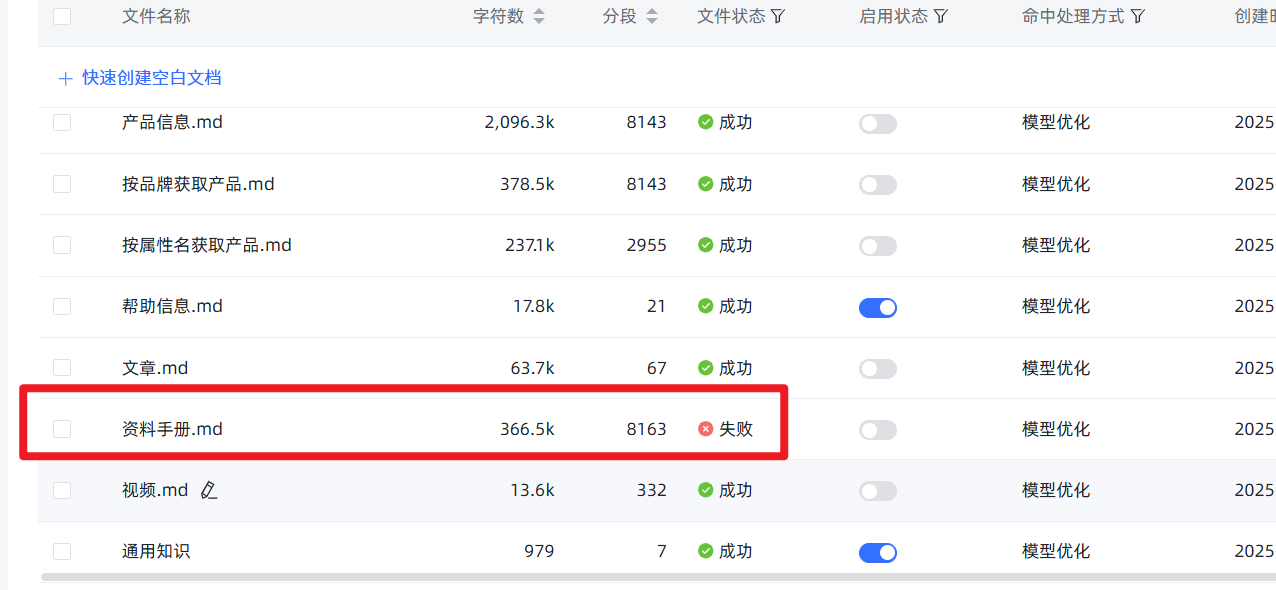
- Rule 3: Enable "Hybrid Search." In the knowledge base settings, it is highly recommended to enable "Hybrid Search." It uses both semantic (understanding like a human) and keyword (searching like traditional search) methods to find information, greatly increasing the probability of finding the correct information.
6. Creating Advanced Applications: Giving Your AI a "Brain"
Advanced Applications are the essence of MaxKB. They allow you to design AI workflows like building blocks. 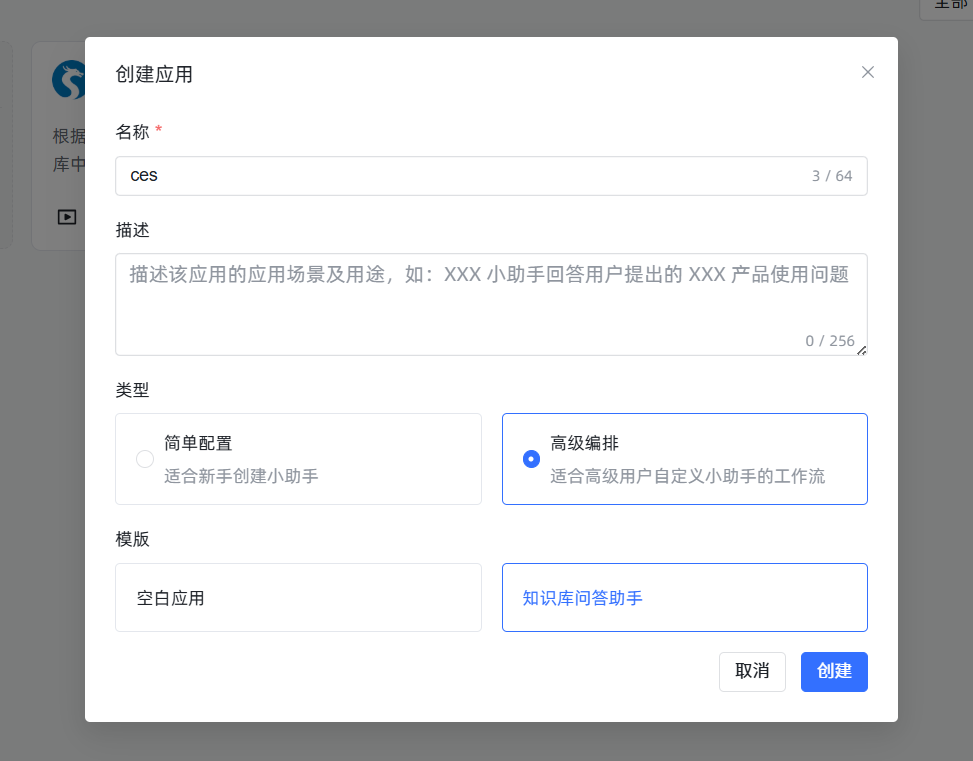 After entering the editing interface, you'll see a flowchart canvas.
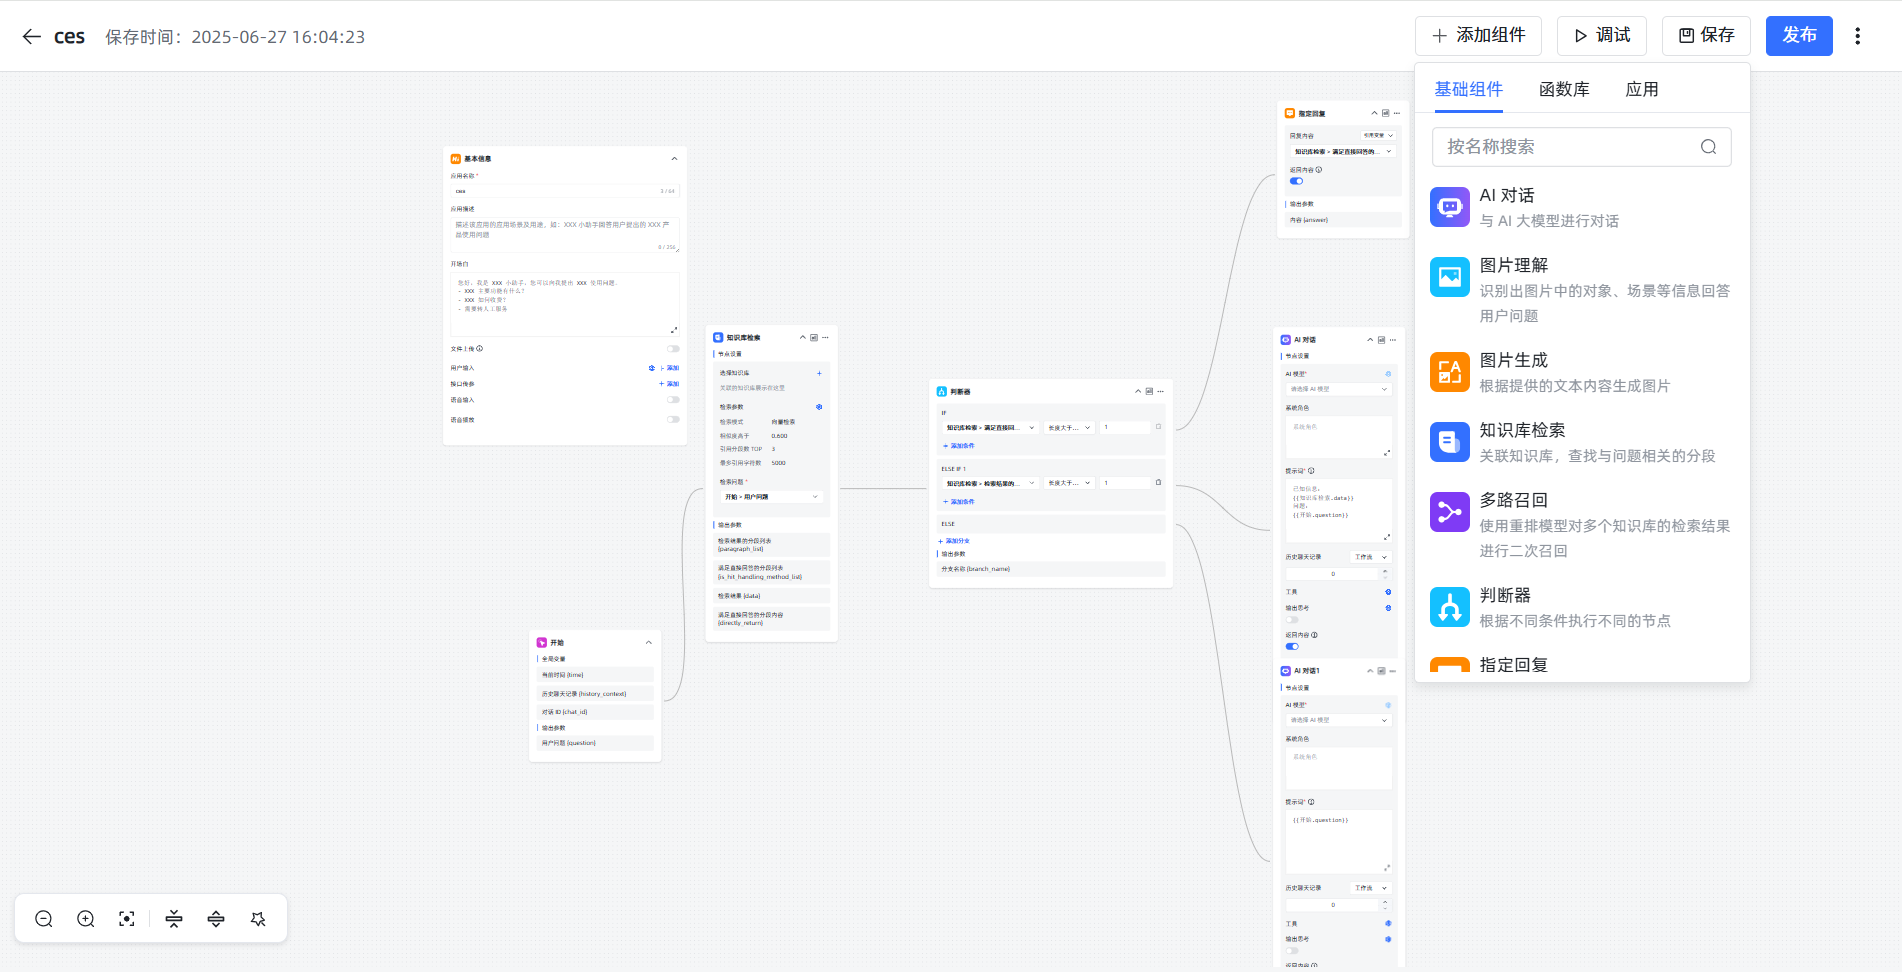
Golden Rules:
- For any modification to the canvas, you must click
Savein the upper right corner.- After saving, you must click
Publishfor your changes to take effect in the chat window.
Core Concepts: Nodes and Variables
- Nodes: Each block on the canvas is a "node," representing a function, such as "Start," "Knowledge Base Search." Each node has a Chinese name in its upper left corner, which we can modify.
- Variables: Nodes pass information between each other using "variables." The variable format is fixed:
\{\{NodeName.OutputVariableName\}\}.- Example:
\{\{Start.question\}\}means: find the node namedStartand get the value of its output variable namedquestion. In the default process, this value is the user's input question. Similarly,\{\{KnowledgeBaseSearch.data\}\}gets the knowledge fragments found by theKnowledgeBaseSearchnode.
- Example:
Default Process Explained
- Start: This is the starting point. The user inputs a sentence, and this node packages it into a variable named
question. - Knowledge Base Search: This is the "librarian." Its "Search Query" field needs to be filled with
\{\{Start.question\}\}, telling it to search the knowledge base based on the user's question. The found materials are packaged into thedatavariable. - Judgment Node: This is the "traffic cop." It directs the flow based on conditions. For example, it can judge whether
KnowledgeBaseSearch.datais empty; if materials are found, it takes the IF branch, otherwise it takes the ELSE branch. - AI Dialogue: This is the "expert." Its most important setting is the Prompt, which is the instruction given to the AI.
An Excellent Prompt Template:
You are a professional customer service agent for XX Company. Please answer the user's [question] strictly based on the [Known Information] below. Do not use any of your own knowledge or fabricate information. If there is no answer in the [Known Information], reply: "Sorry, I couldn't find relevant information about your question for now."

[Known Information]:
\{\{KnowledgeBaseSearch.data\}\}

[Question]:
\{\{Start.question\}\}This template clearly tells the AI its role, information source, basis for answering, and the standard reply when no answer is found.
Level Up: Using the "Function" Component
What if you want to automatically add a timestamp to every AI response? The "Function" node can help!
Practical Example: Adding a Timestamp to the AI's Response
Add a Node: After the "AI Dialogue" node, drag a "Function" node from the right component list and connect them with a mouse drag.
Write the Code: Click the "Function" node to configure it. In the code editor, paste the following Python code:
pythonimport datetime # This is the fixed function entry point, 'ai_answer' is the input parameter name we defined def process(ai_answer: str) -> dict: # Get the AI's original answer # The variable name 'ai_answer' can be customized, but must match the input parameter setting below # Get current Beijing time and format it beijing_time = datetime.datetime.utcnow() + datetime.timedelta(hours=8) time_str = beijing_time.strftime("%Y-%m-%d %H:%M:%S") # Concatenate the original answer and timestamp into new text final_response = f"{ai_answer}\n\n---\n*This answer was generated by AI at {time_str}*" # Return the processed result as a dictionary # "response_with_timestamp" will become the output variable name of this function node return {"response_with_timestamp": final_response}Configure Input Parameters: In the function node's "Input Parameters" section, click "Add," enter the parameter name
ai_answer(consistent with the code), and the parameter value\{\{AIDialogue.answer\}\}. This step tells the function where its input data comes from.Use the Function Output: After this function executes, it produces a new variable named
response_with_timestamp. Now, in the final "End" node of the process, change the value of itsanswerfield from the original\{\{AIDialogue.answer\}\}to\{\{Function.response_with_timestamp\}\}.
For more functions, check the MaxKB official forum share: https://bbs.fit2cloud.com/t/topic/11004 For more advanced application techniques, refer to this forum post: https://bbs.fit2cloud.com/t/topic/7753
Through the above steps, you have successfully customized the AI's output! This is the power of MaxKB. By freely combining these nodes, you can create intelligent applications that meet various complex needs.